ETL/ELT Strategies
Demo Video

Before you Begin
Capture the following parameters from the launched CloudFormation template as you will use them in the demo. Use the link below to access your CloudFormation dashboard.
https://console.aws.amazon.com/cloudformation/home?region=us-east-1#/stacks?filteringText=&filteringStatus=active&viewNested=true&hideStacks=false
- GlueExternalDatabaseName
- TaskDataBucketName
Client Tool
The screenshots for this demo will leverage the SQL Client Tool of SQLWorkbench/J. Be sure to complete the SQL Client Tool setup before proceeding. Alternatives to the SQLWorkbench include:
- SageMaker: dataengineer.ipynb
- Redshift Query Editor
Challenge
The data analyst Miguel built product review reports for his business users from the Data Lake. They use the reports to evaluate the product reviews, star ratings etc., which helps them plan new product offerings. Because these reports are gaining in popularity, Miguel reaches out to Marie to see if there is a way to make the reports perform faster and save costs.
Marie decides to build a data pipeline so that these reports can be loaded into the Redshift attached storage. To solve this challenge Marie will build a data pipeline to source the data and perform an ETL (extract, transform, and load) operation to populate it into a dimensional model. Further, she will setup the data pipeline to make the refresh process repeatable. To solve this challenge Marie will do the following:
- Demo Video
- Before you Begin
- Client Tool
- Challenge
- Create and Load the Staging Environment
- Trigger based load of CSVs to Staging Environment
- Create the Reporting Model
- Create Materialized Views
- Create Stored Procedures
- Perform Data Quality Checks
- Before you Leave
Here is the architecture of this setup:
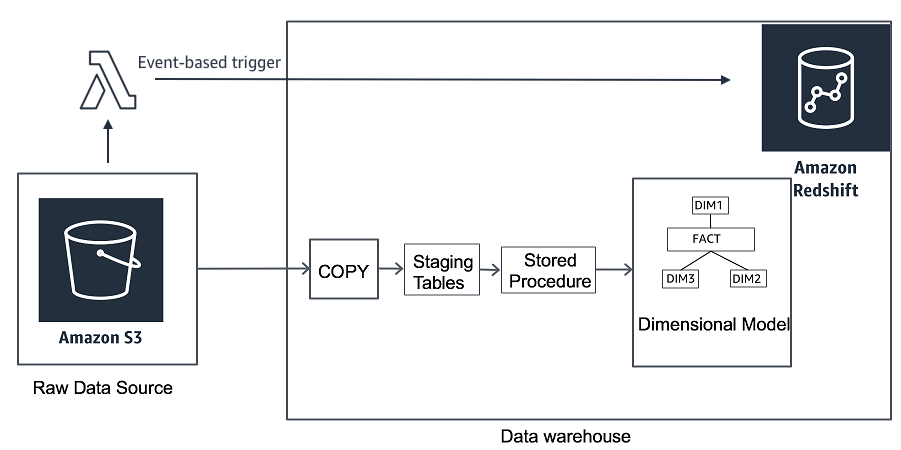
Create and Load the Staging Environment
| Say | Do | Show |
|---|---|---|
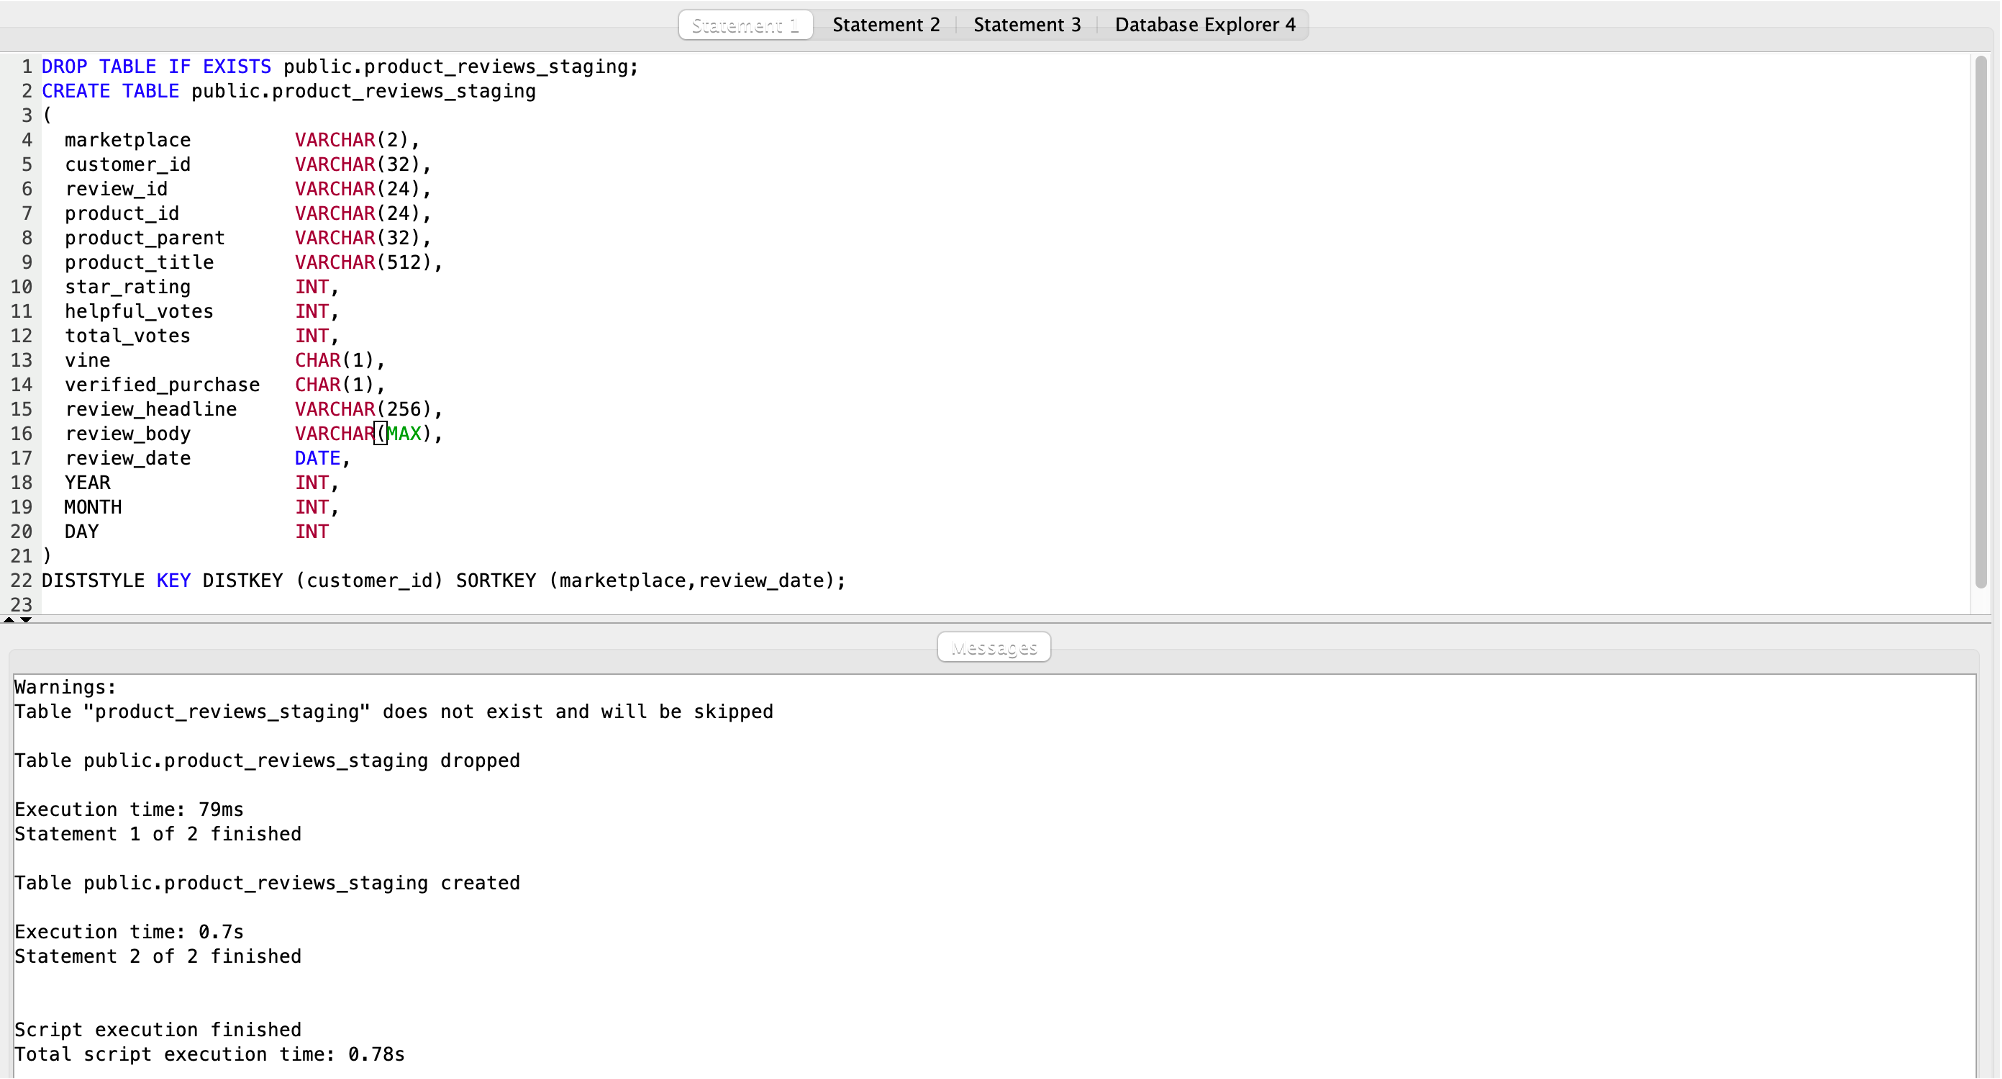
| Marie defines a staging table to load the new product review data. This staging table will mimic the structure of the raw source data except it has two additional columns at the end which is not available in the S3 files. She names the staging table in Redshift, product_reviews_staging. |
Using your SQL Client Tool, execute the following command:
|
|
|
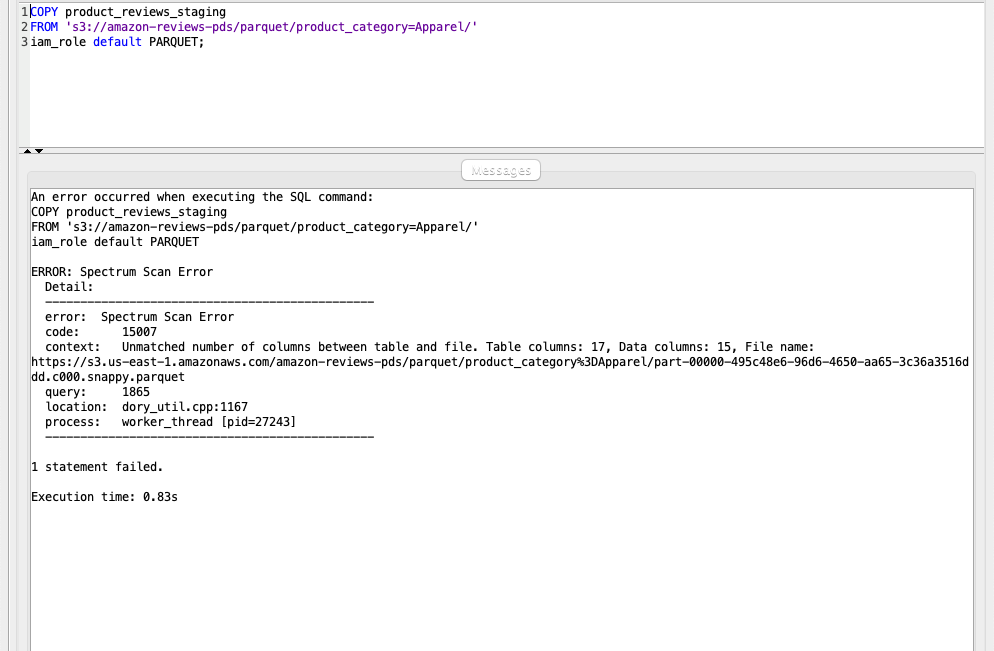
To load the data from S3 to the Redshift staging tables, Marie will use the COPY command. The COPY command is the fastest way to ingest bulk data to Amazon Redshift. Amazon Redshift now supports attaching the default IAM role. If you have enabled the default IAM role in your cluster, you can use the default IAM role as follows. Follow the blog for details. |
Using your SQL Client Tool, execute the following command to load review data.
You get an error because the number of columns in the target table is more than the file being copied. The file does not have MONTH and DAY fields. |
|
|
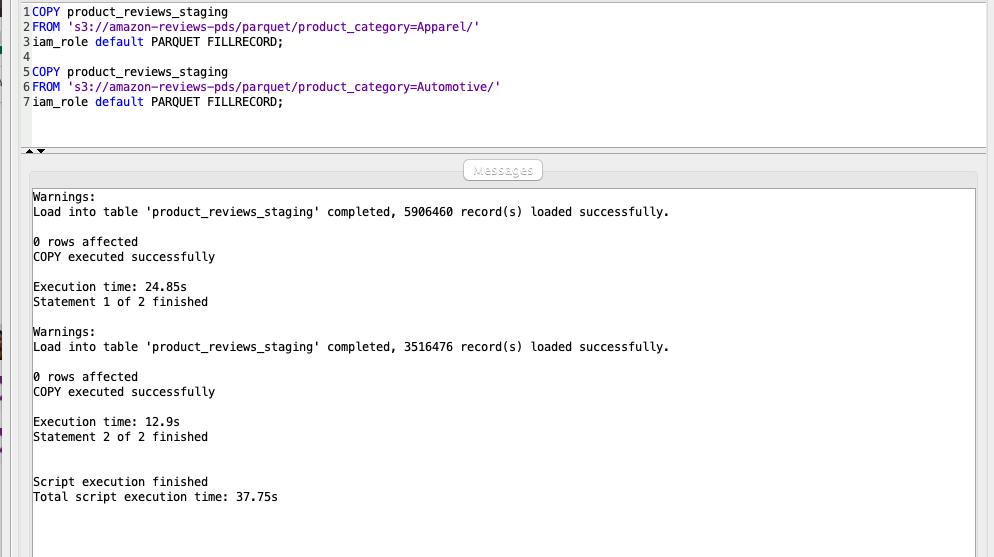
To address the issue and load the data from S3 to the Redshift staging tables successfully, Marie will now use a parameter called FILLRECORD in the COPY command. FILLRECORD will populate NULL for the last columns which are not available in the file and still load the data into the target table. |
Using your SQL Client Tool, execute the following command. It will load Apparel (5906460 rows) and Automotive (3516476) data successfully.
|
|
|
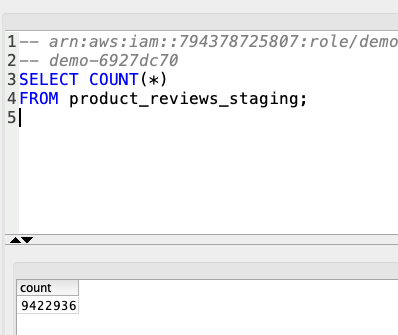
To double check that the data was loaded correctly, Marie will query the staging table to do a sanity check on the number of rows loaded. |
Using your SQL Client Tool, execute the following command. you should expect it to return 9422936 records.
|
|
Trigger based load of CSVs to Staging Environment
| Say | Do | Show |
|---|---|---|
|
Marie has already deployed a Lambda function that polls an S3 bucket folder to detect new data files. The Lambda then triggers a load into Redshift but first she must create the folder in that S3 Bucket.
The lambda function and associated code was deployed when the Cloud Formation template run to setup the demo. You can find it in the Resources tab to see it’s specific code. |
In the AWS management Console, Open the S3 bucket named «TaskDataBucketName»
Create a folder named trigger-based-load
|

|
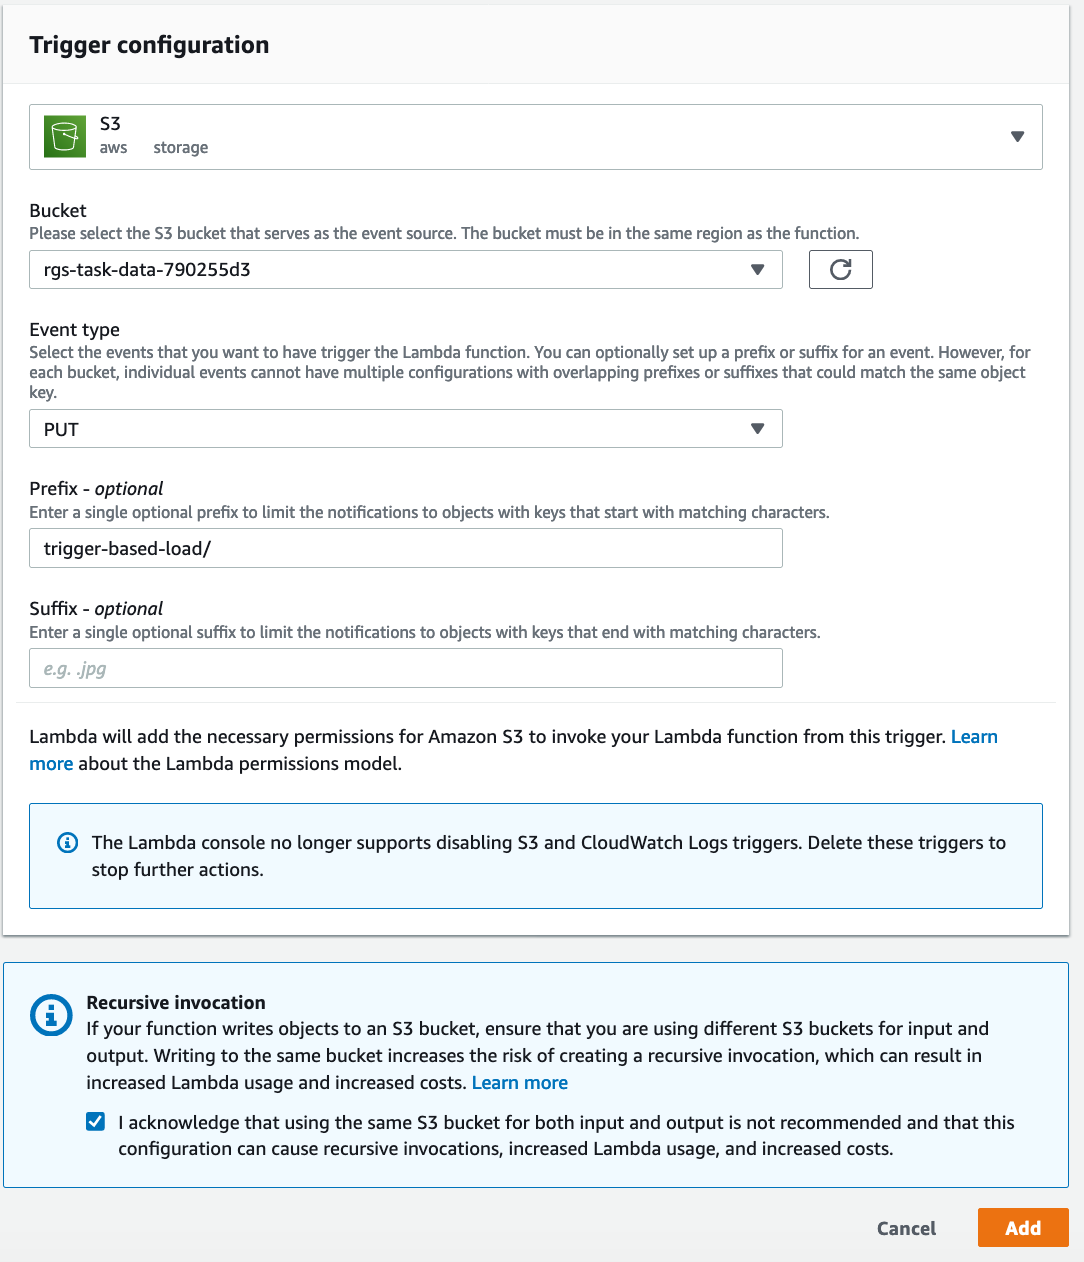
| Now Marie will create a trigger to this folder in her Lambda function |
To to Lambda and look for Function with TriggerETLLambda Name in it
Click on Select Enter the details as shown below: Click |
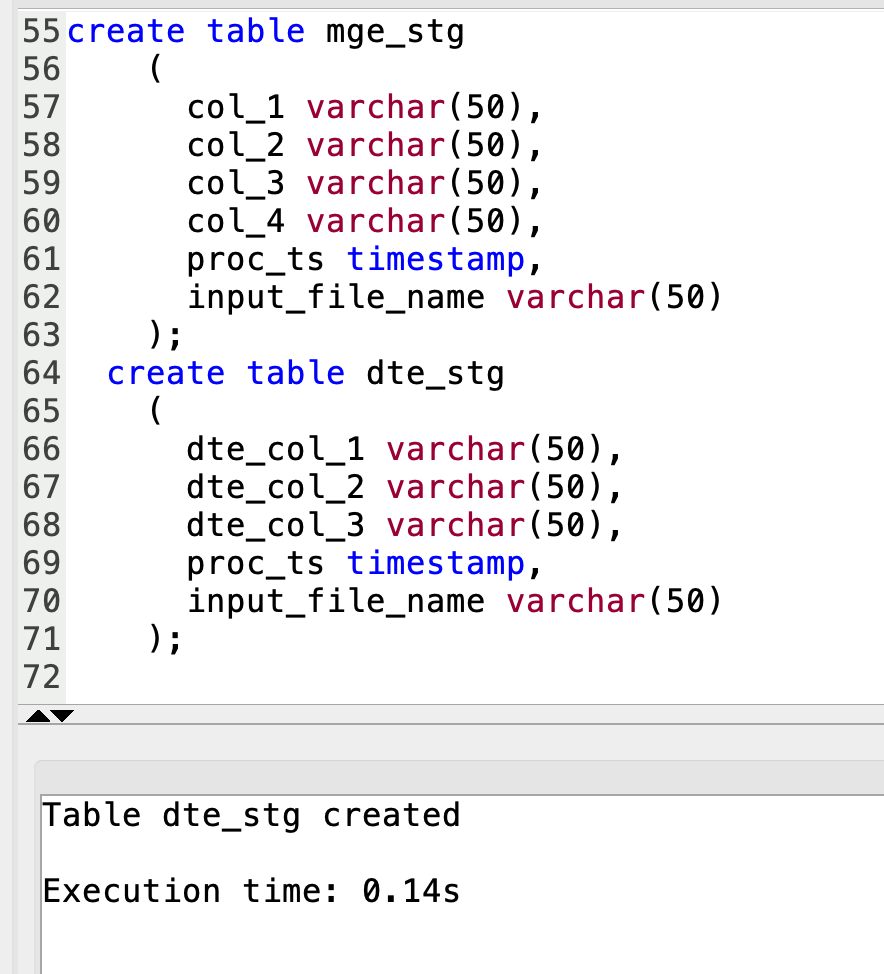
|
| Marie will then create target tables in Redshift as per her file structure to enable Redshift in preparation for the Lambda function’s attempt to load when triggered. |
Run the below SQL statements to create tables
|
|
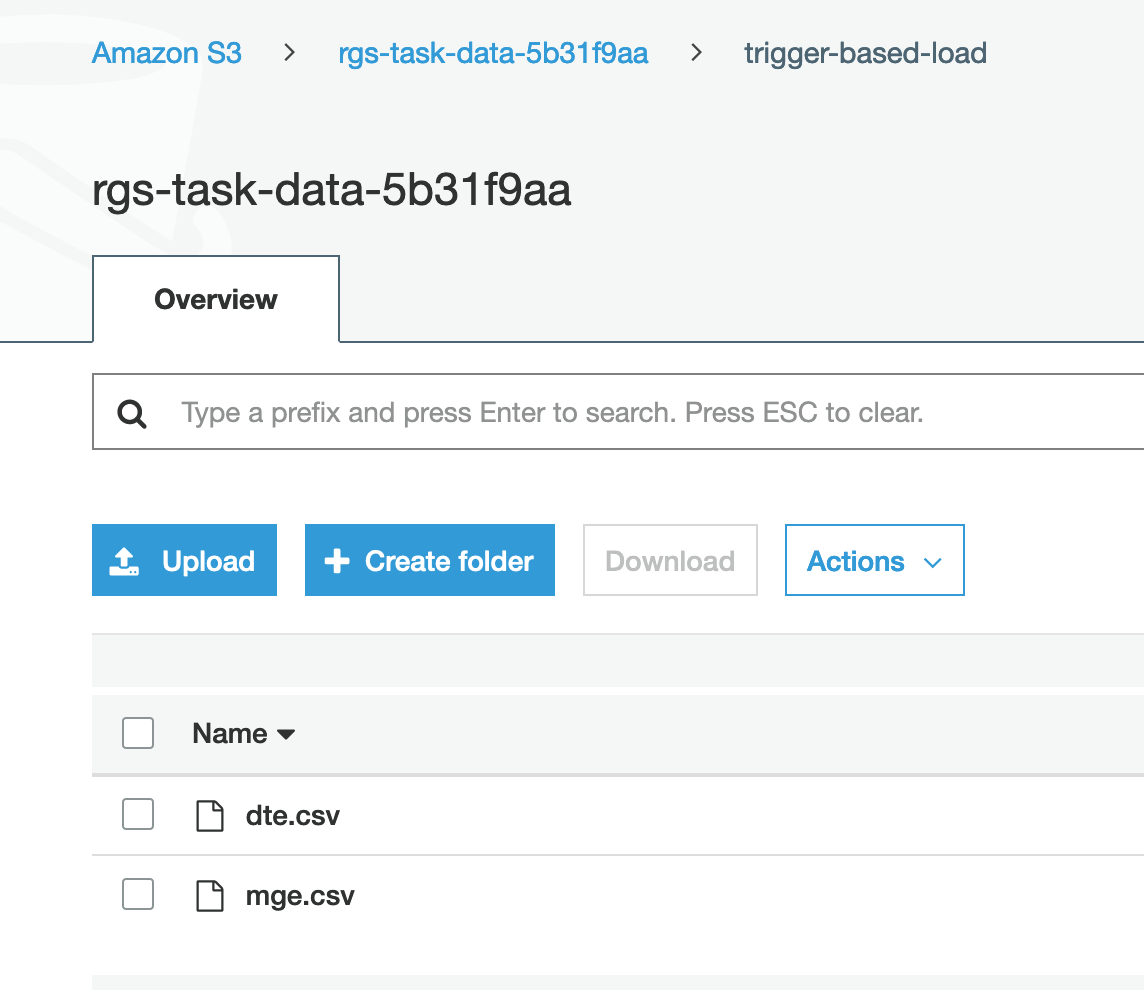
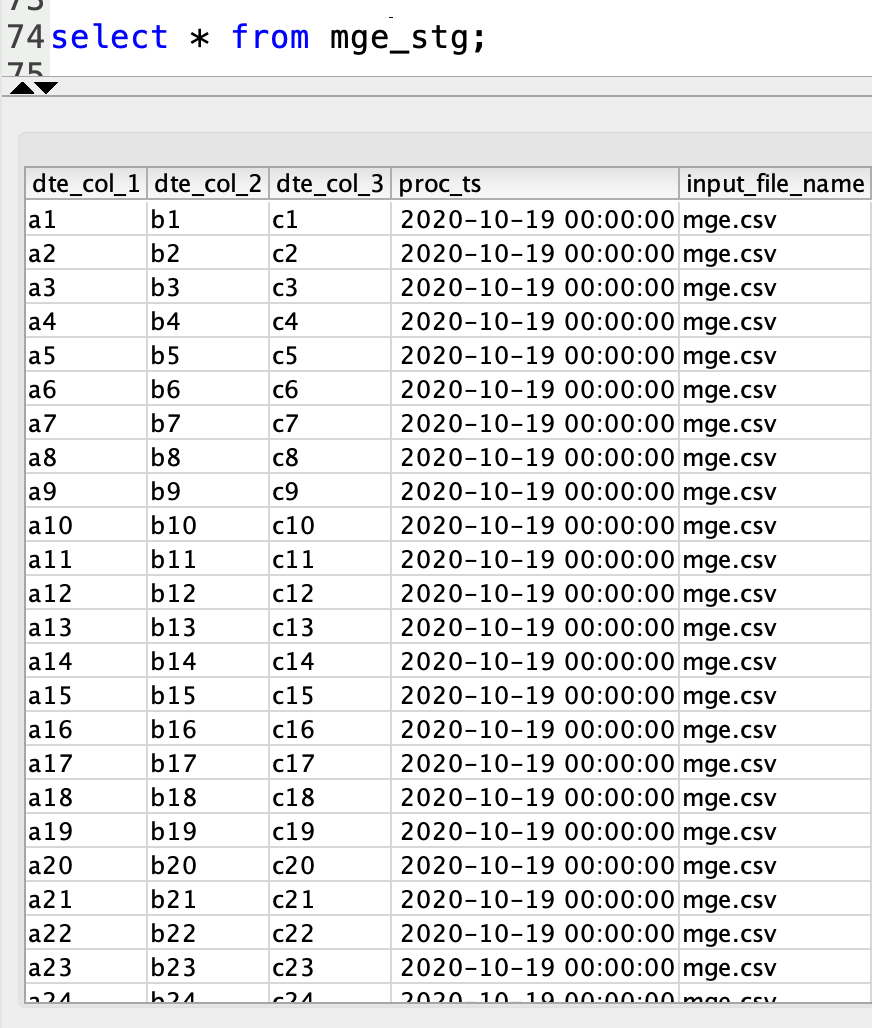
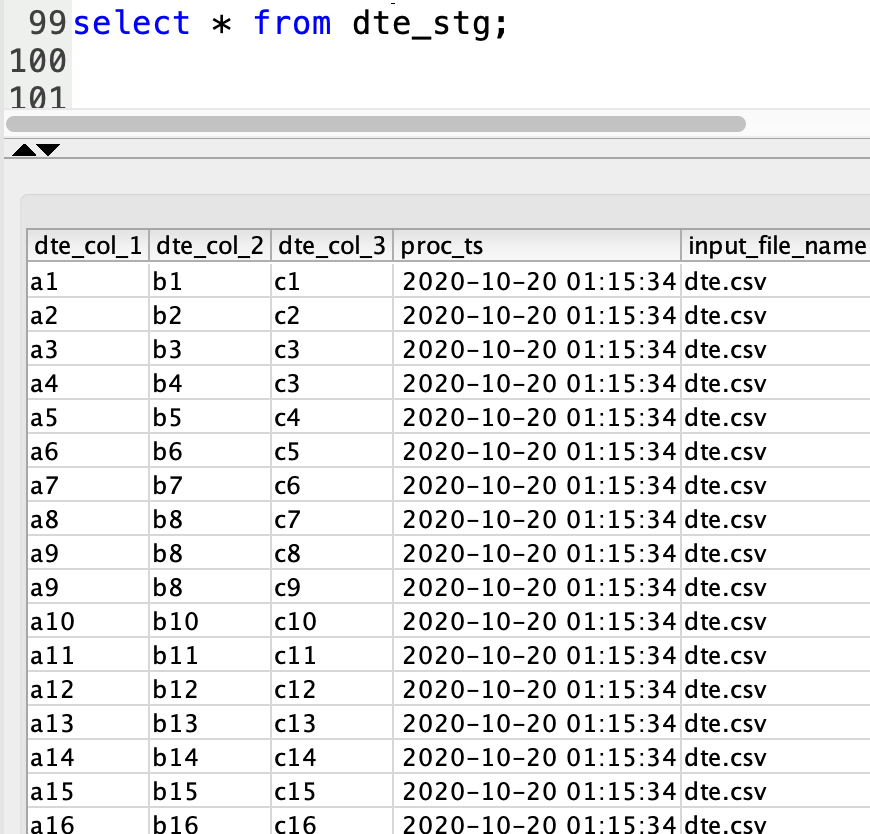
| Marie will now upload files into S3 folder she created to test the Lambda trigger and then verify the data in Redshift |
Upload the files below into S3 trigger-based-load folder created above:
|
|
| Marie then runs queries to validate data in Redshift data warehouse. This confirms that simple uploads to S3 Buckets can now trigger a load to her Redshift cluster going forward. |
Run the below queries and verify you see the same data that was uploaded in the CSV files.
|
|
Create the Reporting Model
| Say | Do | Show |
|---|---|---|
|
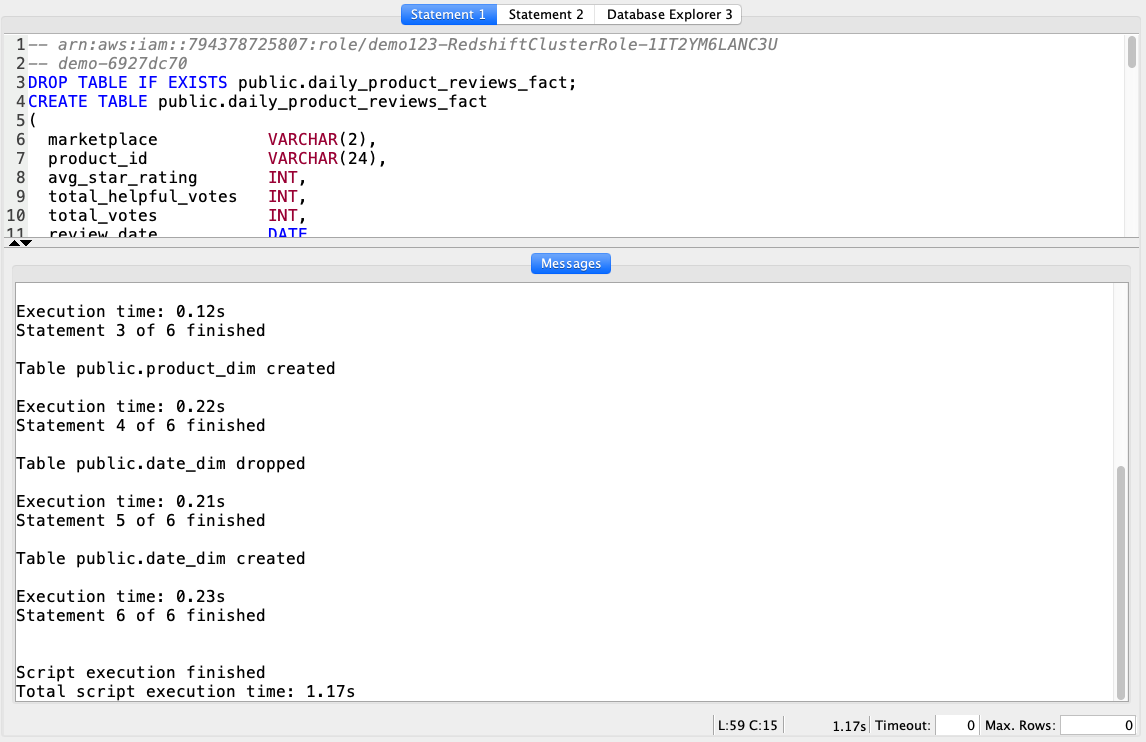
Based on the reporting requirements from Miguel, Marie needs to create a dimensional model that will be used by the business users. She will create a FACT table in Redshift called daily_product_reviews_fact along with product_dim dimensional tables.
Here is the dimensional model for the setup:
|
Using your SQL Client Tool, execute the following command:
|
|
|
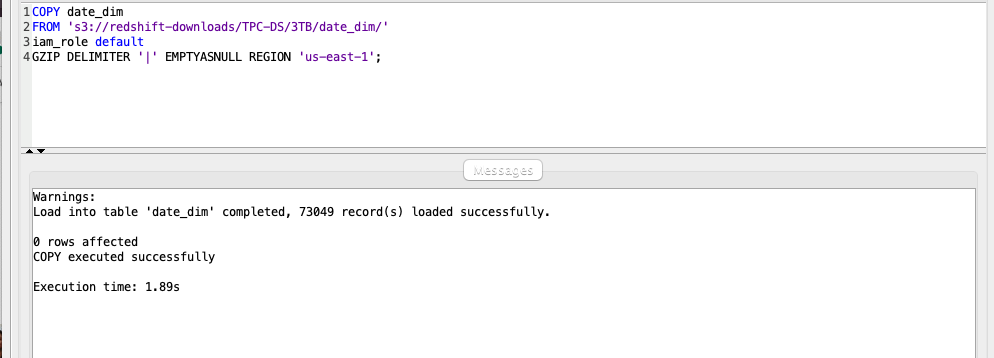
The DATE_DIM table will only need to be loaded once and is not part of the daily process. Marie will load that table now.
Amazon Redshift now supports attaching the default IAM role. If you have enabled the default IAM role in your cluster, you can use the default IAM role as follows. Follow the blog for details. |
Using your SQL Client Tool, execute the following command:
|
|

Create Materialized Views
| Say | Do | Show |
|---|---|---|
|
Marie decides she will leverage materialized views to precompute the result set for transformations. That will be reused in the different steps of the dimensional model refresh. In addition, Materialized views will provide a performance improvement for aggregation operations.
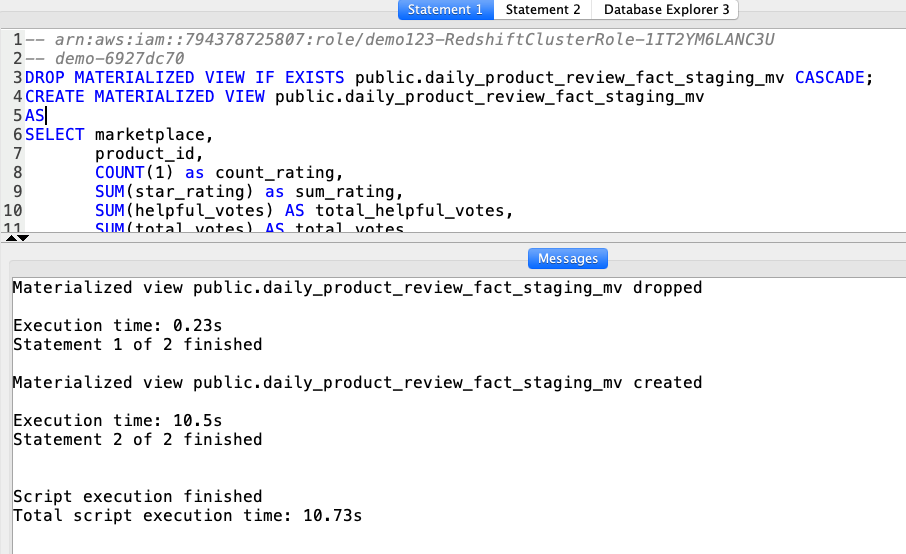
The first view will implement the business rule for daily fact table aggregation. |
Using your SQL Client Tool, execute the following command:
|
|
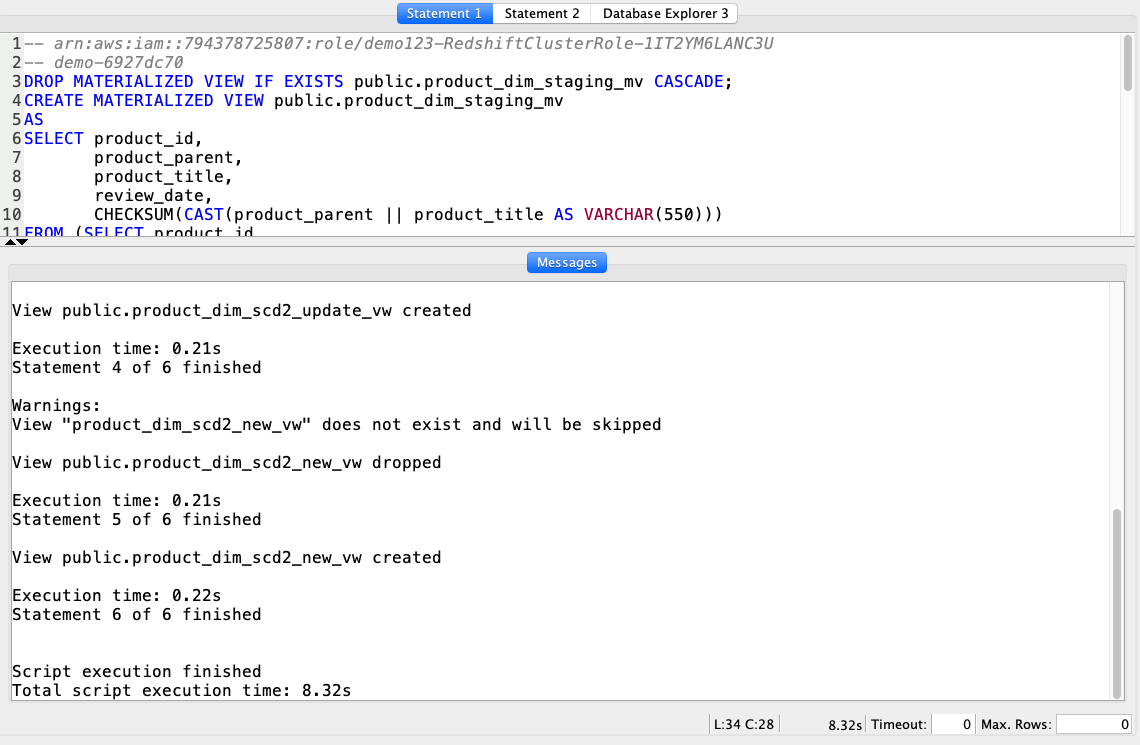
The next set of views will implement the business rule to:
|
Using your SQL Client Tool, execute the following command:
|
|
Create Stored Procedures
| Say | Do | Show |
|---|---|---|
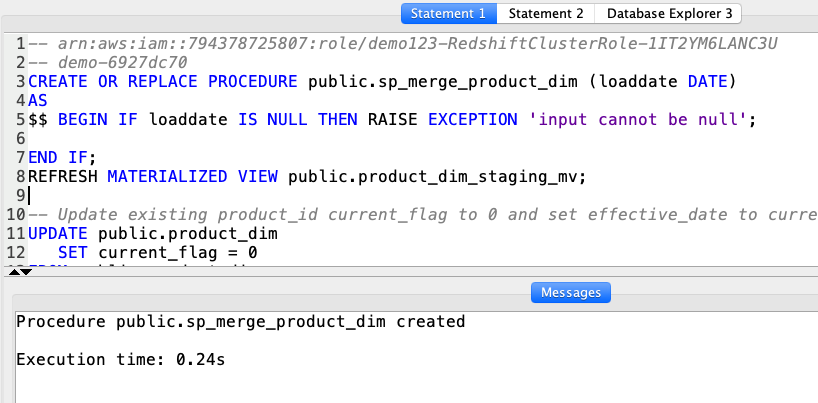
Marie will use stored procedures to execute the transformations for the ETL process. Stored Procedure provide a convenient method to encapsulate the business logic. The first procedure will update the PRODUCT_DIM table by doing the following steps:
|
Using your SQL Client Tool, execute the following command:
|
|
| The second procedure will insert new aggregated data into the daily_product_reviews_fact table. |
Using your SQL Client Tool, execute the following command:
|

|
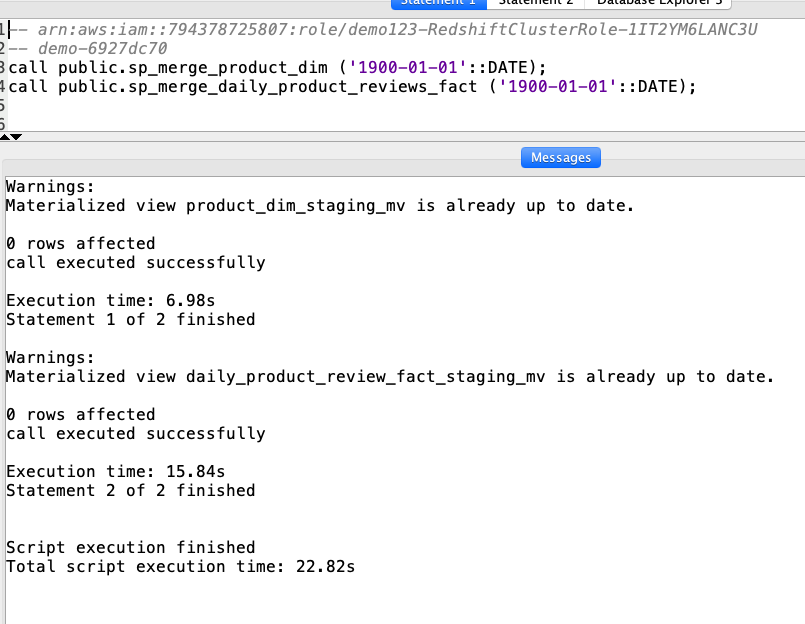
| To test this pipeline, Marie will execute the stored procedures and expects the data in the dimensional model to be refreshed. She will pass in the parameter ‘1900-01-01’ to trigger the load of the historical data. To trigger and incremental load, she can pass in the date of the last load. |
Using your SQL Client Tool, execute the following command:
|
|
|
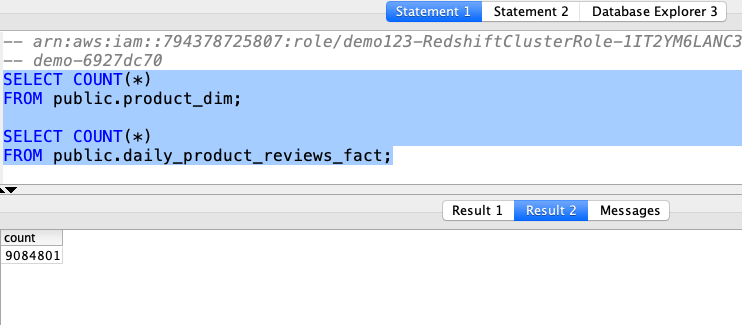
To do a quick sanity check on the data, Marie executes the following count queries.
You should expect 3,068,610 records in the product_dim table and 9,084,801 records in the daily_product_reviews_fact table. |
Using your SQL Client Tool, execute the following command:
|
|
Perform Data Quality Checks
| Say | Do | Show |
|---|---|---|
|
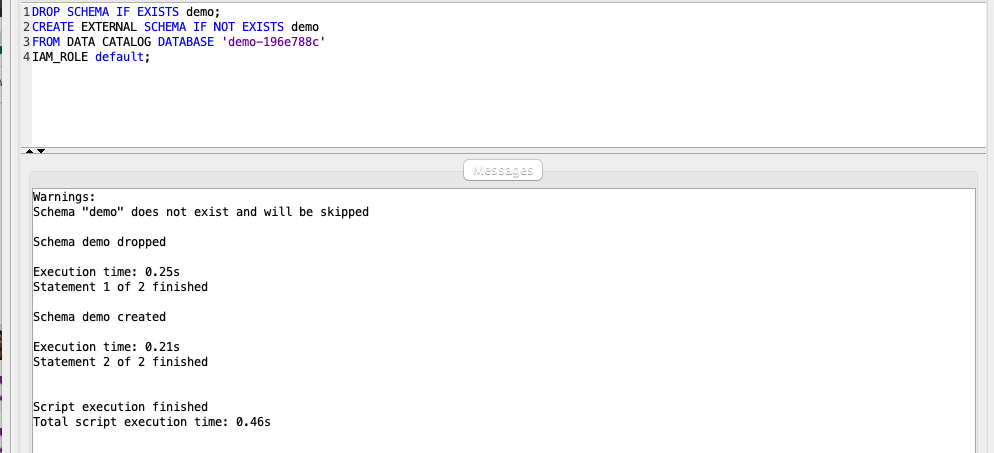
Marie wants to also incorporate a data quality check to ensure the source data and final fact match. Since the data is available in our Data Lake, the Amazon Redshift Spectrum external table demo.parquet can be utilized to compare against the target fact table. Let’s now connect our Redshift Cluster to our Data Lake.
Replace the value for <GlueExternalDatabaseName> with the value previously determined. Amazon Redshift now supports attaching the default IAM role. If you have enabled the default IAM role in your cluster, you can use the default IAM role as follows. Follow the blog for details. |
Using your SQL Client Tool, execute the following command:
|
|
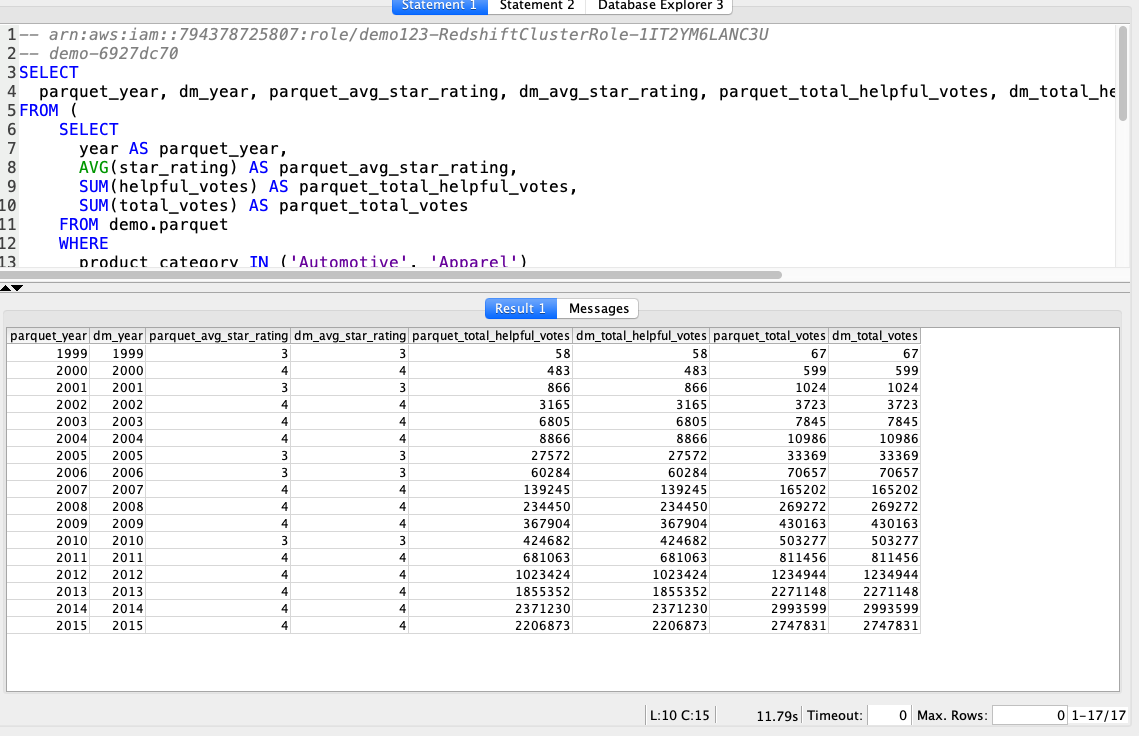
| Marie will implement a strategy of summing the source data and comparing the aggregate values with the ones loaded into the data warehouse. The expected output would be to have corresponding columns of parquet_* and dm_* to be matched. |
Using your SQL Client Tool, execute the following command:
|
|
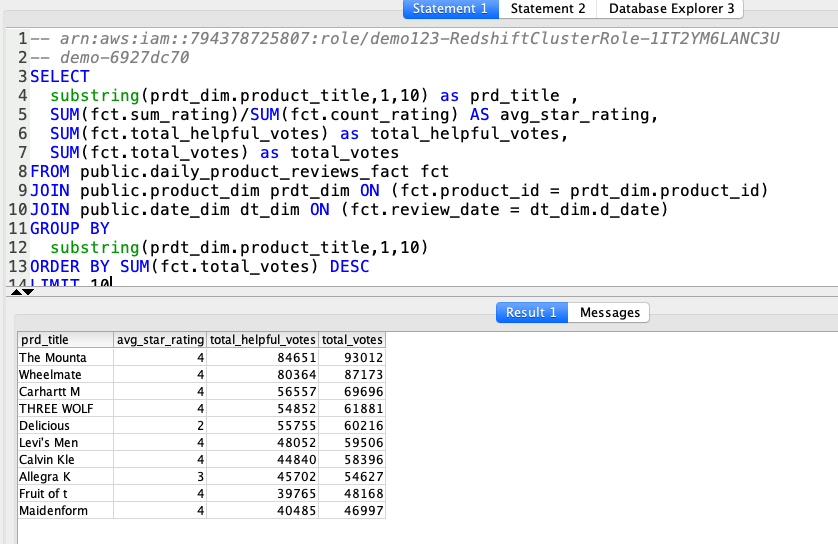
| The dimensional data is now ready for end user consumption. Miguel can build a report similar to the one below to analyze the data. |
Using your SQL Client Tool, execute the following command:
|
|
Before you Leave
If you want to re-run the demo, make sure you delete the Redshift tables/views, stored procedures and materialized views using the following SQL:
DROP PROCEDURE public.sp_merge_product_dim(date);
DROP PROCEDURE public.sp_merge_daily_product_reviews_fact(date);
DROP VIEW IF EXISTS public.product_dim_scd2_update_vw;
DROP VIEW IF EXISTS public.product_dim_scd2_new_vw;
DROP MATERIALIZED VIEW IF EXISTS public.product_dim_staging_mv CASCADE;
DROP MATERIALIZED VIEW IF EXISTS public.daily_product_review_fact_staging_mv CASCADE;
DROP TABLE IF EXISTS public.date_dim;
DROP TABLE IF EXISTS public.daily_product_reviews_fact;
DROP TABLE IF EXISTS public.product_dim;
DROP TABLE IF EXISTS public.product_reviews_staging;
If you are done using your cluster, please think about deleting the CFN stack or to avoid having to pay for unused resources do these tasks:
- pause your Redshift Cluster
- stop the Oracle database
- stop the DMS task