Scale a Data Warehouse
Demo Video

Before You Begin
Ensure you have access to the AWS Console and permissions to create a Redshift cluster
Client Tool
The screenshots for this demo will leverage the the AWS Redshift console. No other client is required for this demo. Some of these steps can be performed using awscli but the console is still required for other steps.
Challenge
The company’s new Amazon Redshift data warehouse is providing valuable insights into the company’s data, and good news travels fast. Joe (the DBA) has been asked to help onboard a number of new teams to the data warehouse asap. This means more data, users, and ETL jobs. Joe has looked at the current cluster’s metrics during peak hours and is convinced they need to scale the cluster up (to double the number of nodes) to accommodate the new workloads and preserve existing SLAs.
To help keep the increased costs as lean as possible and conserve company resources, Joe would also like to scale down the cluster on the weekends when the cluster is mostly idle.
Finally, Joe has discovered that various marketing campaigns led to unpredictable workload spikes that slowed down BI dashboards for a number of users. To efficiently handle unpredictable workload spikes, he will enable Concurrency Scaling in Redshift (also referred to as auto-scaling), which adds more compute power to the cluster whenever queries begin to queue. While Concurrency Scaling incurs no additional charges for 97% of customers, Joe would like to follow best-practices and setup a usage limit to ensure only the free-tier limit is used.
In summary, Joe will complete the following steps:
Cluster Resize
| Say | Do | Show |
|---|---|---|
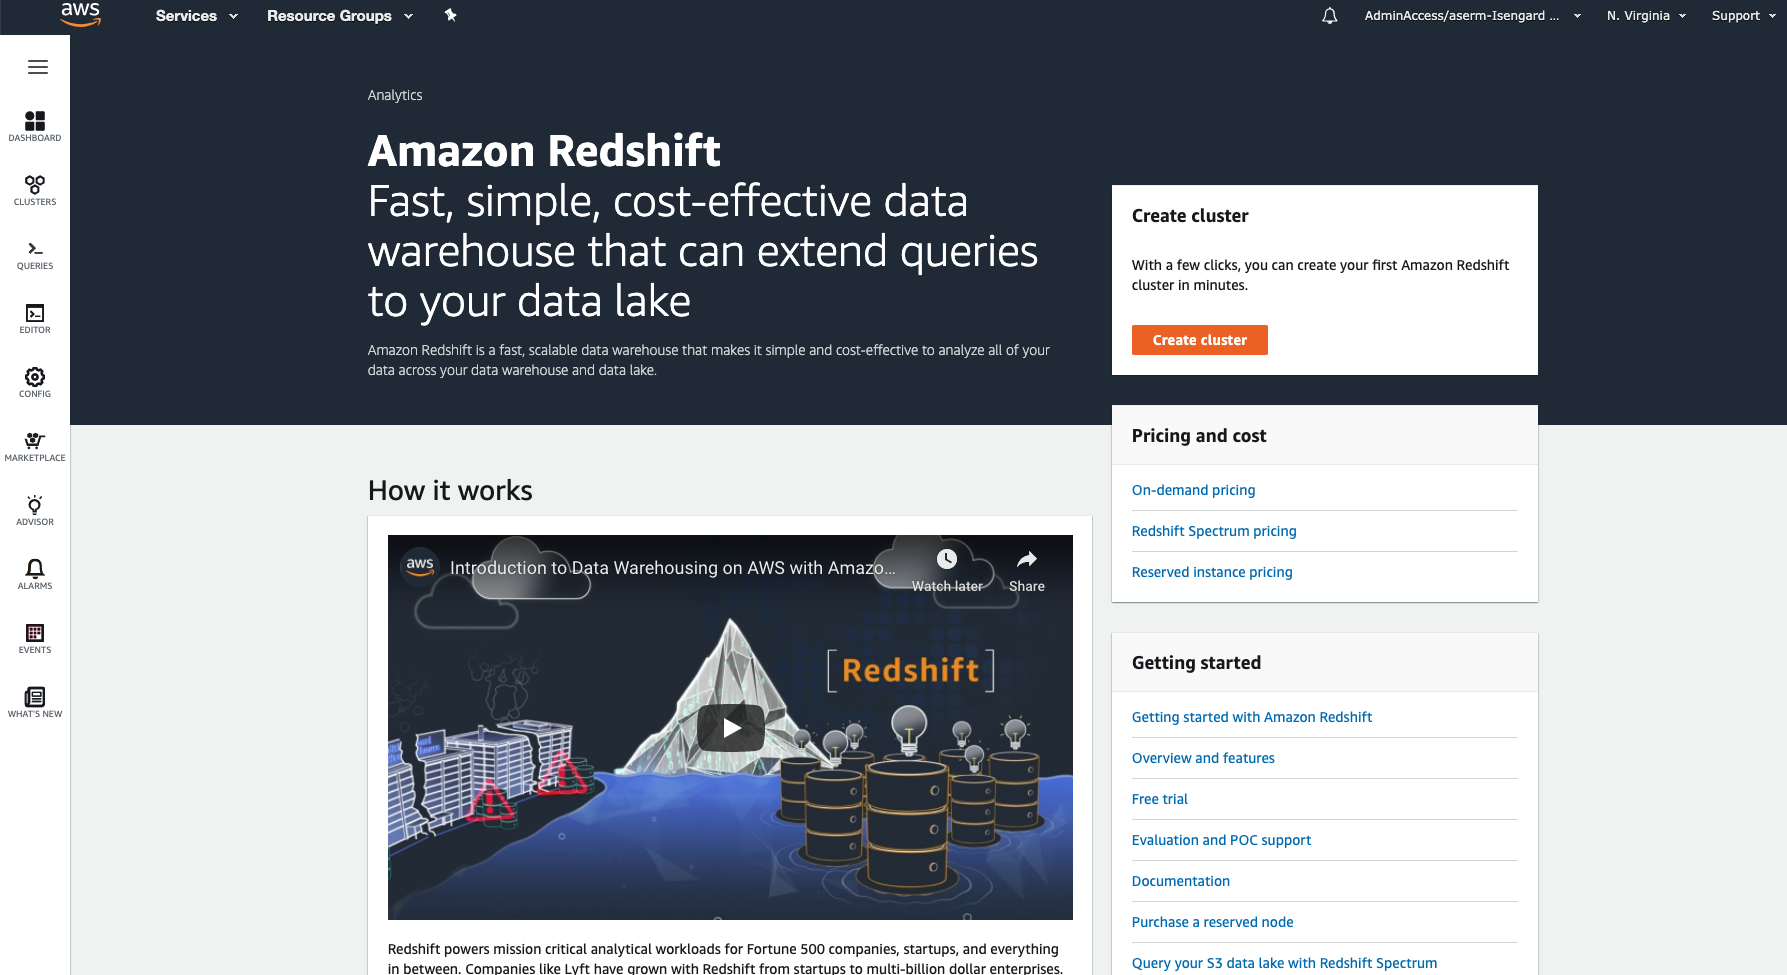
| To get started, let’s go to the Redshift Console | Navigate to https://console.aws.amazon.com/console/home?region=us-east-1# Type Redshift in the ‘Find Services’ search bar and press ‘Enter’ |

|
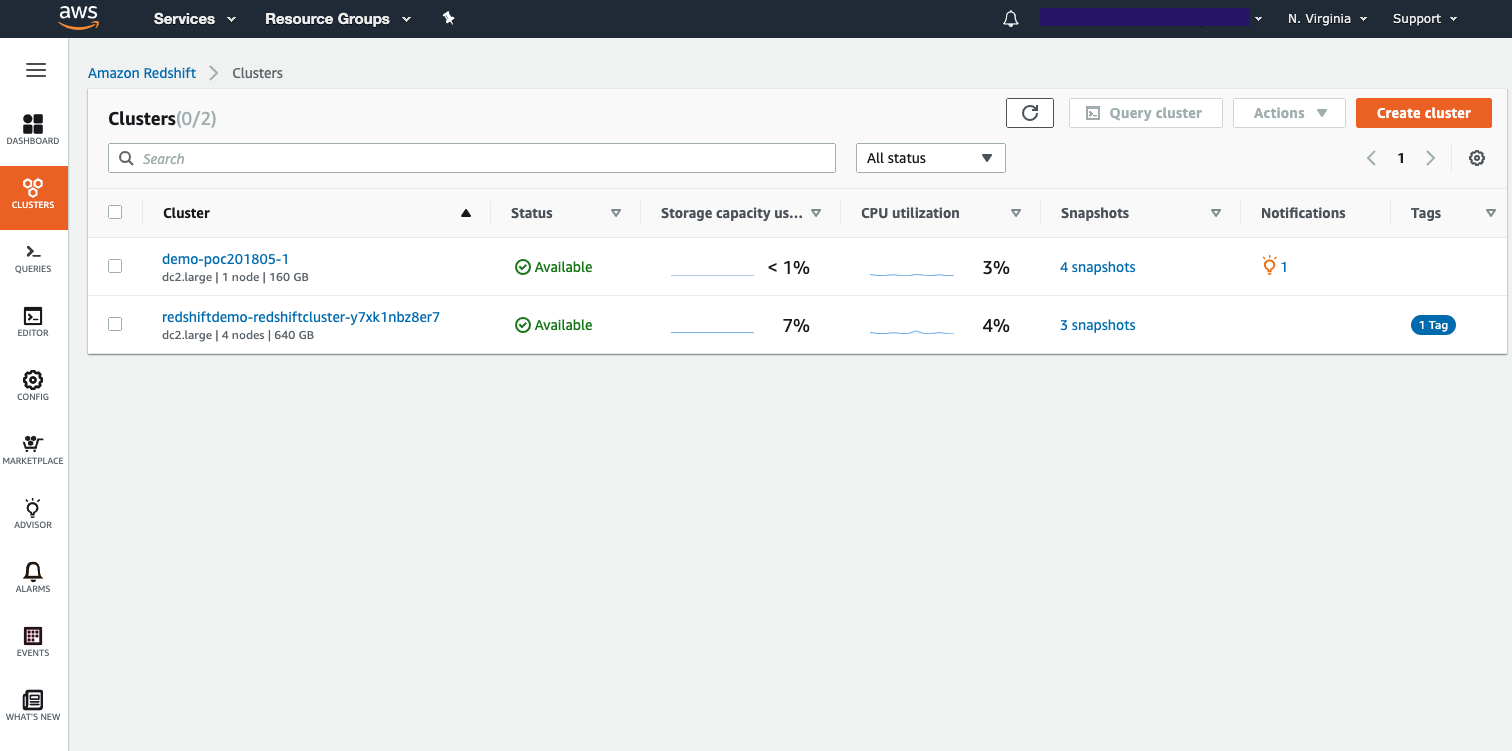
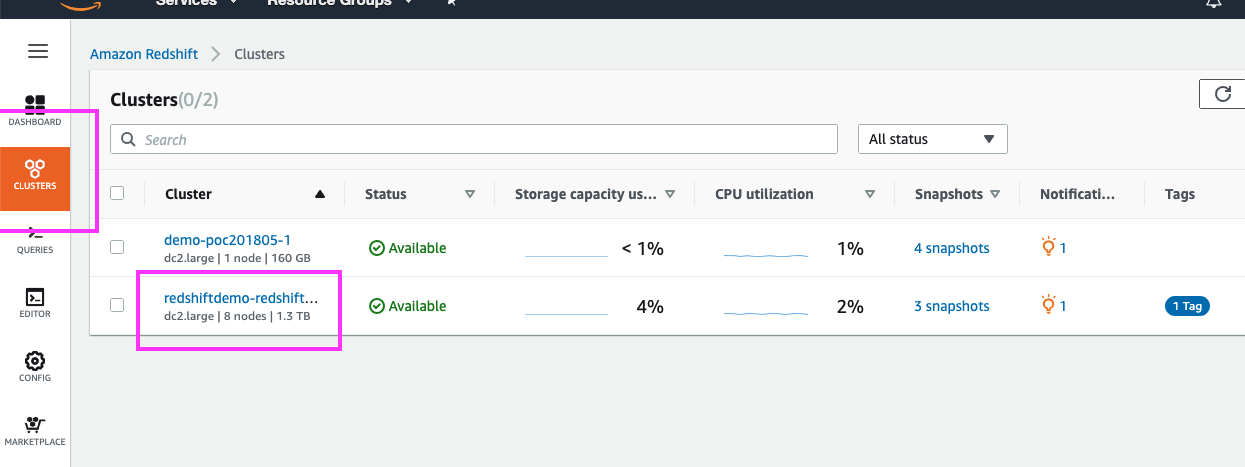
| Now, that we are on the Redshift Console, let us click on ‘Clusters’ to see a holistic view of all the Redshift clusters running in our AWS account | Click ‘Clusters’ on the left panel |
|
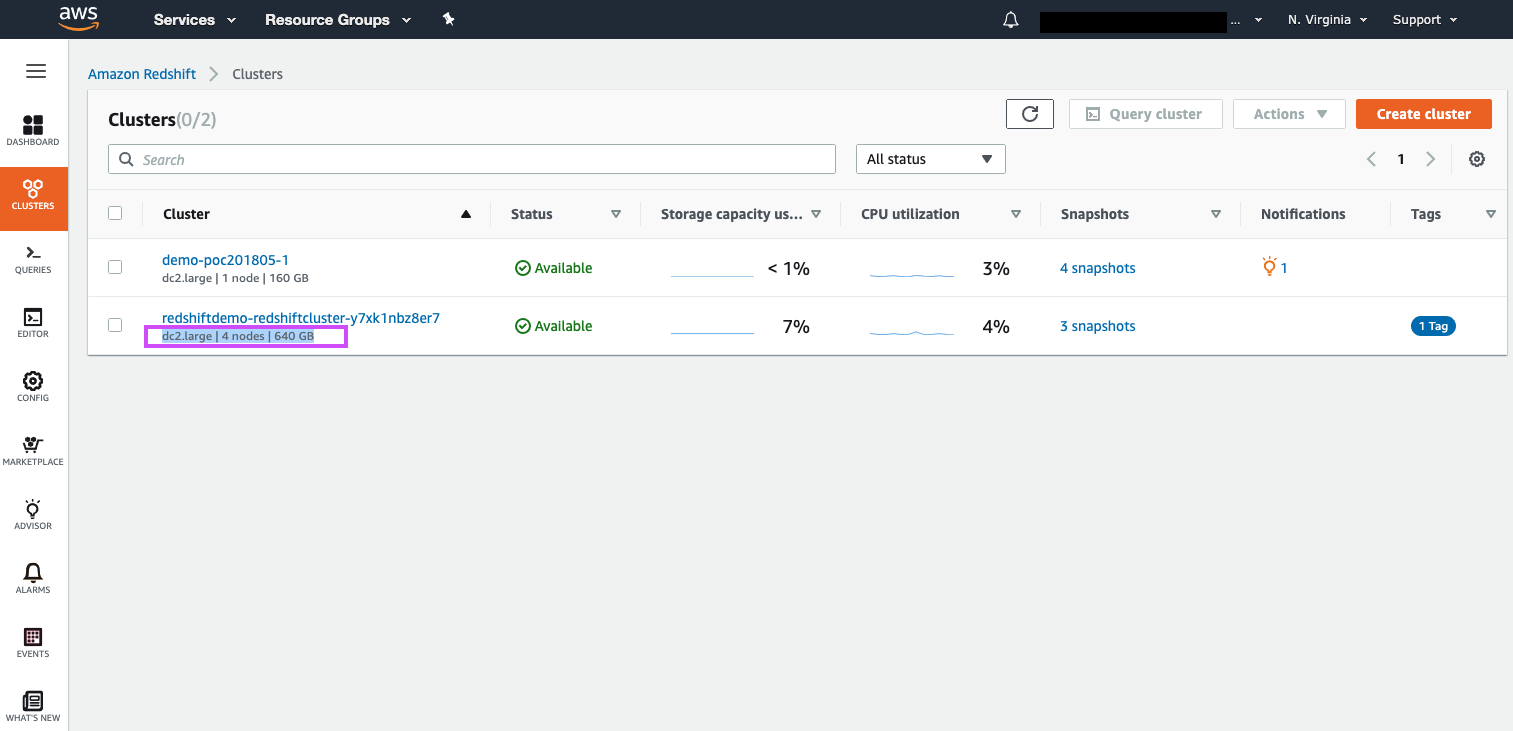
| We can see that our demo Redshift cluster is running, and are immediately able to glean basic information about our cluster, such as node type, number of nodes, and storage capacity | Select with the mouse cursor the cluster details presented under the demo cluster’s name |
|
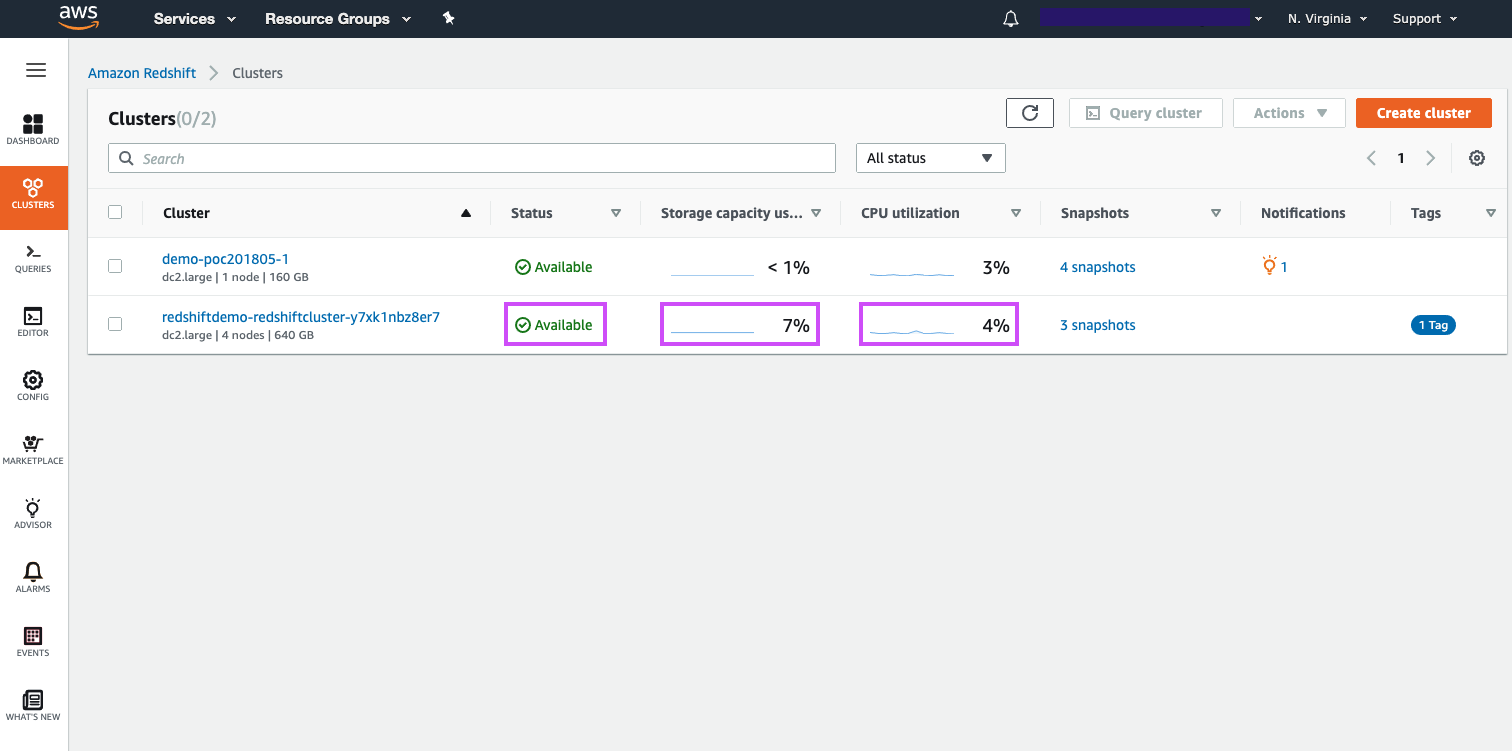
| We can also see high-level cluster metrics such as the cluster’s available state, storage utilization, and CPU utilization | Call attention to the high-level cluster metrics available on this page for the demo cluster |
|
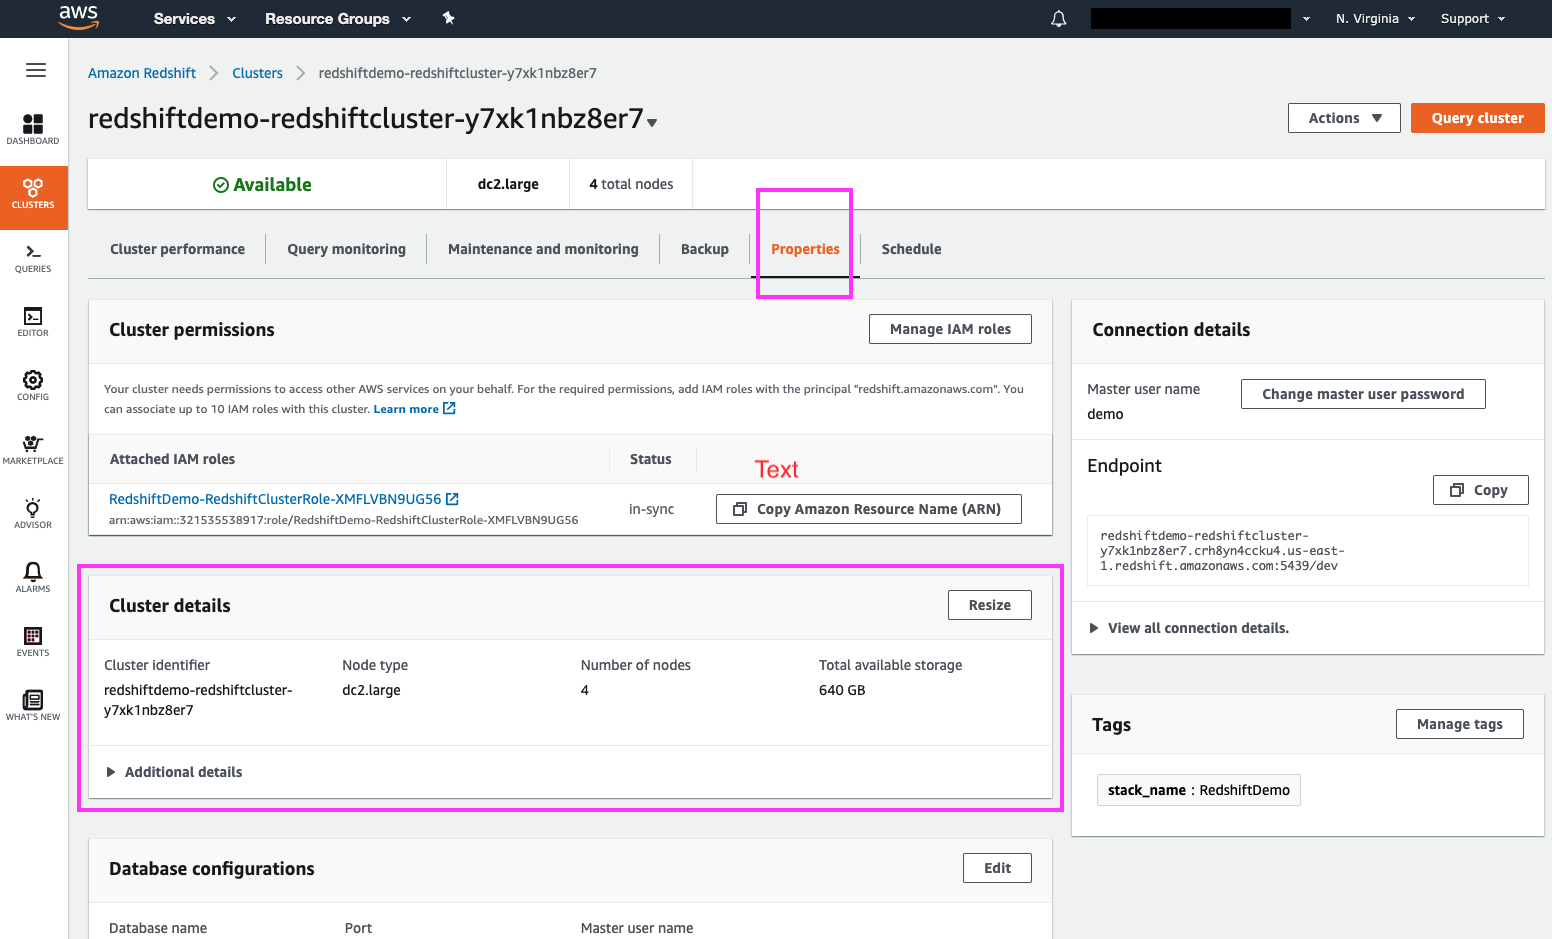
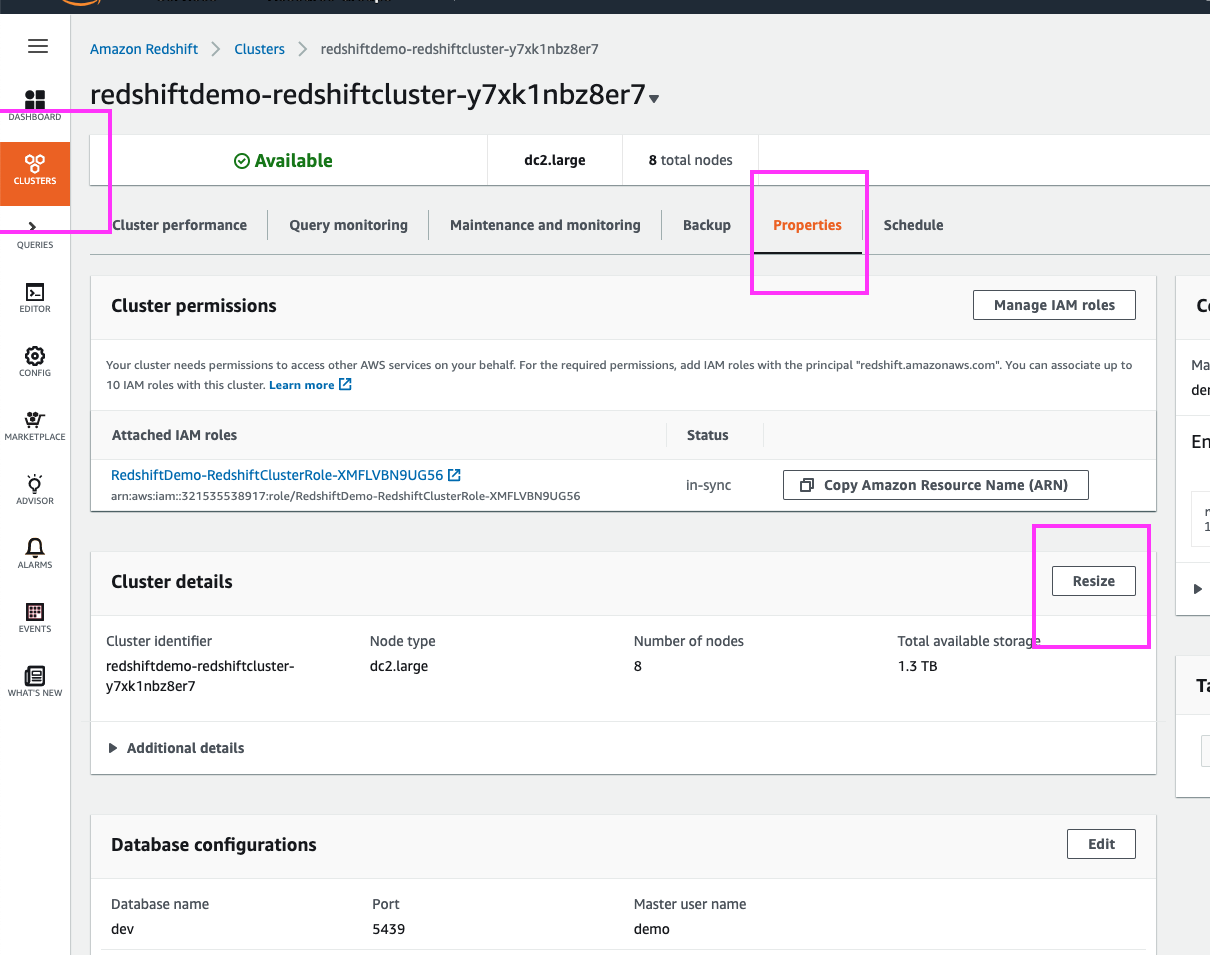
| Let’s navigate to our demo cluster’s dashboard to get a lot more information and access the cluster’s configuration options | Click on the demo cluster’s name to navigate to the cluster’s dashboard |

|
| Clicking on the ‘Properties’ link brings us to the ‘Cluster Details’ page, where we can resize the cluster and change other cluster details | Click on the ‘Properties’ link, highlight the ‘Cluster Details’ section with the mouse cursor |
|
|
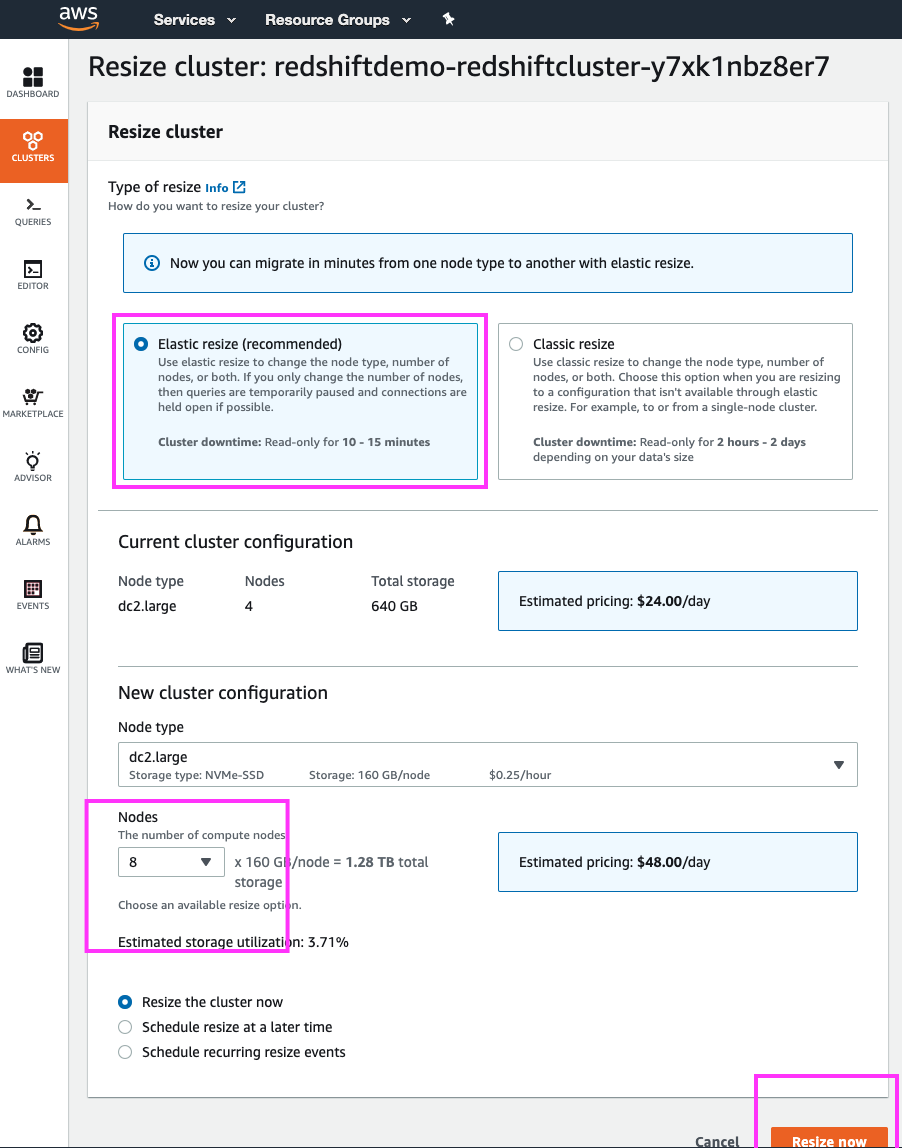
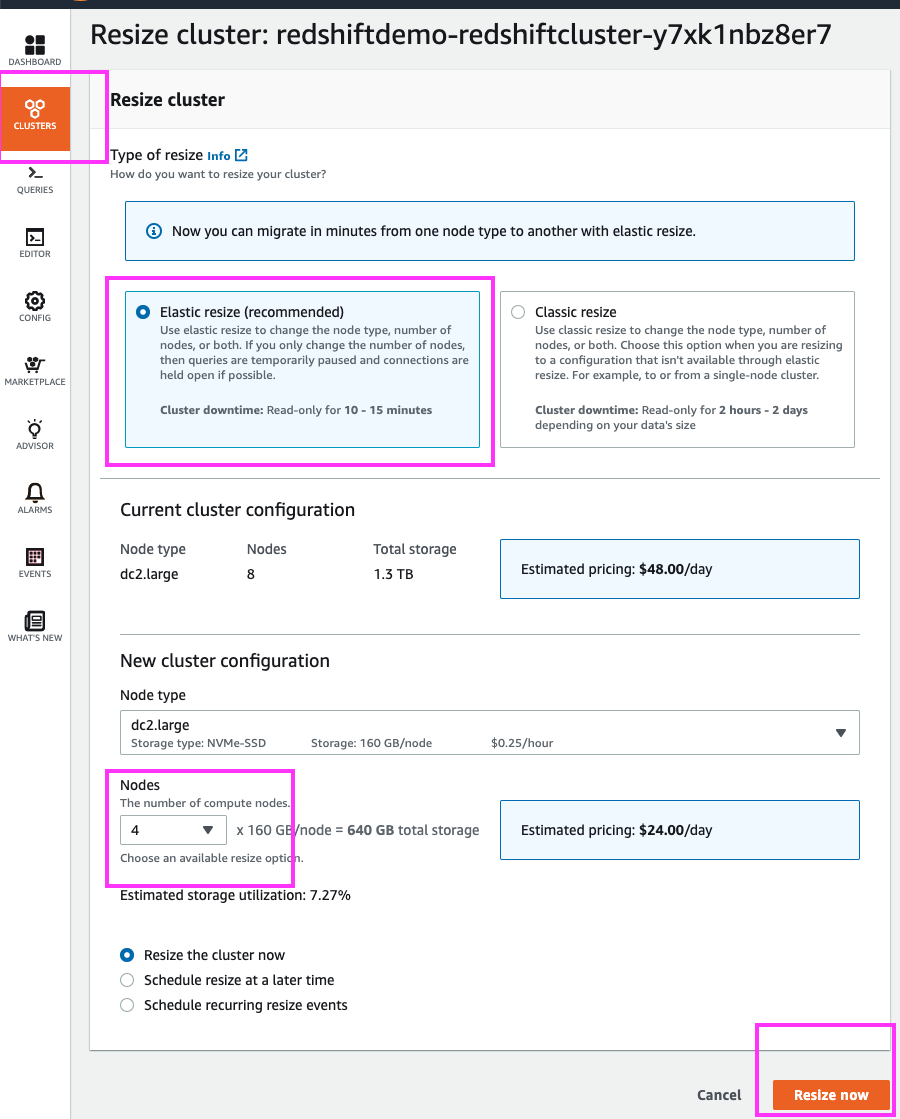
By clicking the ‘Resize’ button we are brought to a cluster resizing page where we can choose the new cluster configuration.
If the DBAs wanted to change to a larger node type, a classic resize would be the way to go. However, in this case – they only want to double the number of cluster nodes from 4 to 8 and for that, Elastic Resize is the best option. | Click on the ‘Resize’ button. Select ‘Elastic Resize’; select ‘8’ nodes from the drop-down and leave everything else with the default value. |

|
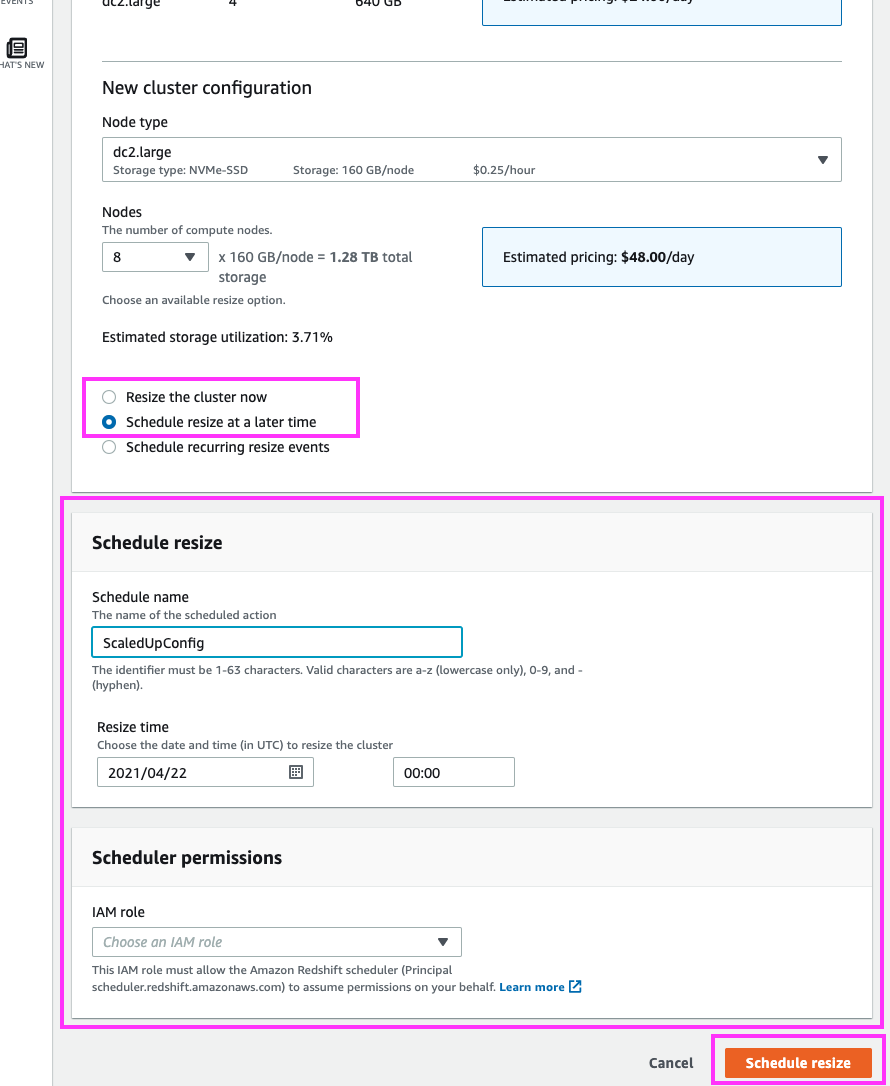
| If the DBAs needed to, they could schedule the resize to occur at a future date/time that, for example, aligns with their maintenance window. | Select the ‘Schedule resize at a later time’ radio button. Type in a name for the schedule, and pick a date/time for the resize. |
|
| In this case, however, the DBAs are performing the resize during off-hours, and so we will resize the cluster now. | Select the ‘Resize the cluster now’ radio button. Click the ‘Resize now’ button |
|
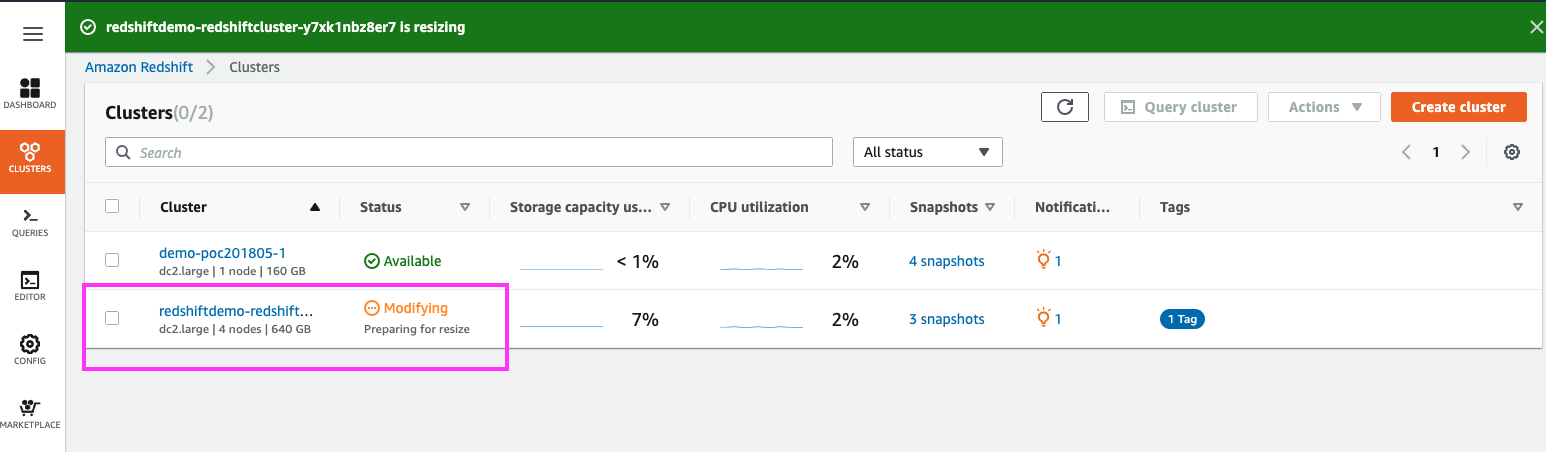
| As the ‘Elastic Resize’ is performed, the cluster’s status goes into a modifying state for a few minutes (about 10 minutes in this case) | Highlight the ‘Modifying’ state in the cluster’s Status column |
|
|
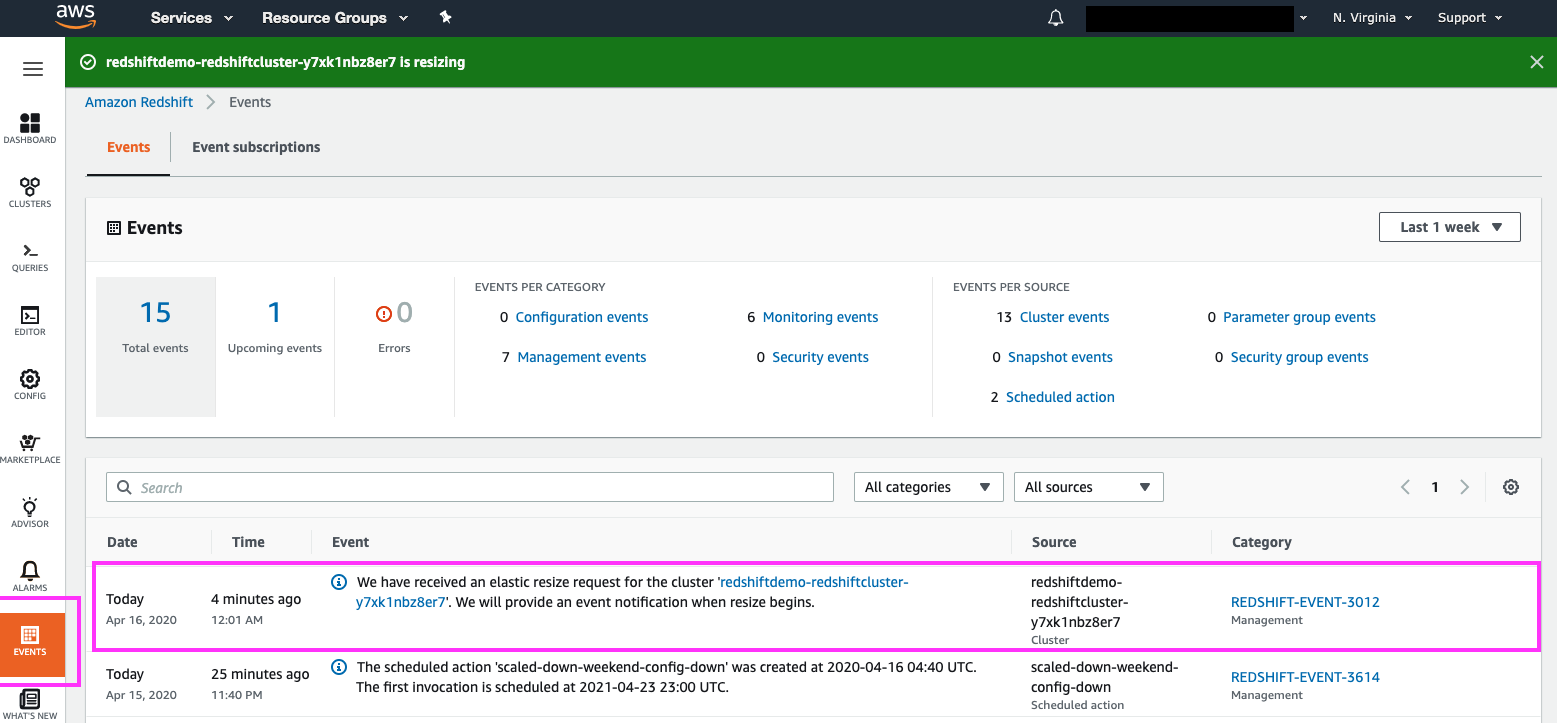
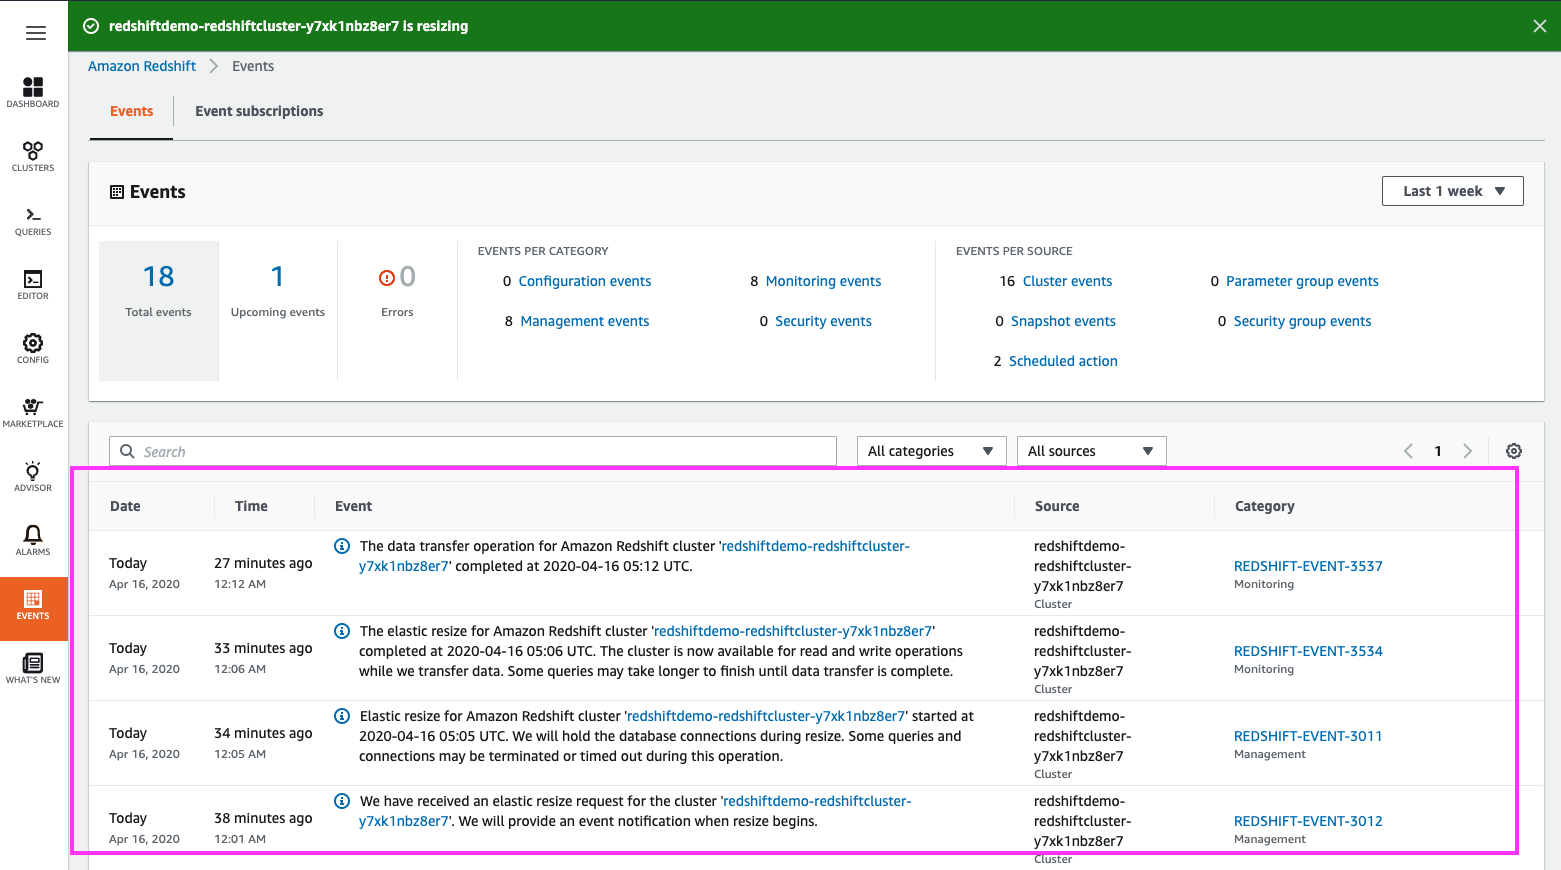
Redshift publishes more fine-grained status updates on the entire life-cycle of the resize beginning-to-end in the ‘Events’ section.
The Events section can also be used to determine if there is a background hydration task in progress |
Click on the ‘Events’ section in the left panel
Highlight some of the resize messages published. Revisit this page throughout the resize to show other status messages |
|
|
When the ‘Elastic Resize’ is complete, the cluster’s state returns back to ‘Available’. The cluster is now fully available for reads/writes.
Note the larger cluster size (8 nodes). As we just saw it is extremely easy and efficient to resize a cluster, and should the DBAs discover they need more or less “horsepower” in their cluster, they are able to repeat this exercise until the desired compute/storage profile is reached | Click the ‘Clusters’ section in the left panel, and highlight with the mouse cursor the ‘Available’ state of the cluster, and the new node size (8 nodes) |

|
Schedule Recurring Resize
| Say | Do | Show |
|---|---|---|
|
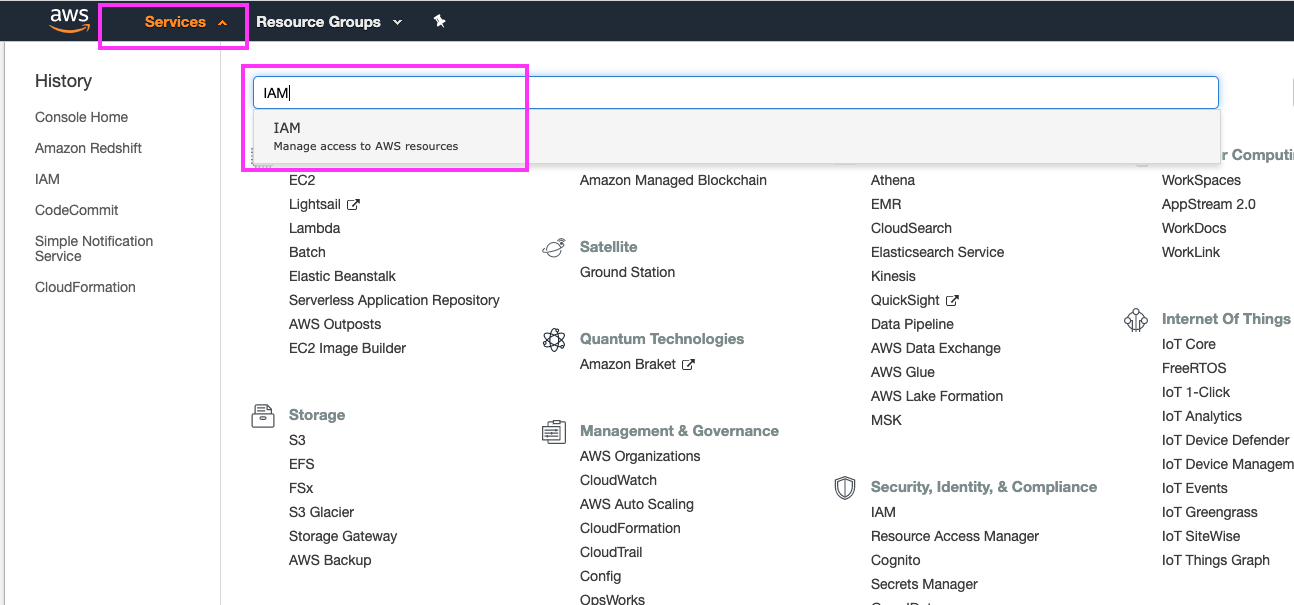
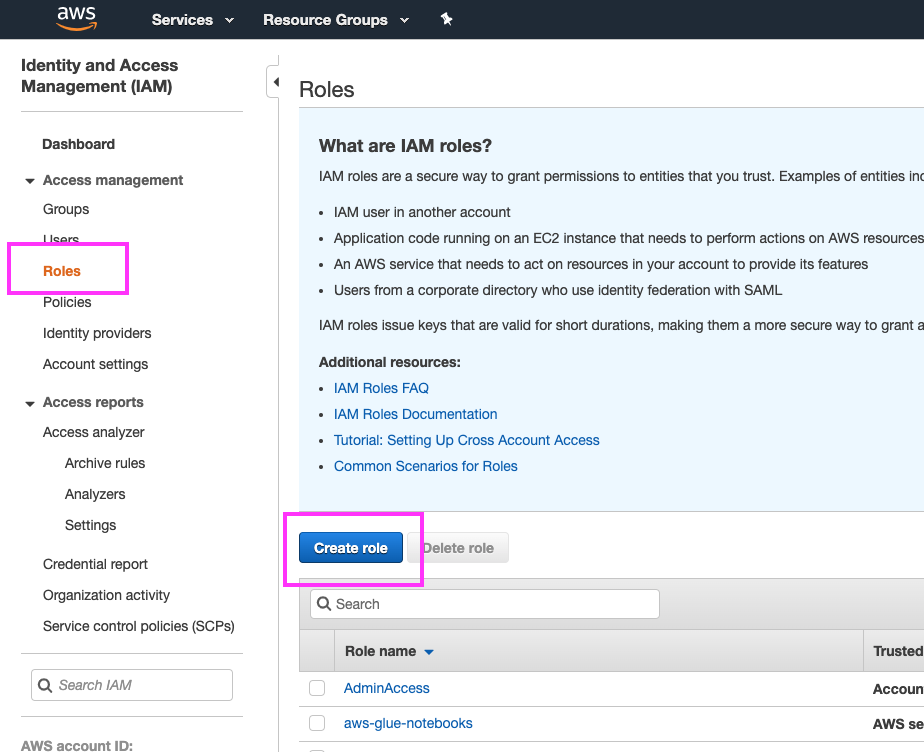
Before we create a scheduled recurring event, there is some prep work we have to take care of. For added security and flexibility, scheduled resize events require the ‘Redshift Scheduler’ IAM privilege, so we first have to create a new IAM role to complete this task. We will start by going to the IAM service and more specifically, the section for managing and creating IAM roles |
Click on ‘Services’ at the top of the page and type in ‘IAM’. Hit the enter key to go the IAM dashboard Click on ‘Roles’ on the left panel Click the ‘Create role’ button |
|
|
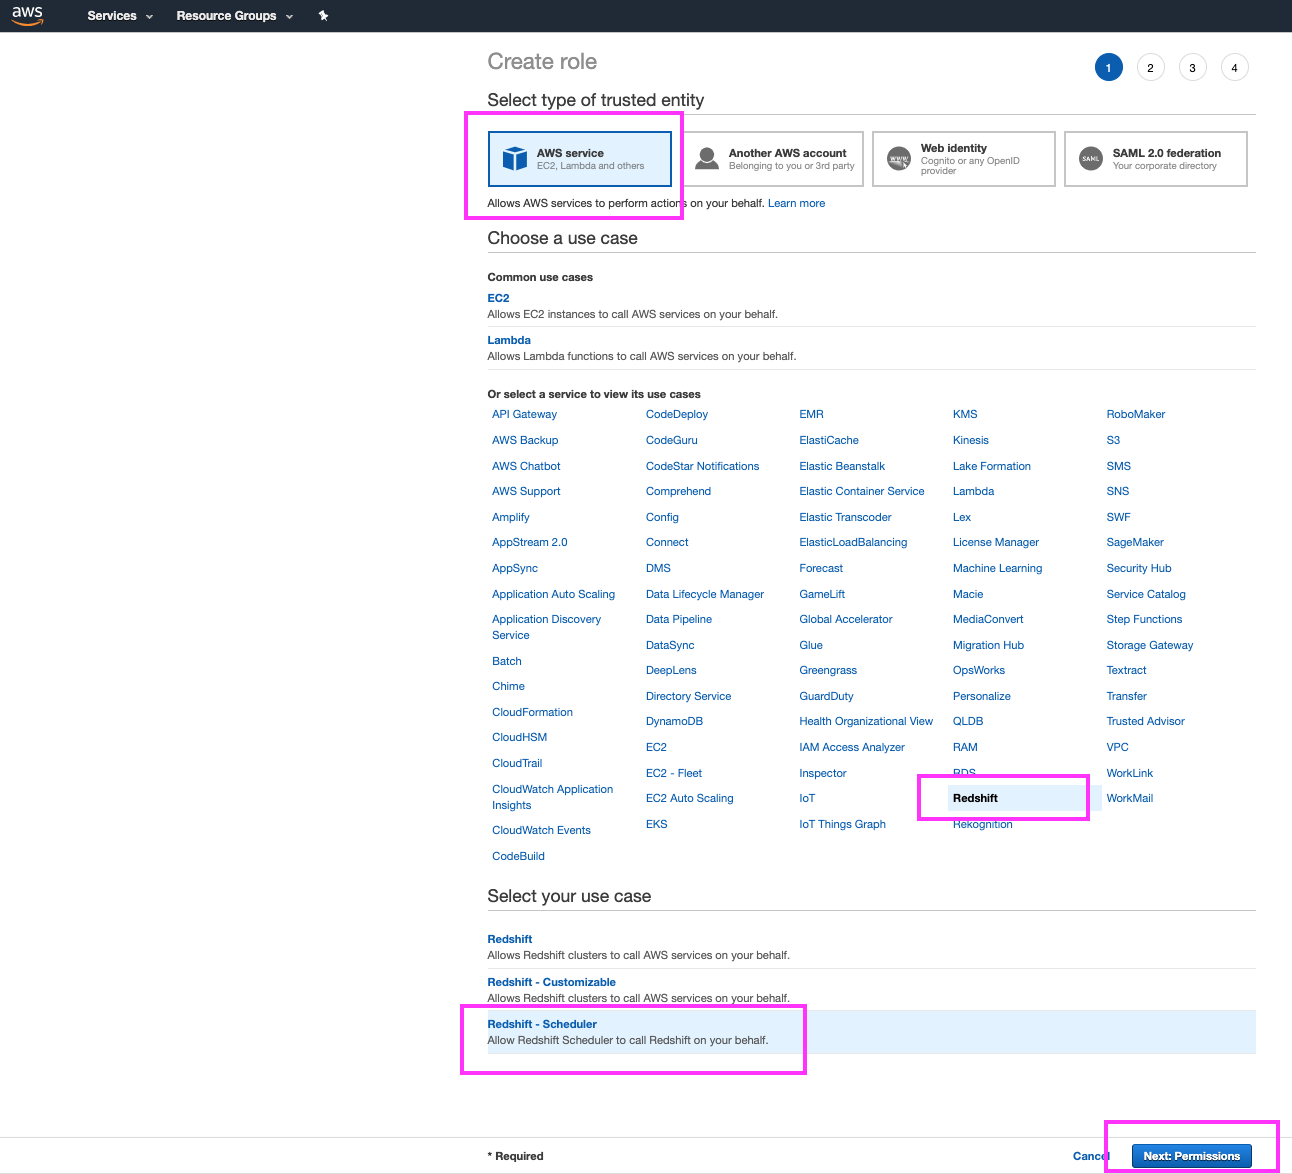
On the create-role page, we can specify that the new role is associated with the Redshift AWS Service, and that our use case is the standard ‘Redshift – Scheduler’ use case. We will keep the default permissions for this role, and skip adding any tags for now |
Select ‘AWS Service’ for the type of trusted entity Select ‘Redshift’ in the list of AWS services Select the ‘Redshift – Scheduler’ use case Click the ‘Next: Permissions’ button and on the following two screens, do not change anything and just click the ‘Next: Tags’ and ‘Next: Review’ buttons, respectively to go the Review step |
|
|
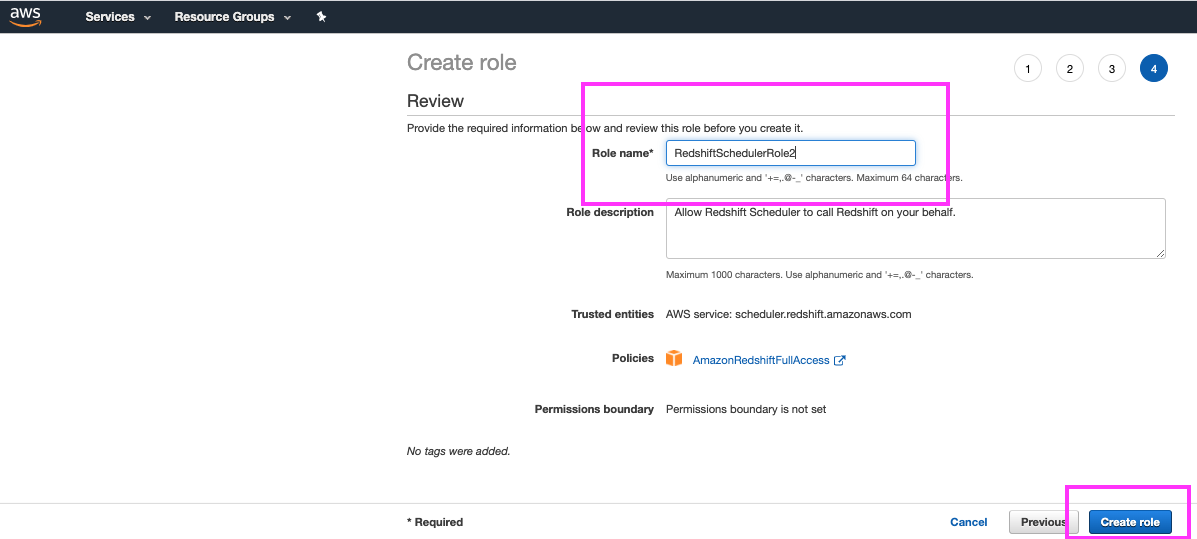
Let’s enter a descriptive name for this role and we are done creating the role. Now let’s work on scheduling a recurring resize event. |
Type in ‘RedshiftSchedulerRole’ for the role name Click the ‘Create role’ button |
|
|
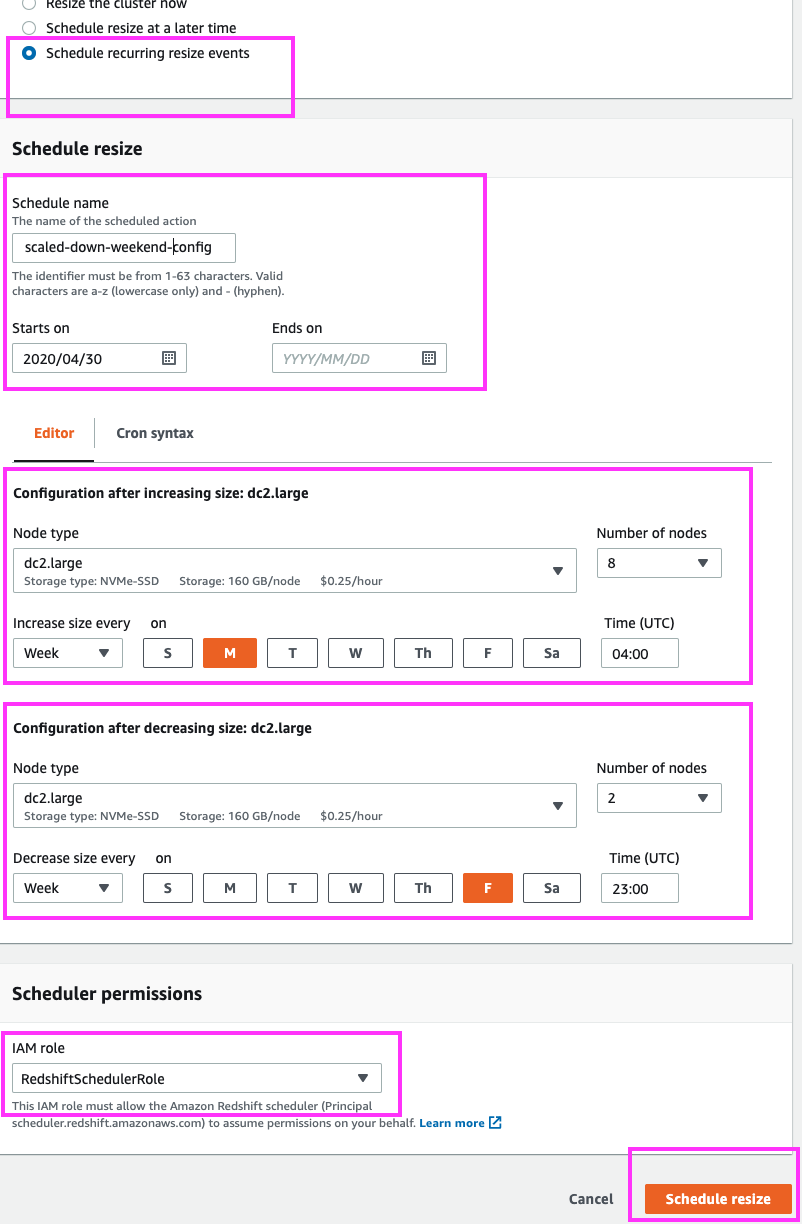
Going back to the Redshift resize screen, we note the ‘Schedule recurring resize events’ option which would allow us to do just that (schedule a recurring resize event). On this page, we can specify the recurring schedule’s begin-date and end-date, or leave the end-date blank so the schedule recurs continuously. We can specify the day and time of the recurring scale-up and recurring scale-down events. And we can also choose whether these resize events are to occur on a daily, weekly, or monthly basis. Note that we could choose ‘Elastic Resize’ or ‘Classic Resize’. ‘Elastic Resize’ is the best option if we are sizing up/down to one of the supported cluster sizes for this feature (e.g. 1/2 or 2x the current number of cluster nodes). ‘Classic Resize’ would be the right choice if we are interested in a specific/different node-count for the scale-up and/or scale-down events. We will choose to stick with ‘Elastic Resize’ and since our cluster currently has 4 nodes, we have the option to scale/resize down to 2 nodes, and scale/resize up to 8 nodes. Bonus: the DBAs could easily choose to use this feature to add more cluster compute power on a regularly scheduled basis – i.e. schedule the automatic scaling up (resizing) of their cluster to accommodate predictable workload spikes such as ETL jobs that run in the early AM. Feel free to give it a try on your own. |
Go back to the Redshift dashboard by clicking on ‘Services’ in the top of the page and typing in ‘Redshift’. Now, go back to the Redshift resize screen by clicking on ‘Clusters’ in the left panel, clicking the demo cluster’s name, the ‘Properties link at the top, and then finally the ‘Resize’ button Select ‘Elastic Resize’ Select the ‘Schedule recurring resize events’ radio button. Type in a name for the schedule (e.g. “scaled-down-weekend-config”, enter a start date that is a few days from today, but leave the end-date blank so that the job keeps repeating. Select 8 nodes for the resize-up, and the date/time values to have the size-up event occur every week on Monday at 04:00 UTC (midnight ET). For the resize-down event, select 2 nodes, and the date/time values to have the size-down event occur every week on Friday at 23:00 UTC (7pm ET). Finally, choose an appropriate IAM role, and click the ‘Schedule Resize’ button |
|
|
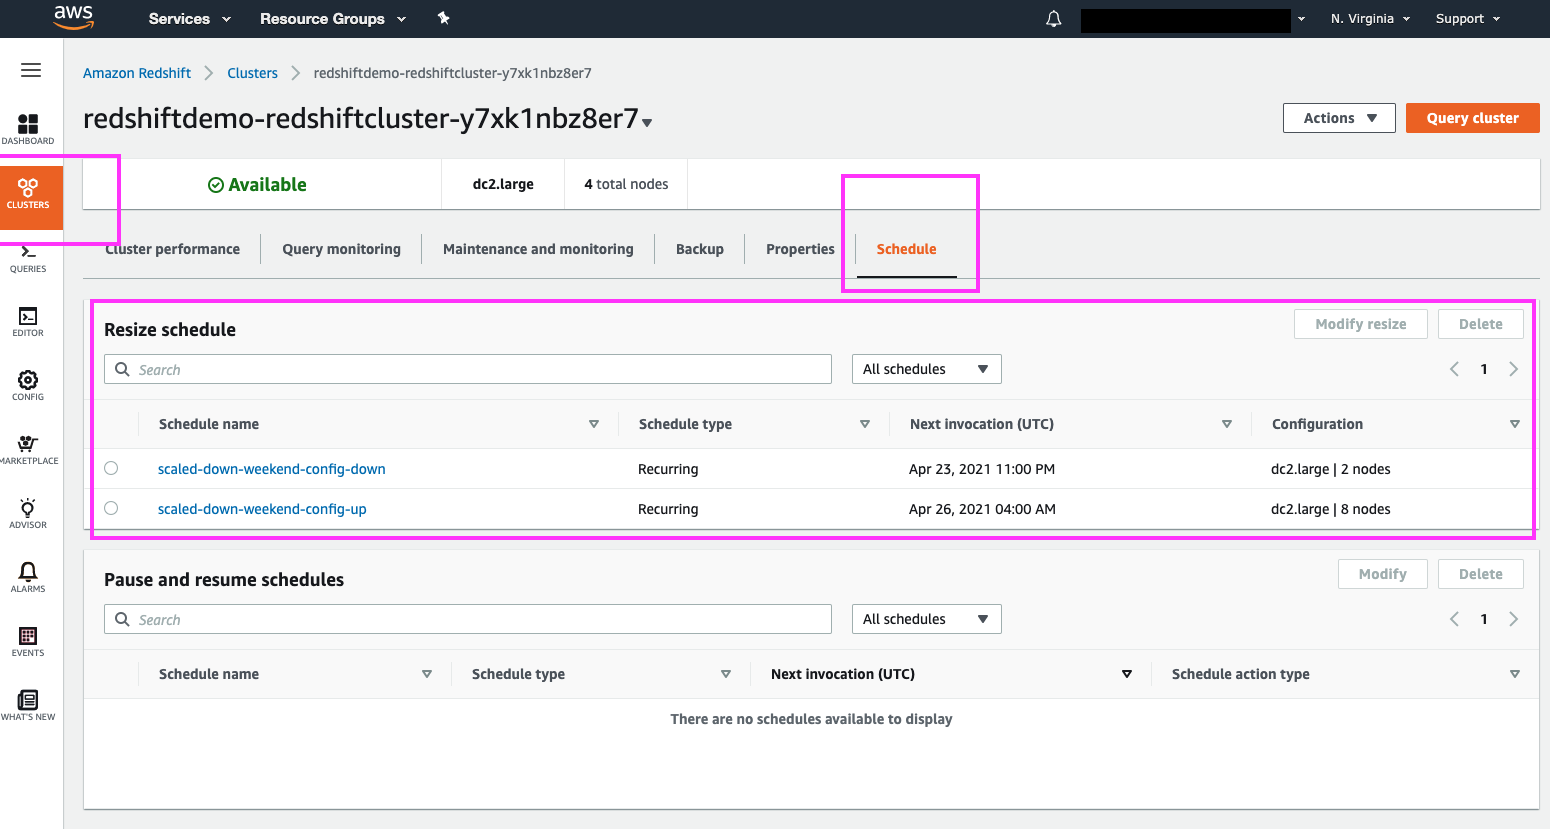
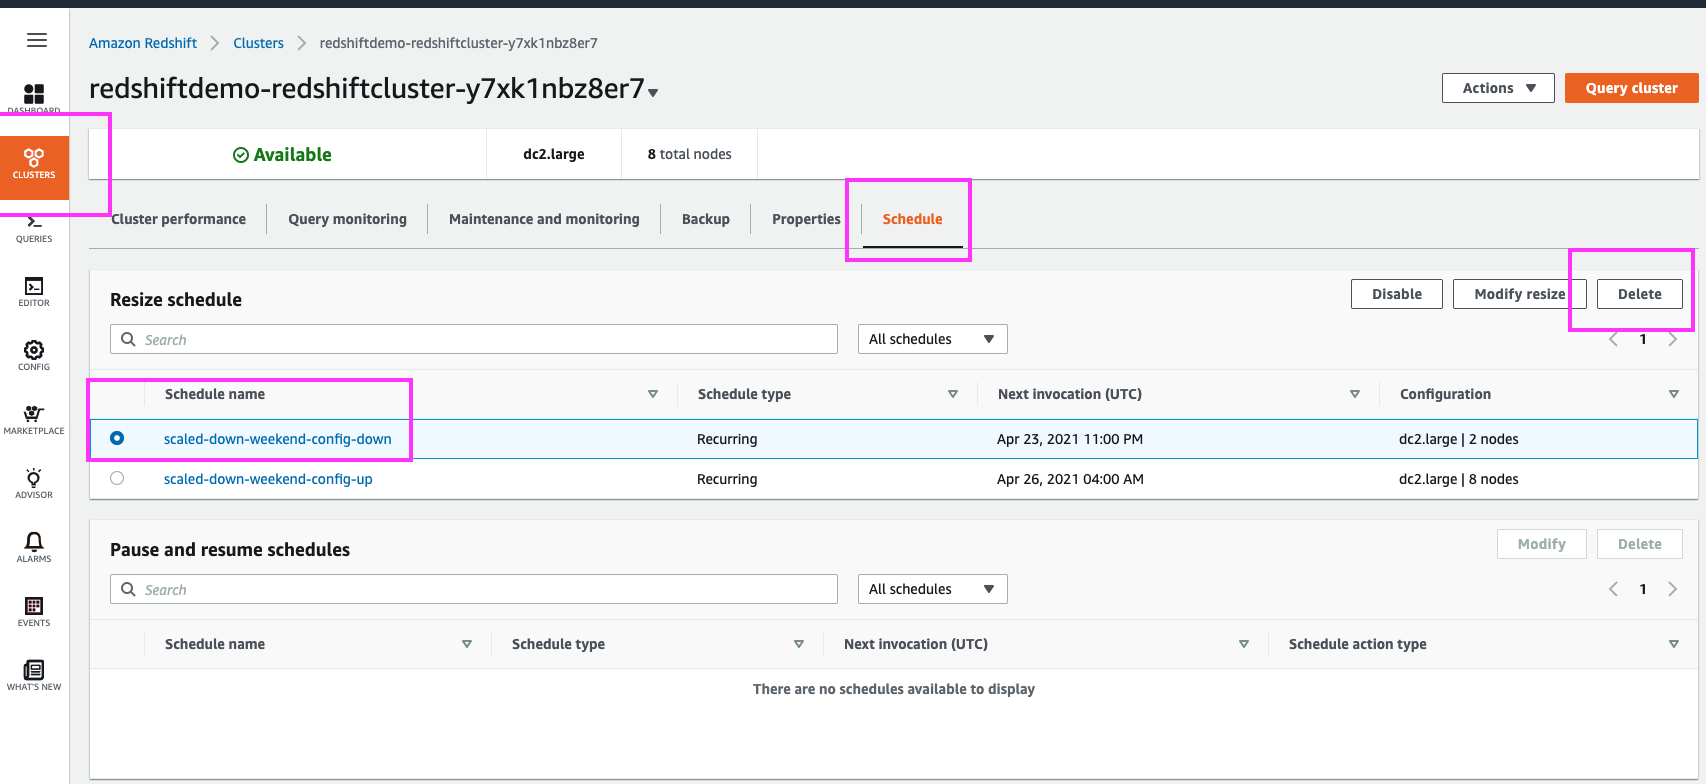
Navigating to the ‘Schedule’ page under Clusters, allows us to view all scheduled resize events | Select ‘Clusters’ section from the left panel, and then select the ‘Schedule’ link at the top. Highlight the ‘Resize schedule’ section with the mouse cursor. |
|
Enable Concurrency Scaling
| Say | Do | Show |
|---|---|---|
| First task is to identify which workload management profile is currently being used by our cluster. Let’s go to the Redshift console and get started | Navigate to https://console.aws.amazon.com/console/home?region=us-east-1# Type Redshift in the ‘Find Services’ search bar and press ‘Enter’ |
|
| Now, that we are on the Redshift Console, let us click on ‘Clusters’ to see a holistic view of all the Redshift clusters running in our AWS account | Click ‘Clusters’ on the left panel |

|
| Let’s navigate to our demo cluster’s dashboard to access the cluster’s configuration options | Click on the demo cluster’s name to navigate to the cluster’s dashboard |

|
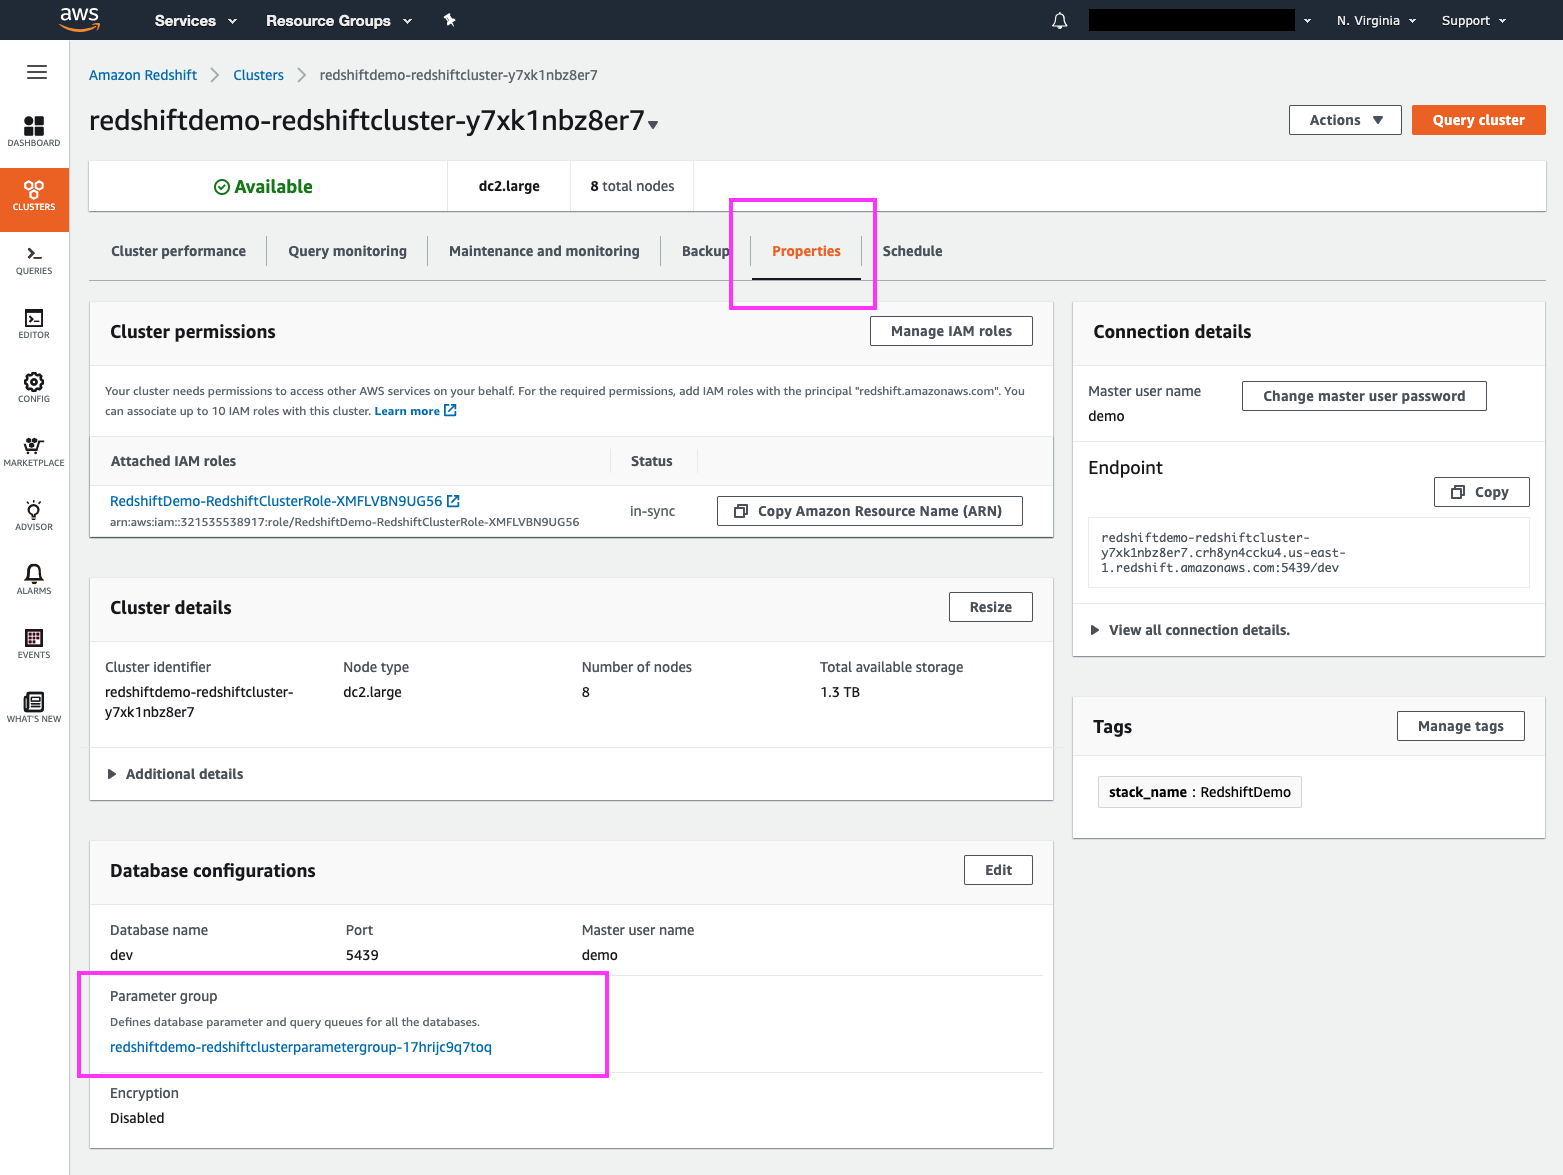
| Clicking on the ‘Properties’ link brings us to the ‘Cluster Details’ page, where we can see our cluster’s Workload Management profile name (aka ‘Parameter Group’) | Click on the ‘Properties’ link, highlight the ‘Cluster Details’ section with the mouse cursor |
|
|
Now that we know our cluster is currently operating with WLM config redshiftdemo-redshiftclusterparametergroup-XXXXXXXXXXXXX.
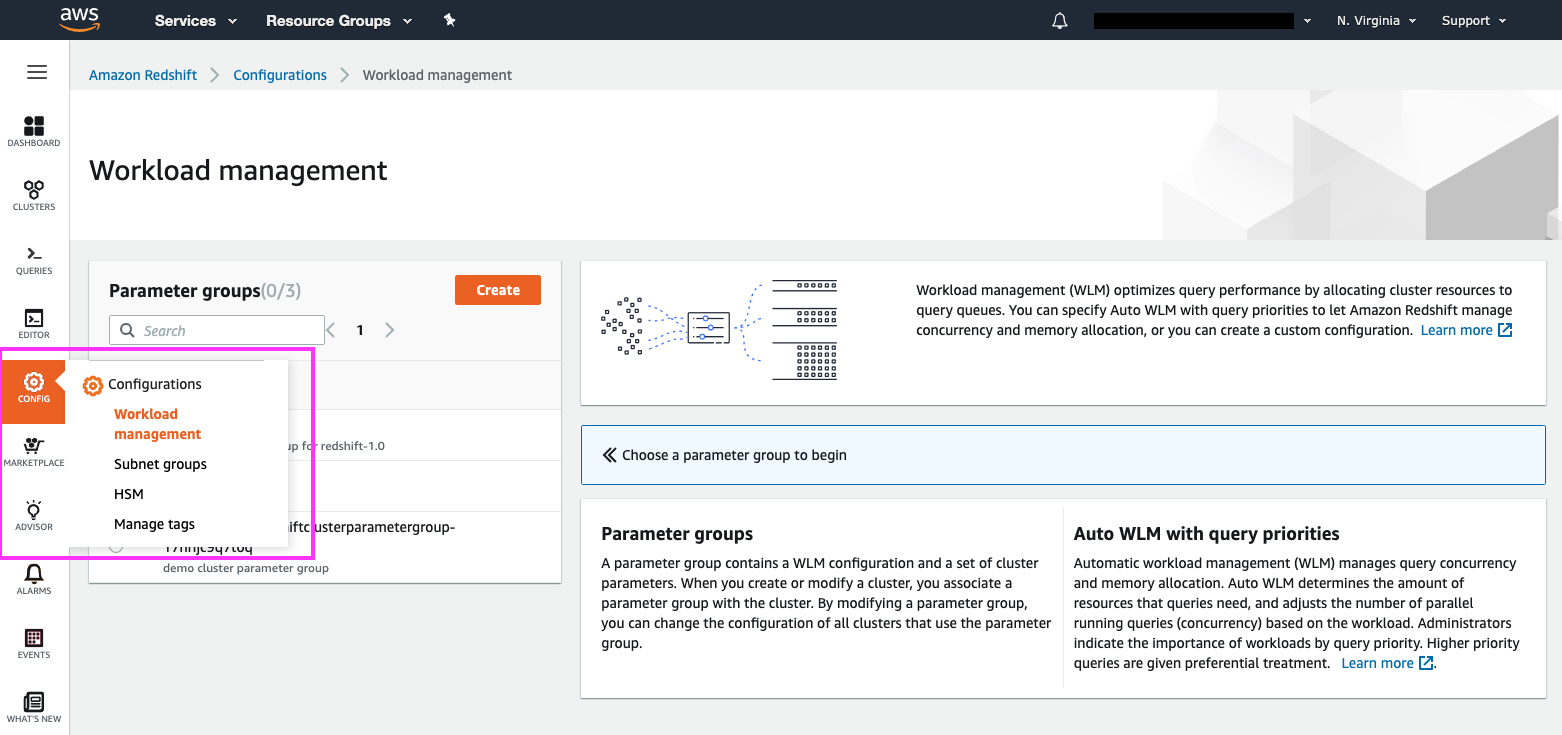
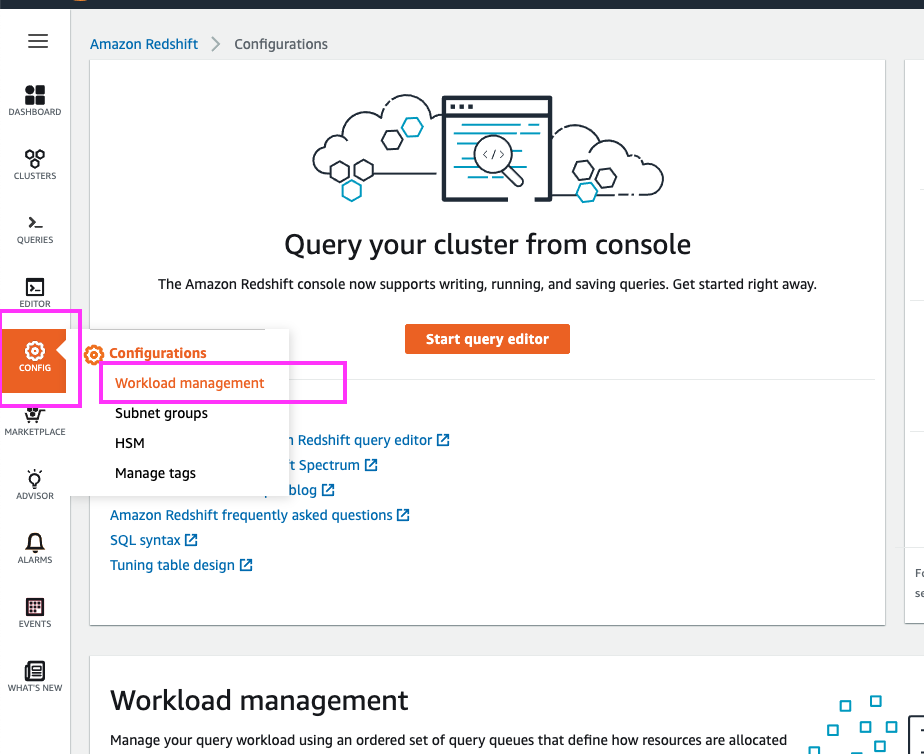
We could click on the WLM config to navigate to its details, but let’s instead familiarize ourselves with the ‘Workload Management’ section under Config as we enable Concurrency Scaling | Hover over ‘Config’ in the left panel and click on Workload Management in the sub-menu |
|
|
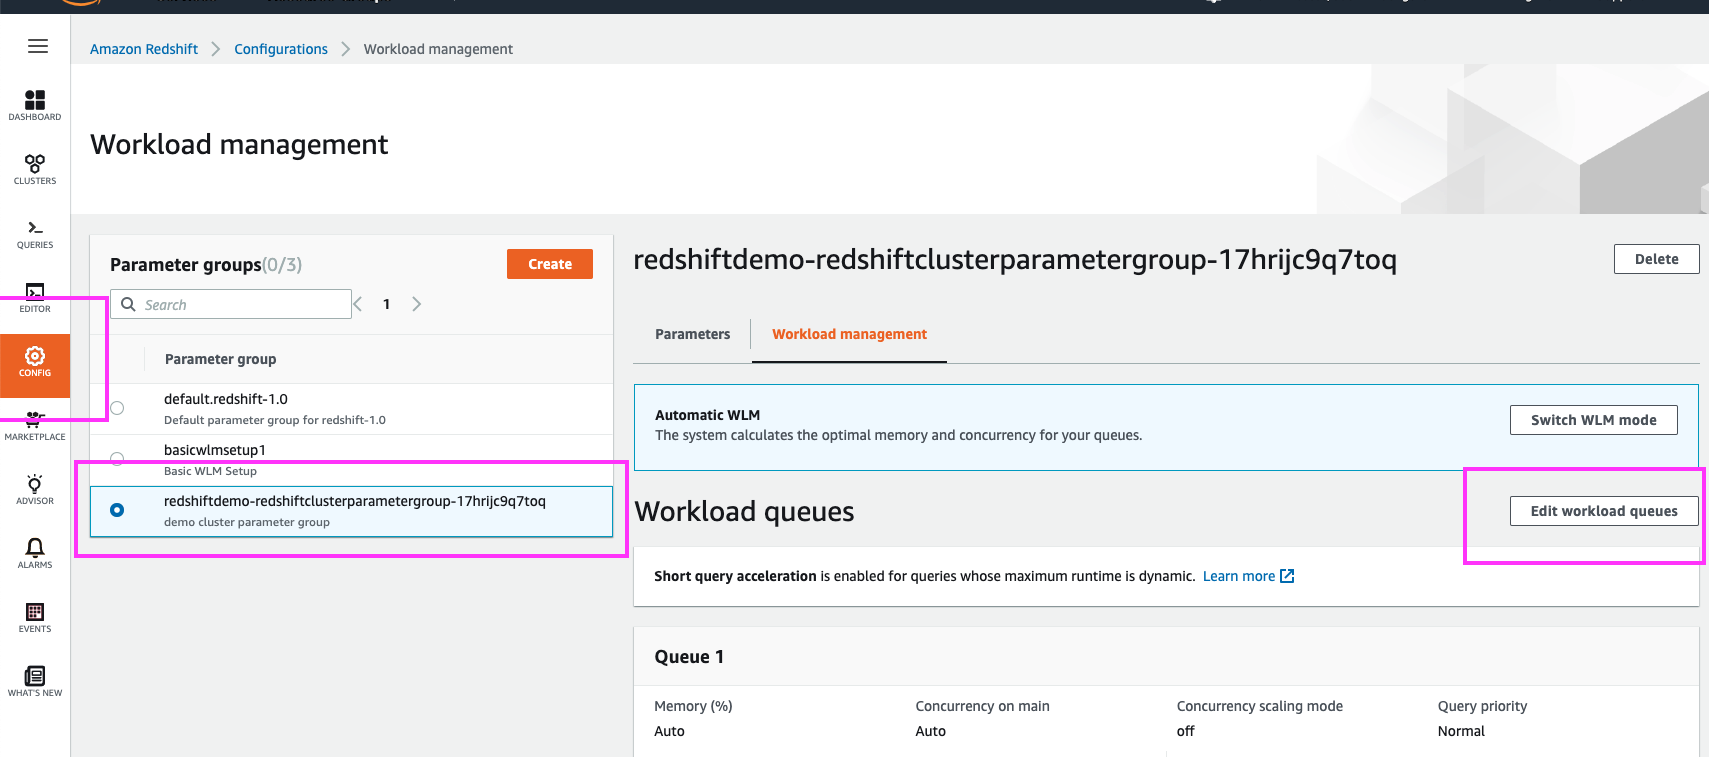
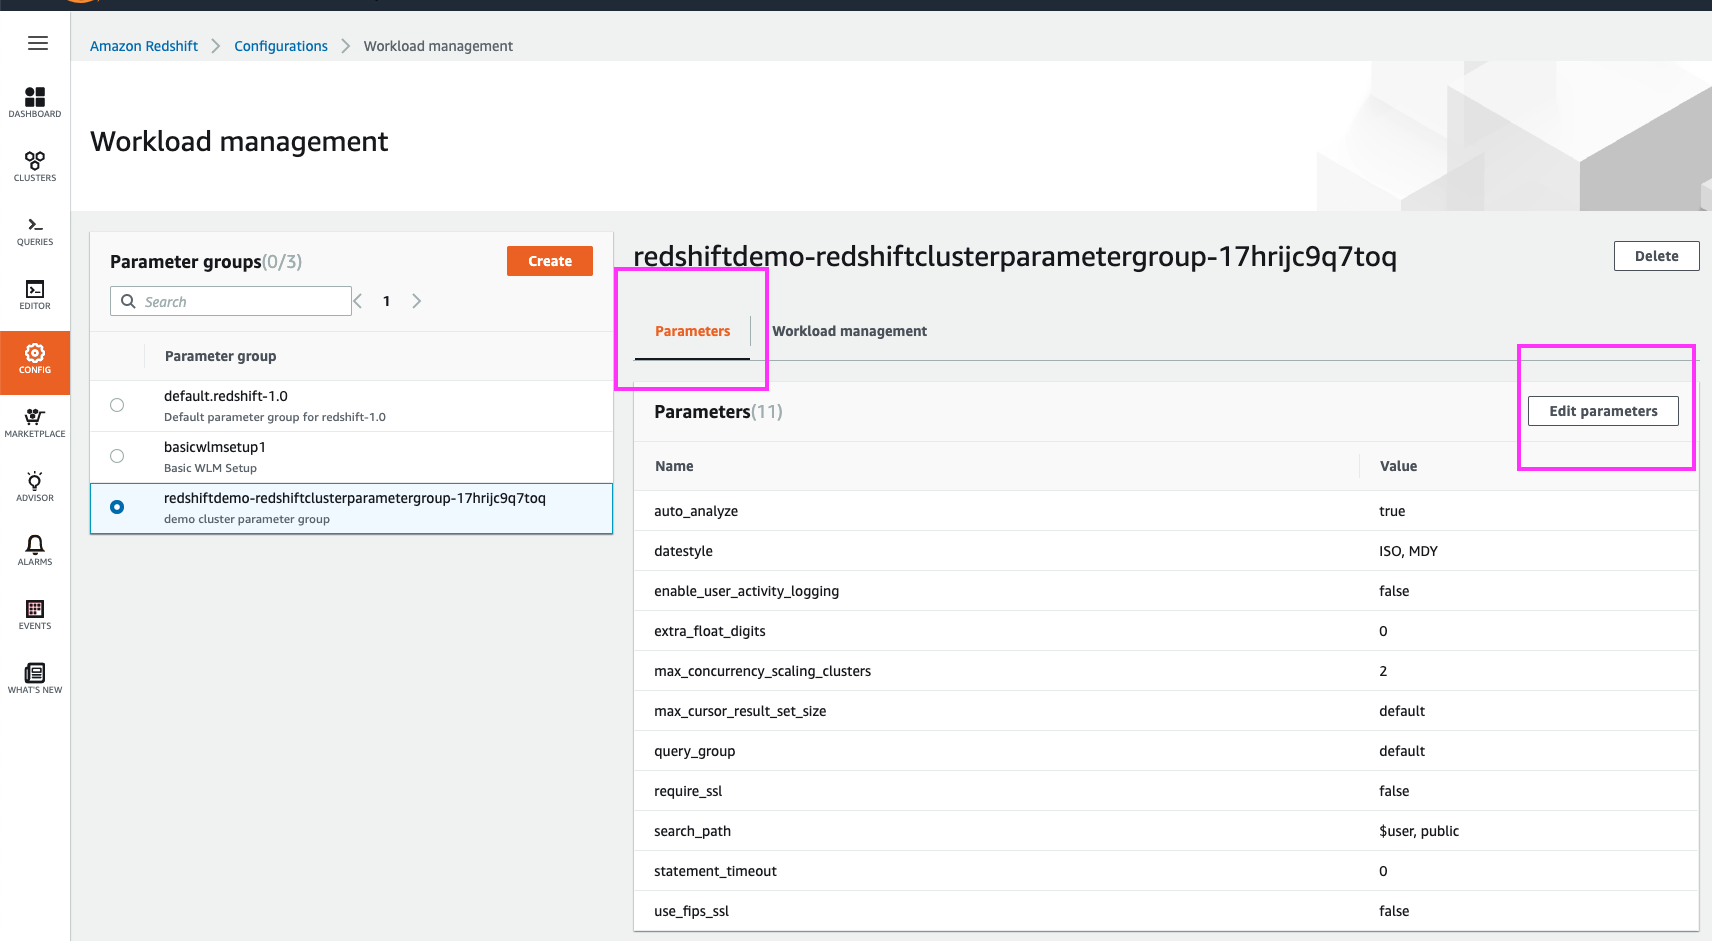
Selecting the WLM config in use by our cluster shows us the details of that WLM profile.
Note that the WLM configs can be used by multiple clusters, and that is why they are not associated with any specific clusters on this splash page. As we will see in a moment, however, the ‘Parameters’ section of this page does present us with a list of associated clusters | Click on the radio button corresponding to the WLM config in use by the demo cluster (redshiftdemo-redshiftclusterparametergroup-XXXXXXXXXXXXX) |

|
|
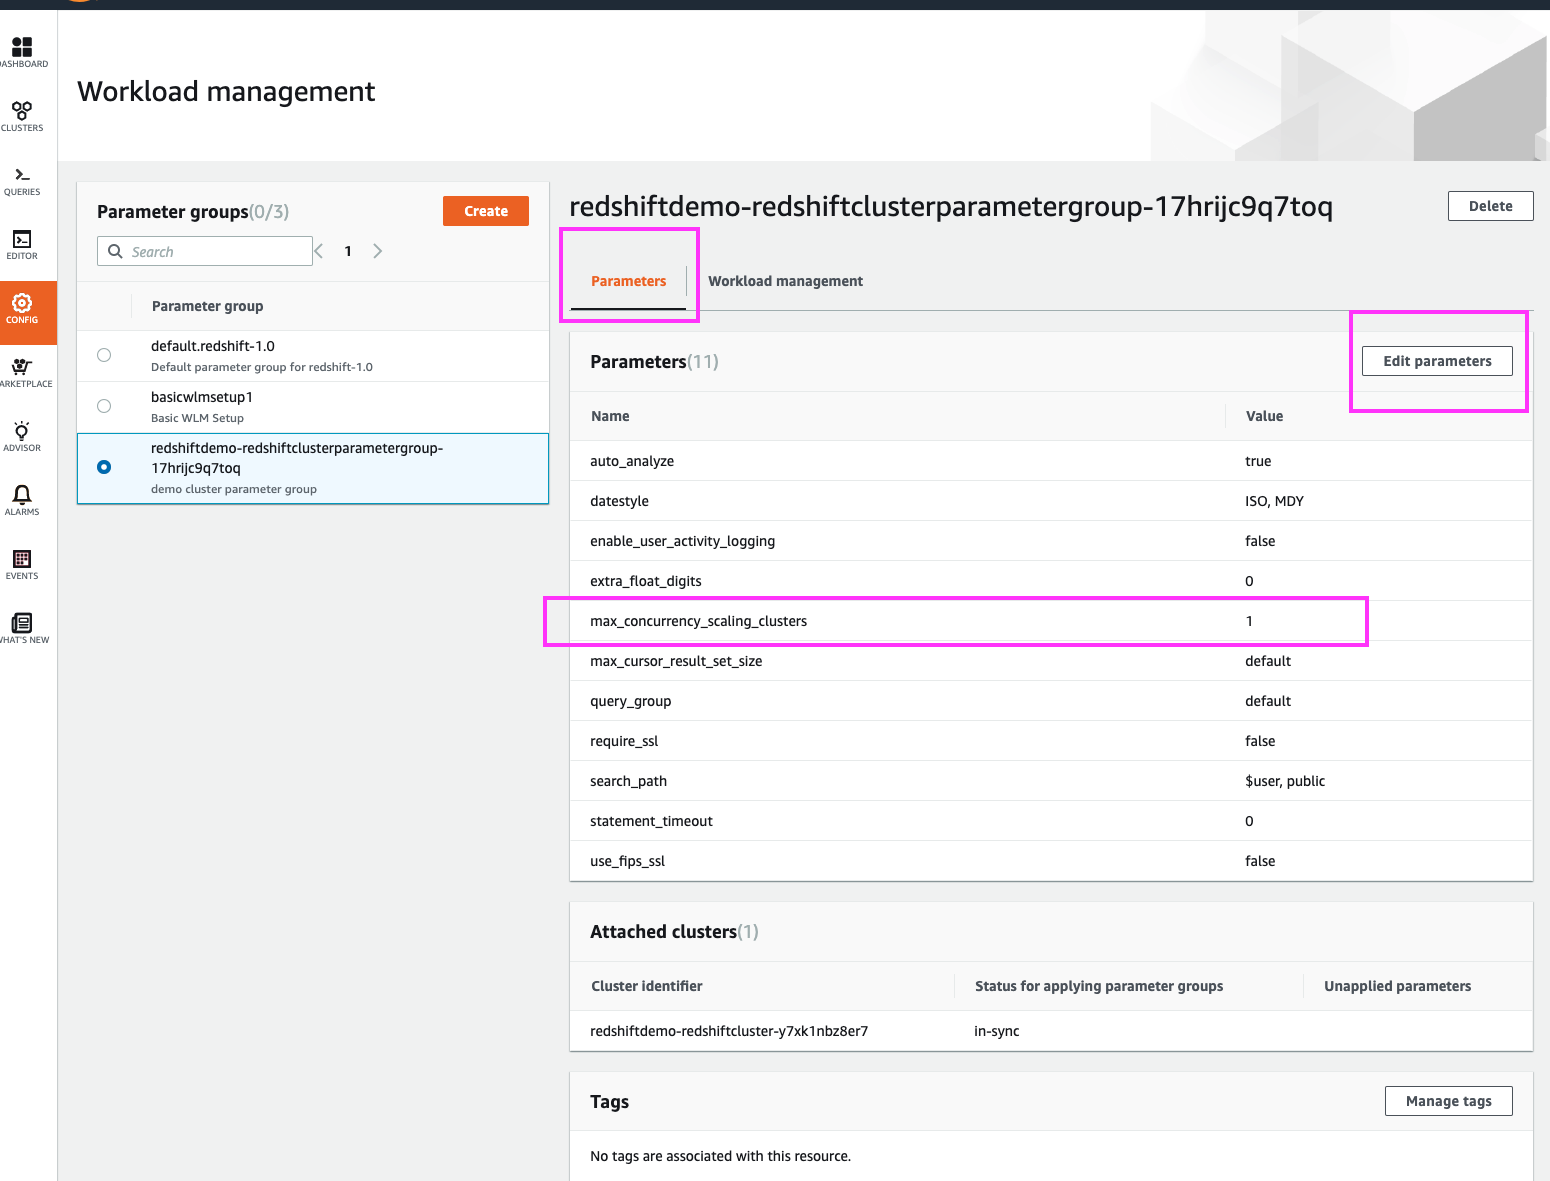
WLM profiles have two sections – global parameters section, and a WLM-queues sections.
Concurrency Scaling is a queue-specific feature, but the maximum number of concurrency scaling clusters that can be engaged is set in the global parameters section. Let’s modify the latter first |
Click on Parameters in the top menu, and highlight the ‘max_concurrency_scaling_clusters’ parameter.
Click the ‘Edit parameters’ button |
|
|
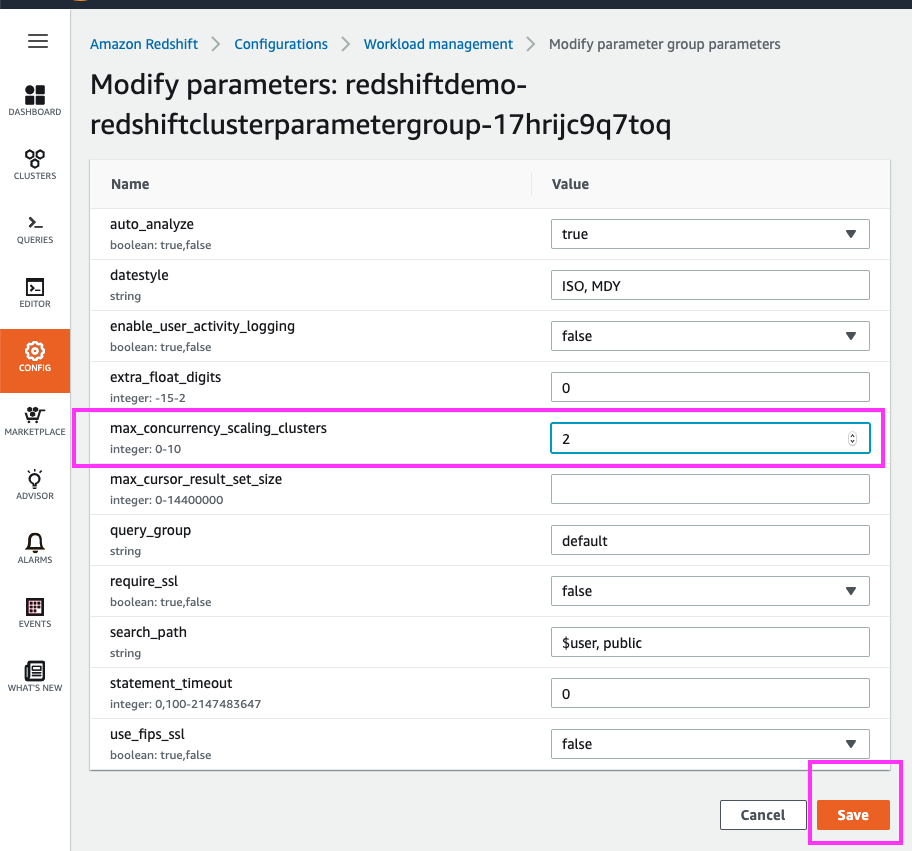
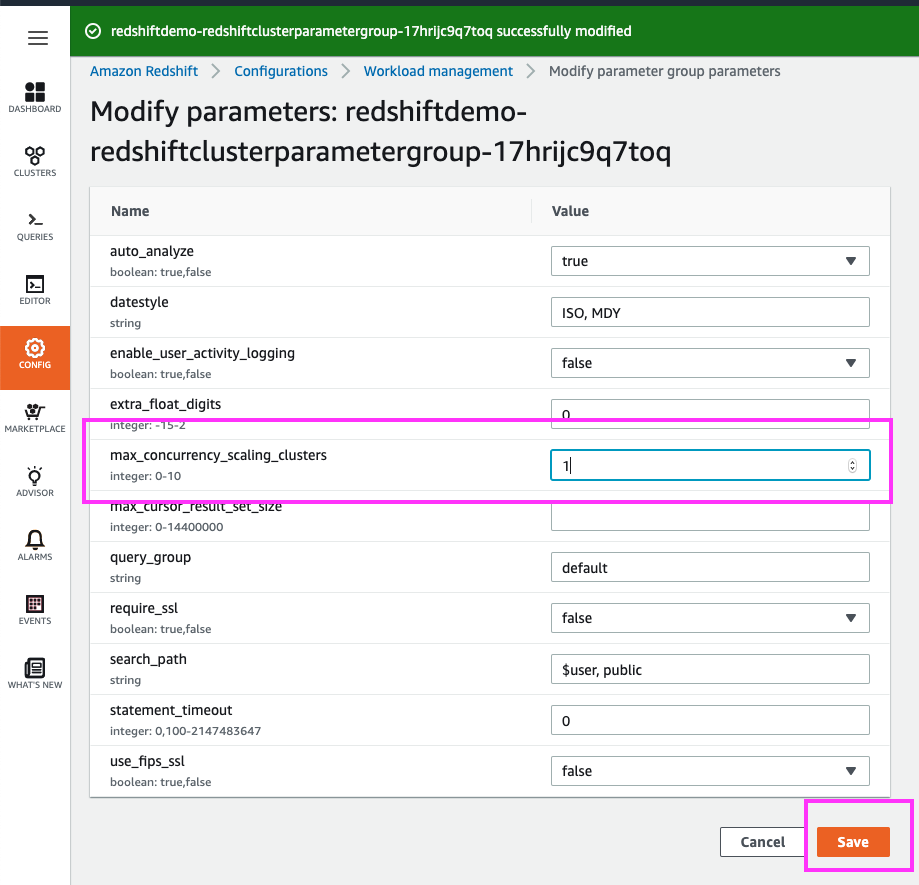
We can engage up to 10 additional Concurrency Scaling clusters, which is equivalent to 10x the number of nodes in our main cluster.
For this exercise, let’s change the maximum number of concurrency scaling clusters that can be engaged from 1 to 2. | Change the ‘max_concurrency_scaling_clusters’ parameter from a value of 1 to 2. Leave everything else unchanged and click the ‘Save’ button |
|
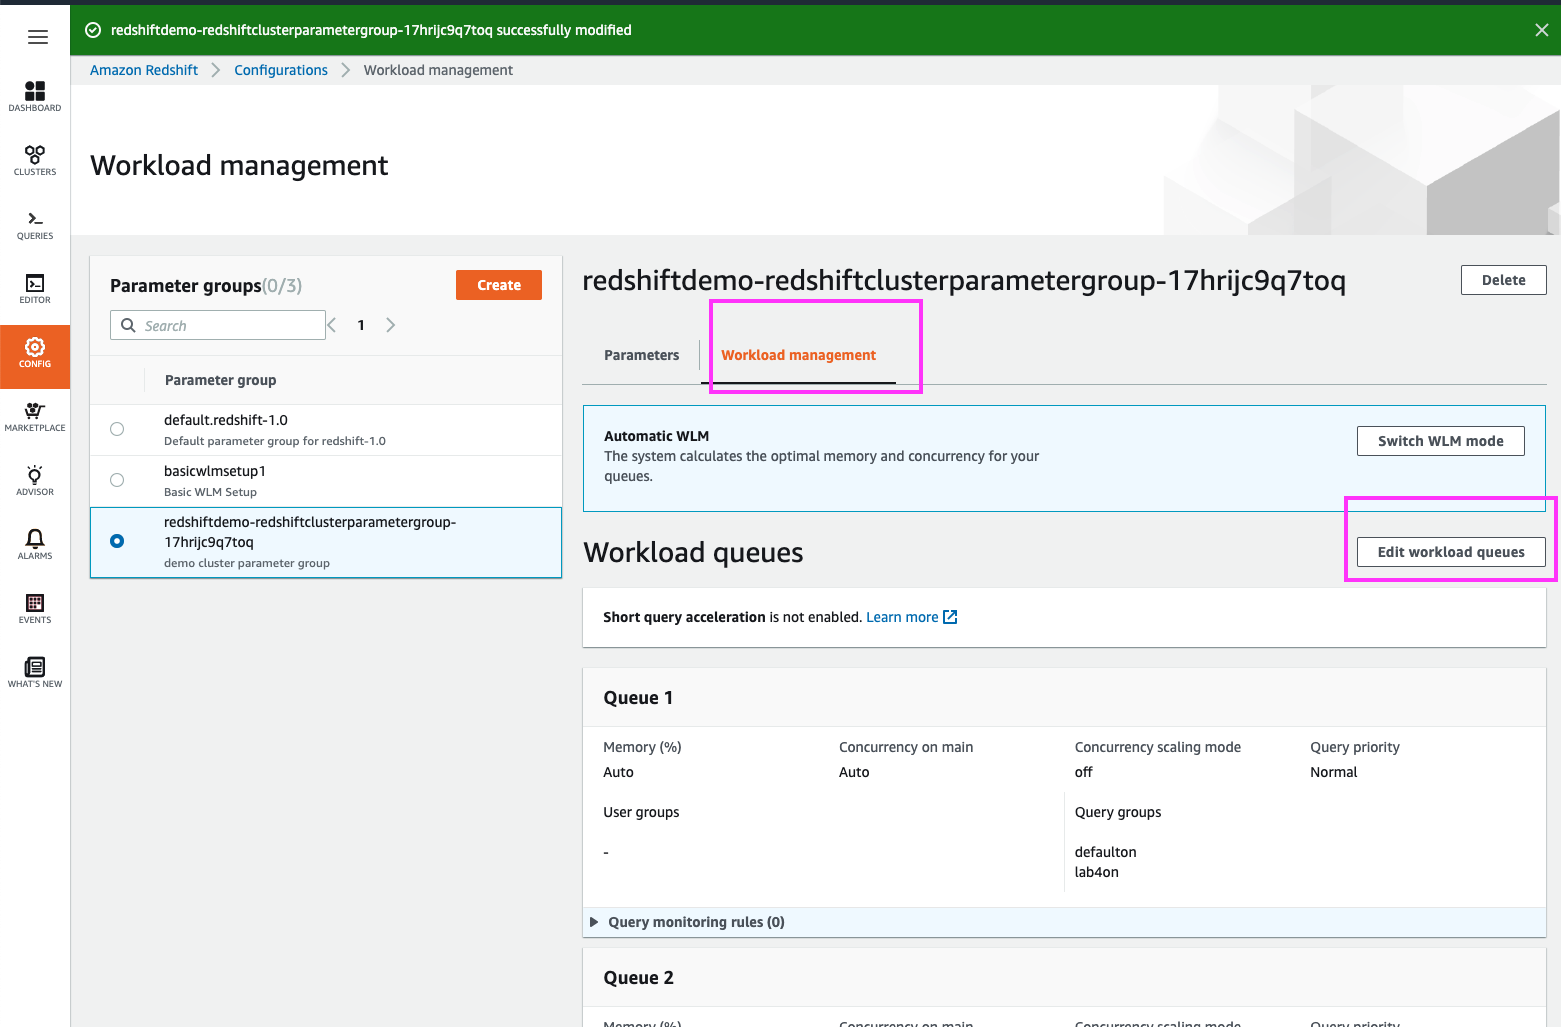
| Now, let’s enable Concurrency Scaling for our BI user queue | Click the ‘Edit workload queues’ button |
|
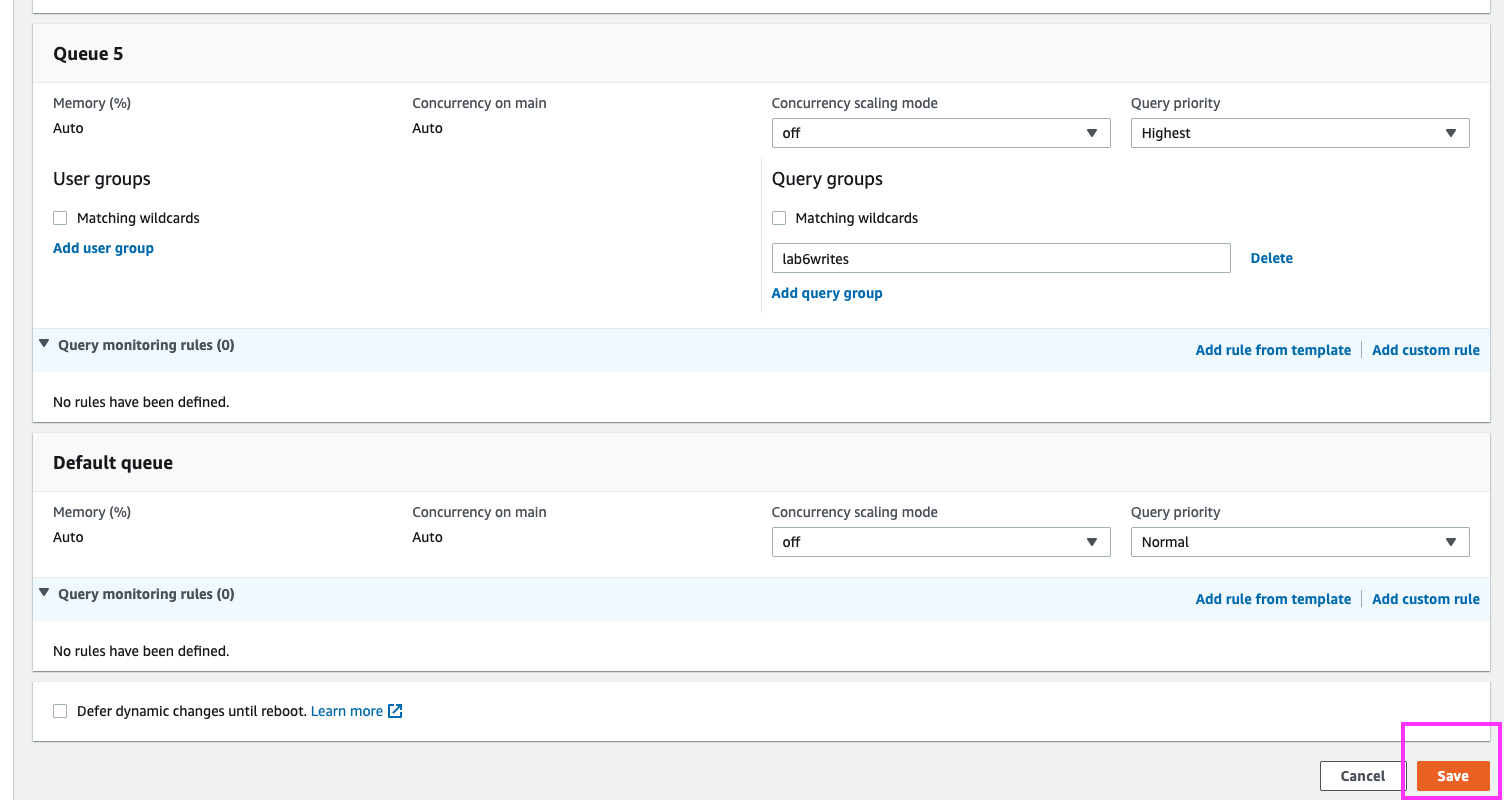
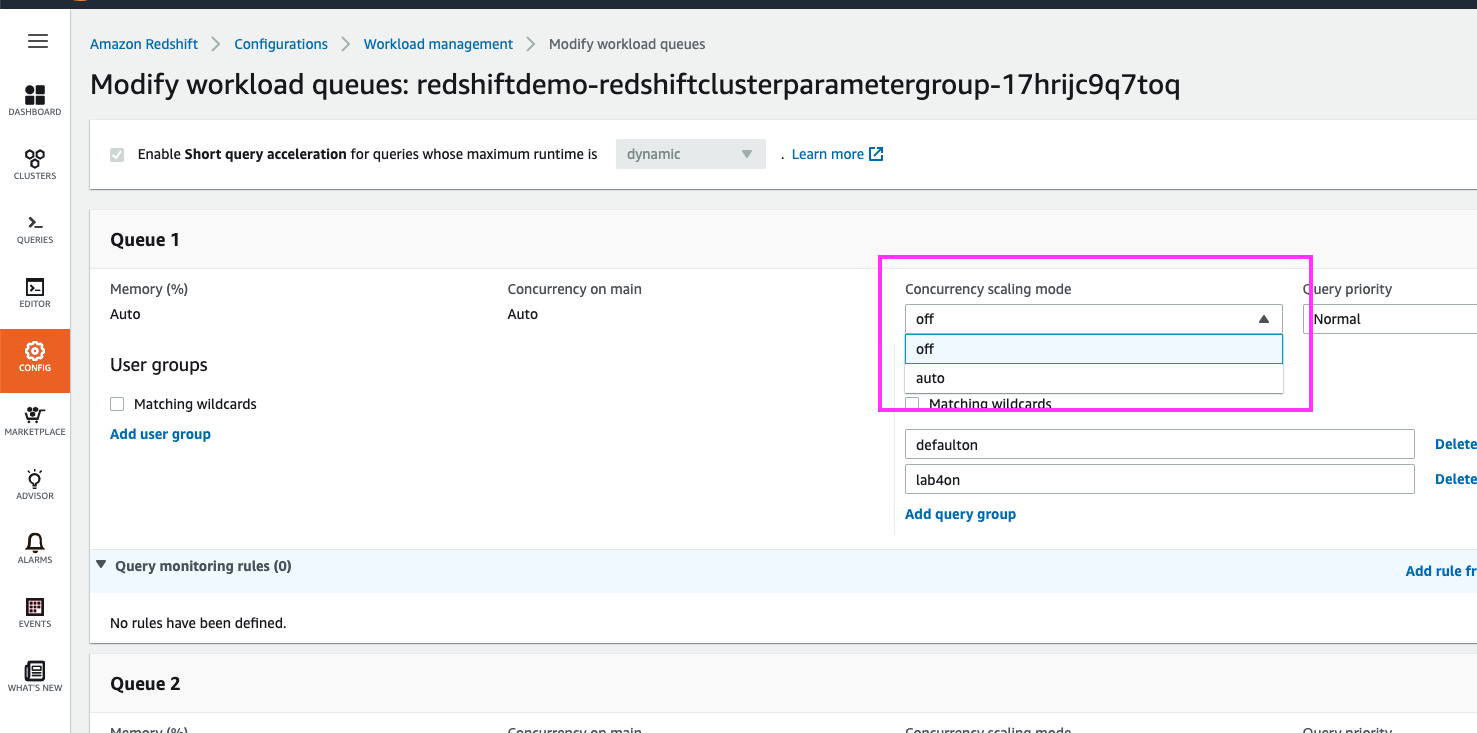
| Switching the ‘Concurrency Scaling mode’ from ‘off’ to ‘auto’ for Queue 1 will enable Concurrency Scaling specifically for this queue |
Click on the ‘Concurrency scaling mode’ drop-down and select ‘auto’.
Click on the ‘Save’ button at the bottom of the page |

|
|
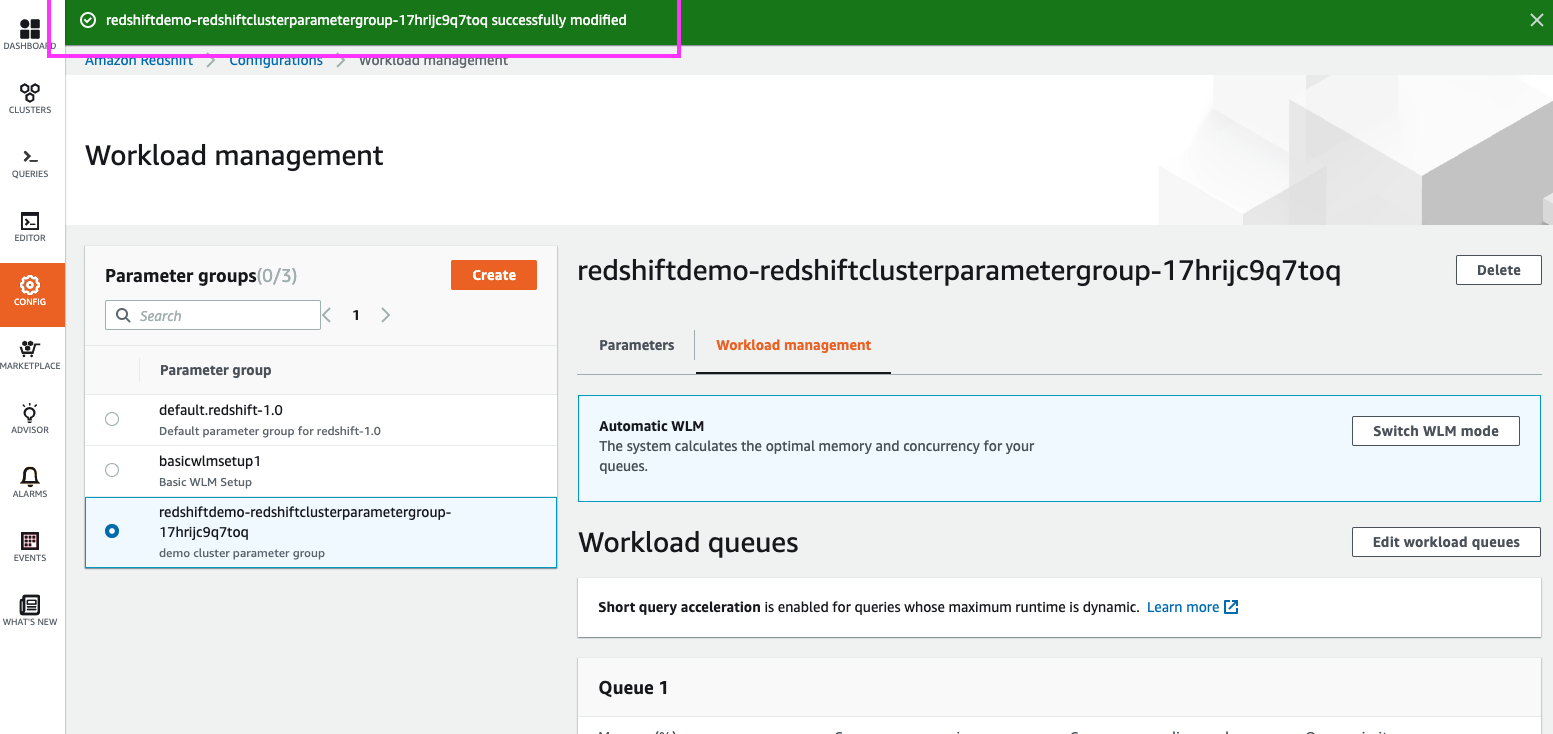
A message at the top confirms our WLM changes, but some WLM changes require a cluster restart to take effect
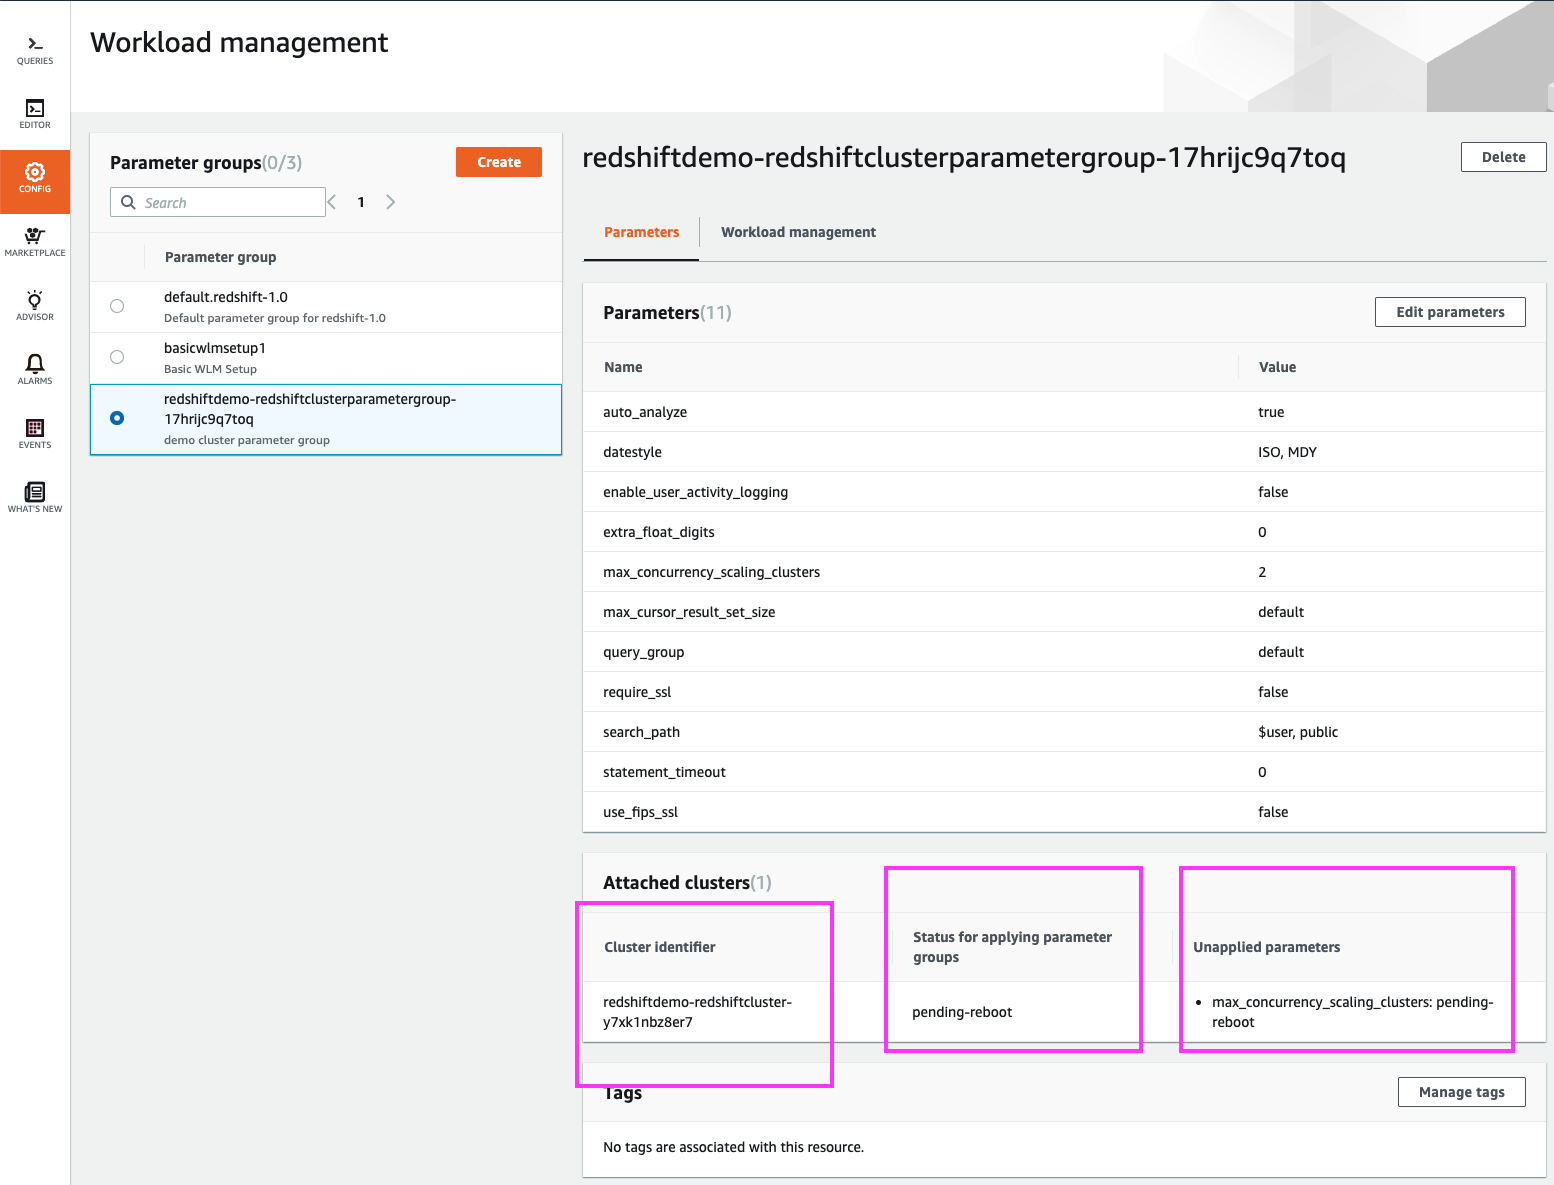
If we switch back to the ‘Parameters’ section, we can see that our changes are pending a cluster restart |
Using your mouse cursor, highlight the green message at the top indicating the WLM profile was modified.
Click on the ‘Parameters’ link in the top menu, and highlight the ‘pending-reboot’ section for our cluster along with the parameters that have not yet been applied. |
|
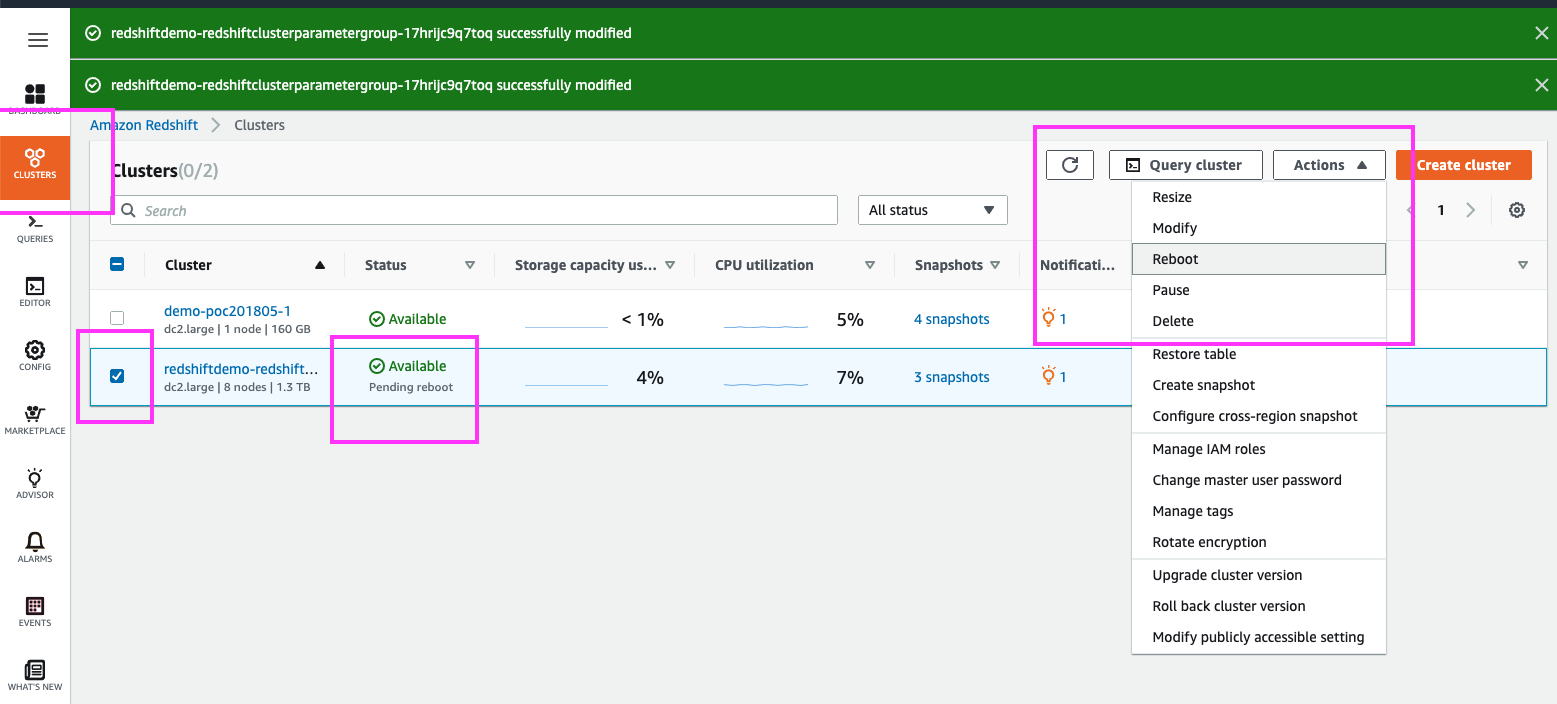
| Switching back to the Cluster page, we can simply select our cluster and reboot from the Action menu |
Click on ‘Clusters’ in the left panel
Select the checkbox next to the demo cluster Use your mouse cursor to highlight that the cluster has a ‘Pending reboot’ status Select Reboot from the Actions menu at the top |
|
|
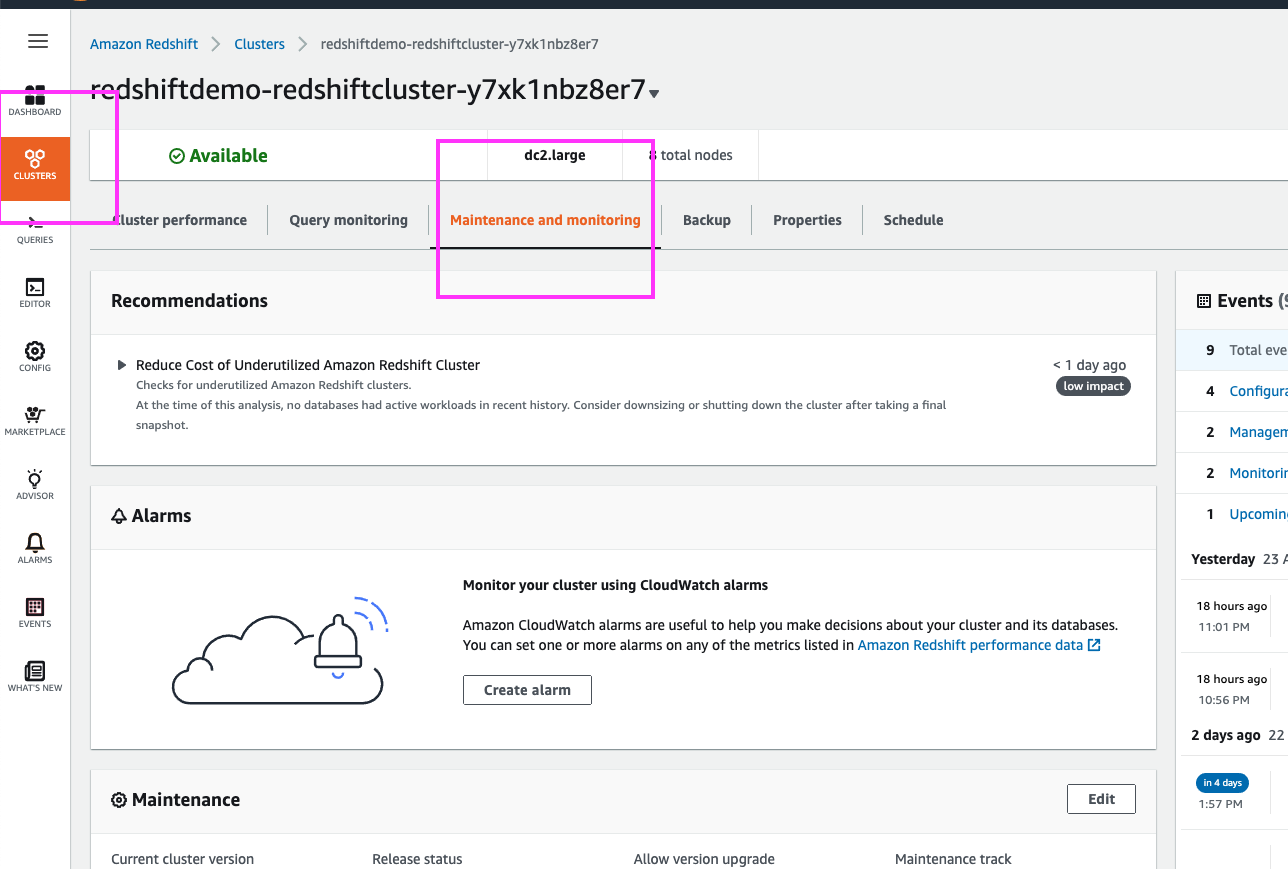
Now that we have enabled Concurrency Scaling, Joe would like to establish a usage limit that ensures Concurrency Scaling usage will not exceed the free tier of 30 hrs per month
To start, let’s go to the ‘Maintenance and Monitoring’ section in the cluster’s dashboard |
Click on ‘Clusters’ in the left panel
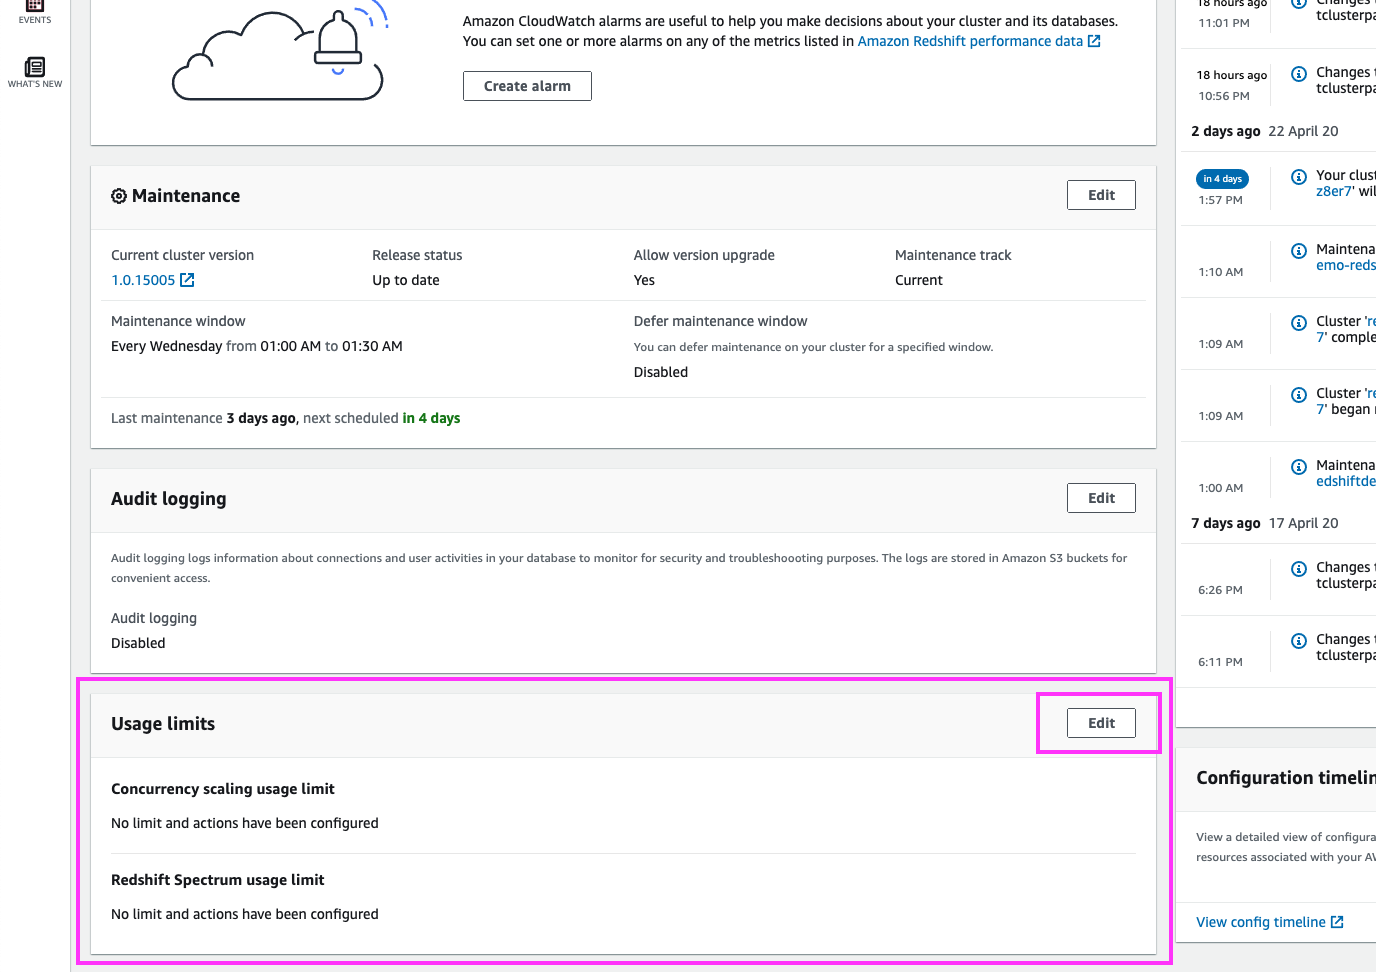
Click on ‘Maintenance and Monitoring’ in the top menu Scroll down and highlight with your mouse cursor the ‘Usage Limits’ section. Click on the ‘Edit’ button |
|
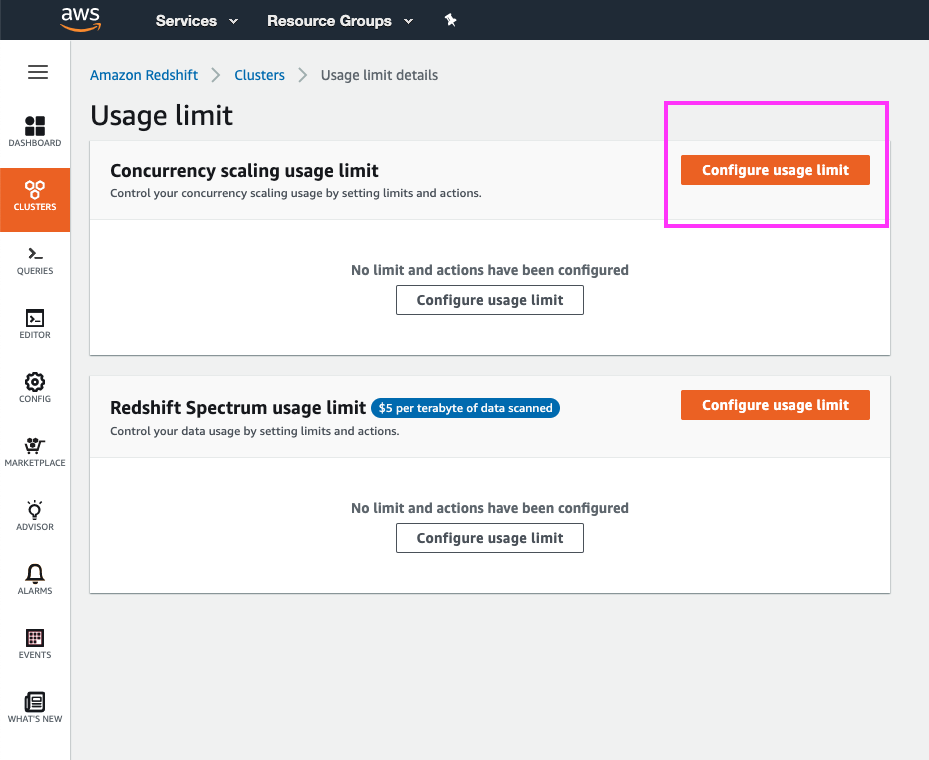
| In the ‘Usage Limit’ page, we can choose to create a usage limit for Concurrency Scaling or Redshift Spectrum usage |
Highlight the different types of usage limits that can be created
Click the ‘Configure usage limit’ button for Concurrency Scaling |
|
|
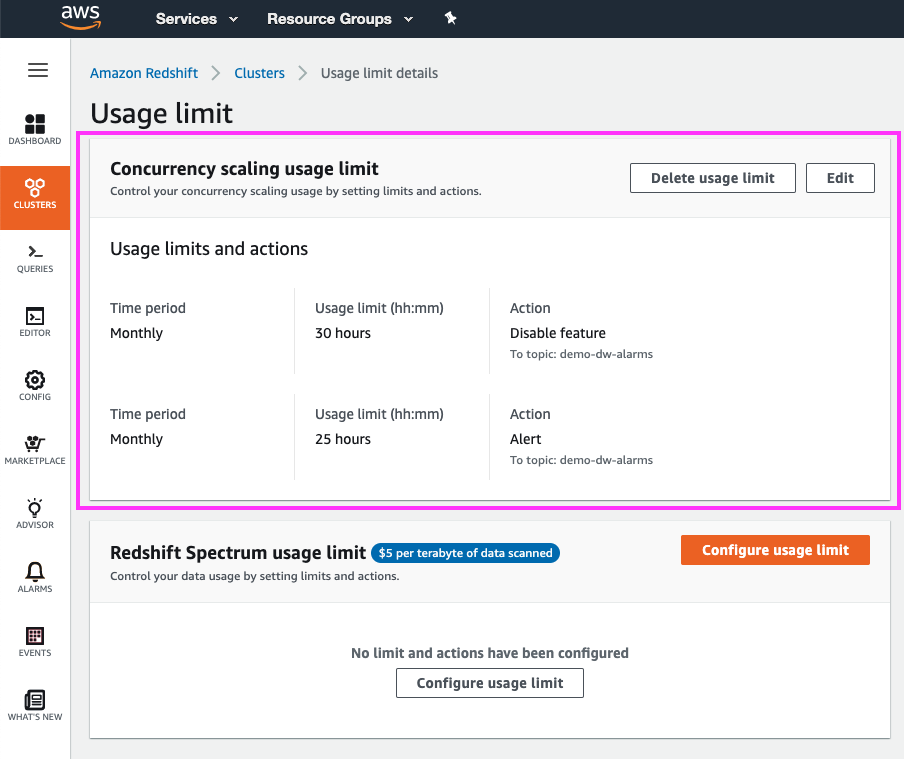
Since we are only interested in capping Concurrency Scaling usage to the free tier, we will setup a monthly usage limit that issues an SNS notification and disables Concurrency Scaling when 30 hours of usage is reached
We will also setup a usage limit to give Joe a heads-up SNS notification when concurrency scaling usage is approaching that 30 hr limit, say at 25 hrs of usage |
For the first limit (heads-up notification), use the following values
Click the ‘Add another limit and action’ button For the second limit (disable concurrency scaling), use the following values
Click the ‘Configure’ button |

|
| In the ‘Configure Usage Limit’, we can now see our usage limits in effect for Concurrency Scaling | Highlight with the mouse cursor the Concurrency Scaling usage limits in effect |
|
Before you Leave
| Say | Do | Show |
|---|---|---|
| Resize the cluster back to original number of nodes |
Go back to the resize screen by clicking on ‘Clusters’ in the left panel, clicking the demo cluster’s name, the ‘Properties link at the top, and then finally the ‘Resize’ button
Click on the ‘Resize’ button. Select ‘Elastic Resize’; select ‘4’ nodes from the drop-down and leave everything else with the default value. Click the ‘Resize now’ button |
|
| Delete the Scheduled Resize Event |
Select ‘Clusters’ from the left panel, and then click on the demo cluster, and select the ‘Schedule’ link at the top
Select the radio button for the scale-up scheduled event (named ‘scaled-down-weekend-config-up’) and click the ‘Delete’ button Select the radio button for the scale-down scheduled event (named ‘scaled-down-weekend-config-down’) and click the ‘Delete’ button |
|
| Disable Concurrency Scaling |
Click on ‘Config’ in the left panel and select ‘Workload Management’ from the submenu
Select the radio button for the ‘redshiftdemo-redshiftclusterparametergroup-XXXXXXXXXXXXX’ parameter group and then click the ‘Edit workload queues’ button Change the ‘Concurrency scaling mode’ for Queue 1 to ‘off’ and click the ‘Save’ button at the end of the page Now click on the ‘Parameters’ link at the top and then click on the ‘Edit parameters’ button Change the ‘max_concurrency_scaling_clusters’ value to ‘1’ and click the ‘Save button at the bottom of the page |
|
If you are done using your cluster, please think about deleting the CFN stack or to avoid having to pay for unused resources do these tasks:
- pause your Redshift Cluster
- stop the Oracle database
- stop the DMS task