Federation with Okta
Demo Video
Coming Soon!
This demo will use a browser to access the AWS and Okta Consoles. You will also need to a SQL Client configured.
Before you Begin
Ensure you have access to the AWS Console and an existing Redshift cluster with permissions to modify it. Capture the following parameters from the launched CloudFormation template as you will use them in the demo.
https://console.aws.amazon.com/cloudformation/home?region=us-east-1#/stacks?filteringText=&filteringStatus=active&viewNested=true&hideStacks=false
- RedshiftClusterEndpoint
- RedshiftClusterPort
- RedshiftClusterDatabase
- RedshiftClusterPassword
- RedshiftClusterUser
Challenge
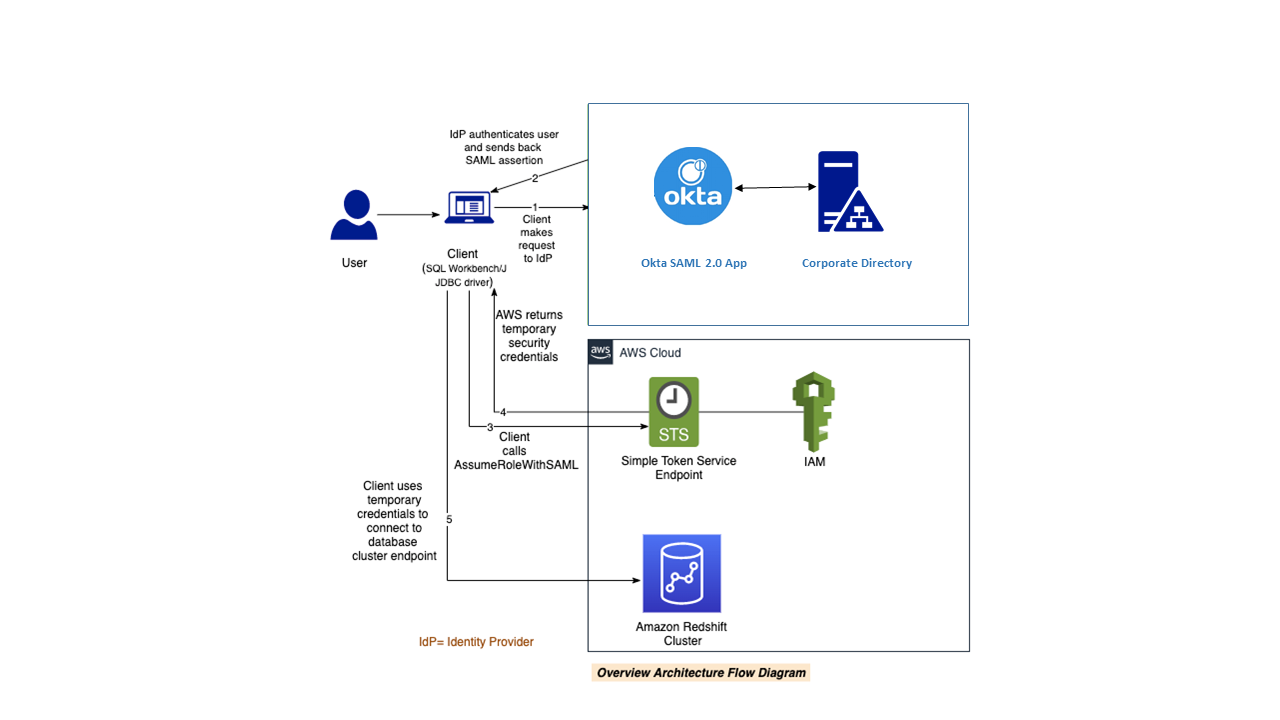
Rachel has been tasked to enable federated single sign-on with multi-factor authentication (MFA) for Redshift users using the existing corporate directory in OKTA. This will provide secure sign-on capabilities for the users without requiring an additional login and password for Redshift. Users will be able to login using their existing enterprise credentials, while the MFA capability will add an extra layer of protection. This is also a good Information Security best practice that helps centralize management and governance of permissions, access, identity and authentication for the users at Red Imports LLC. To accomplish this, she will perform the following tasks:
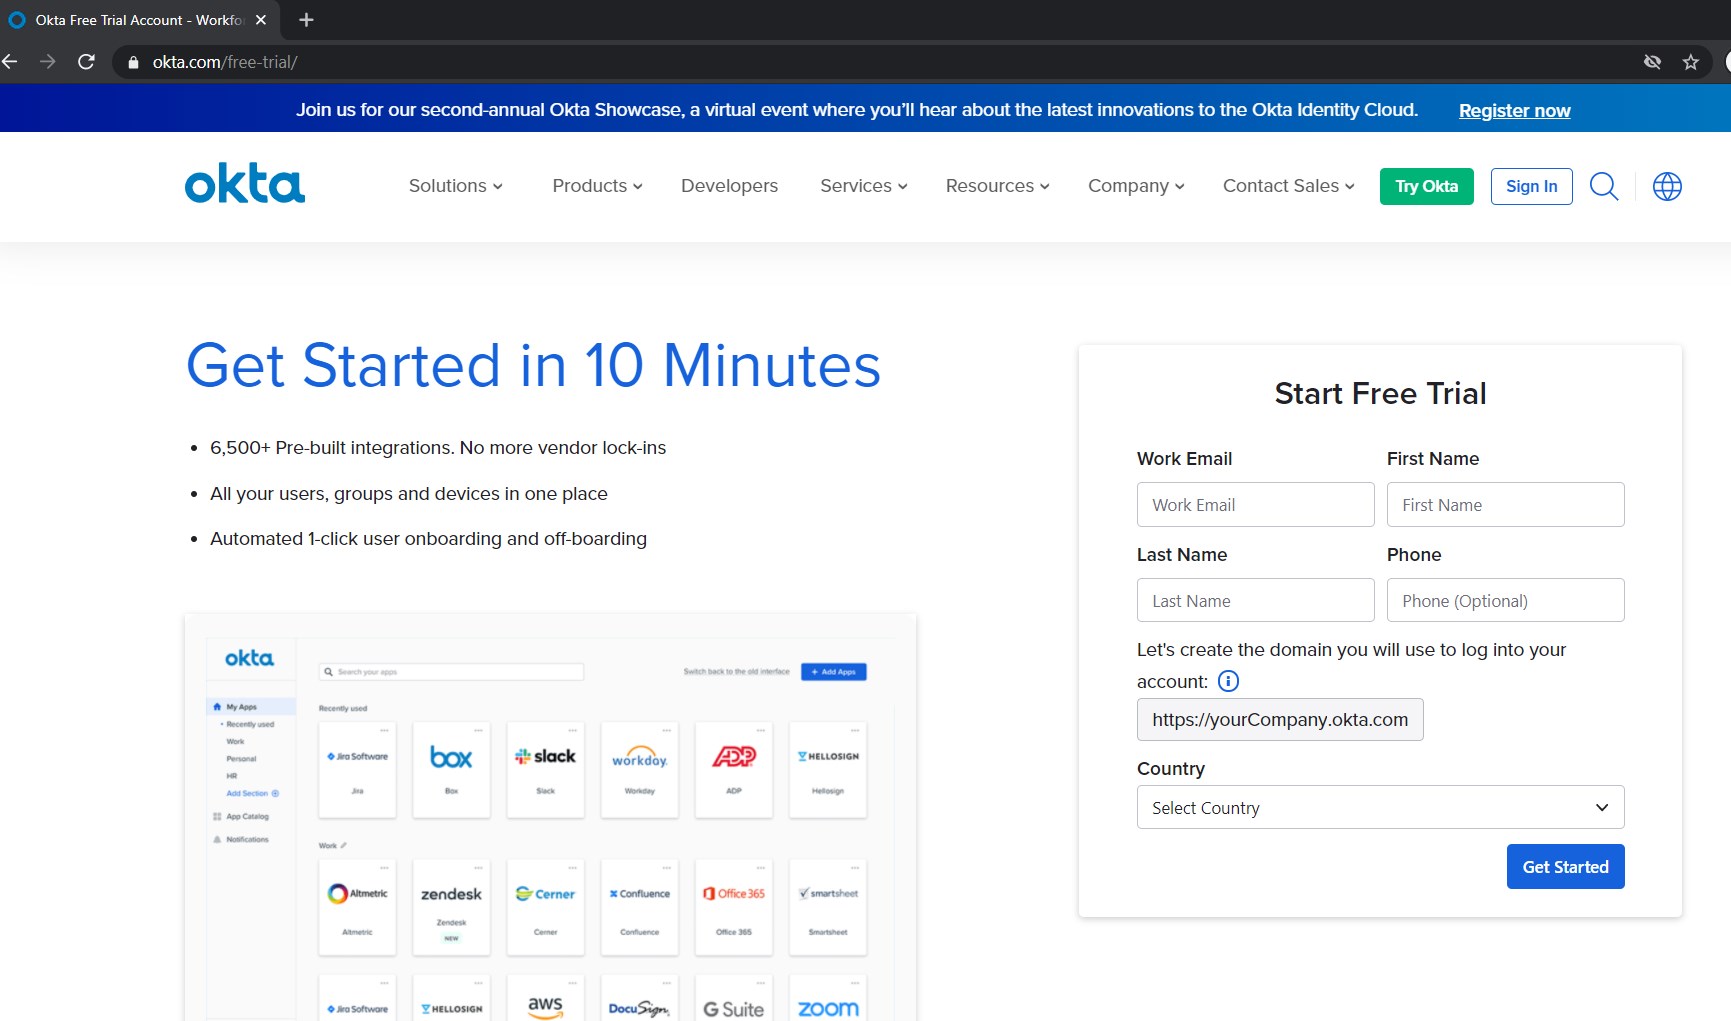
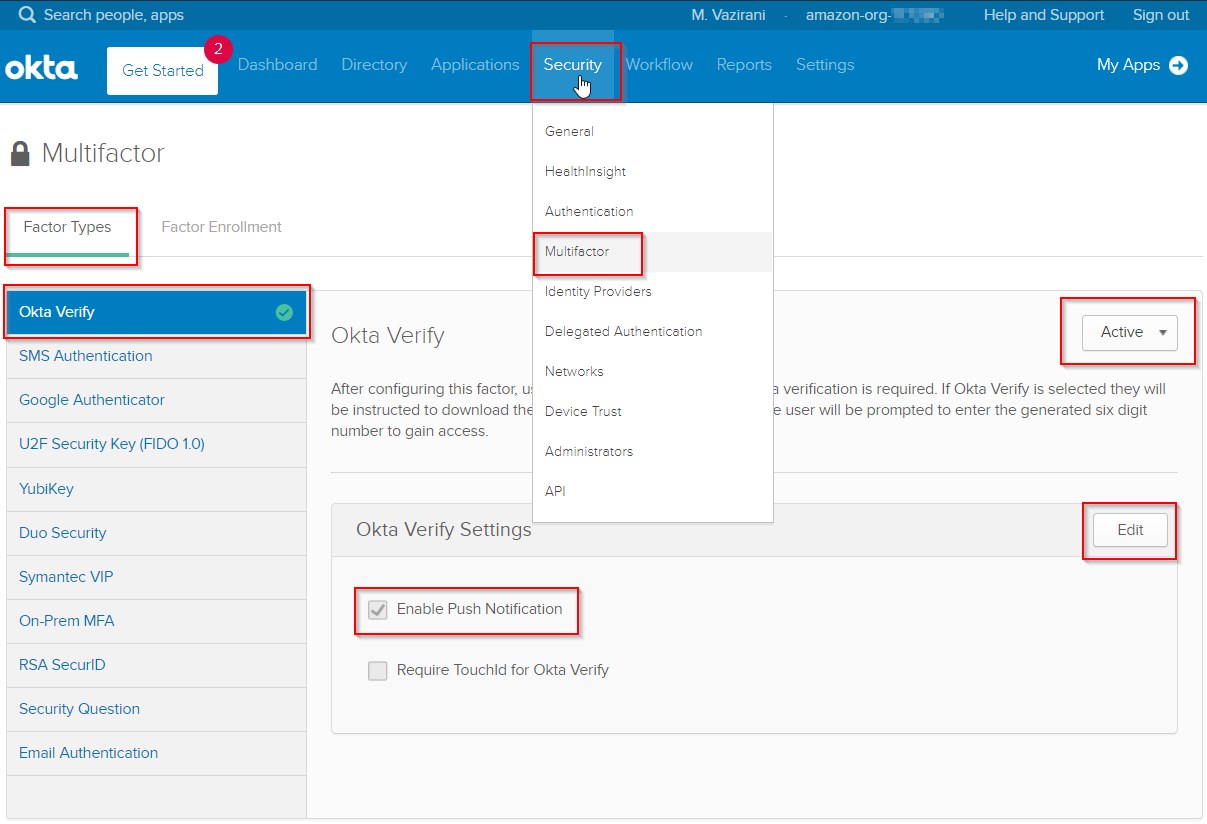
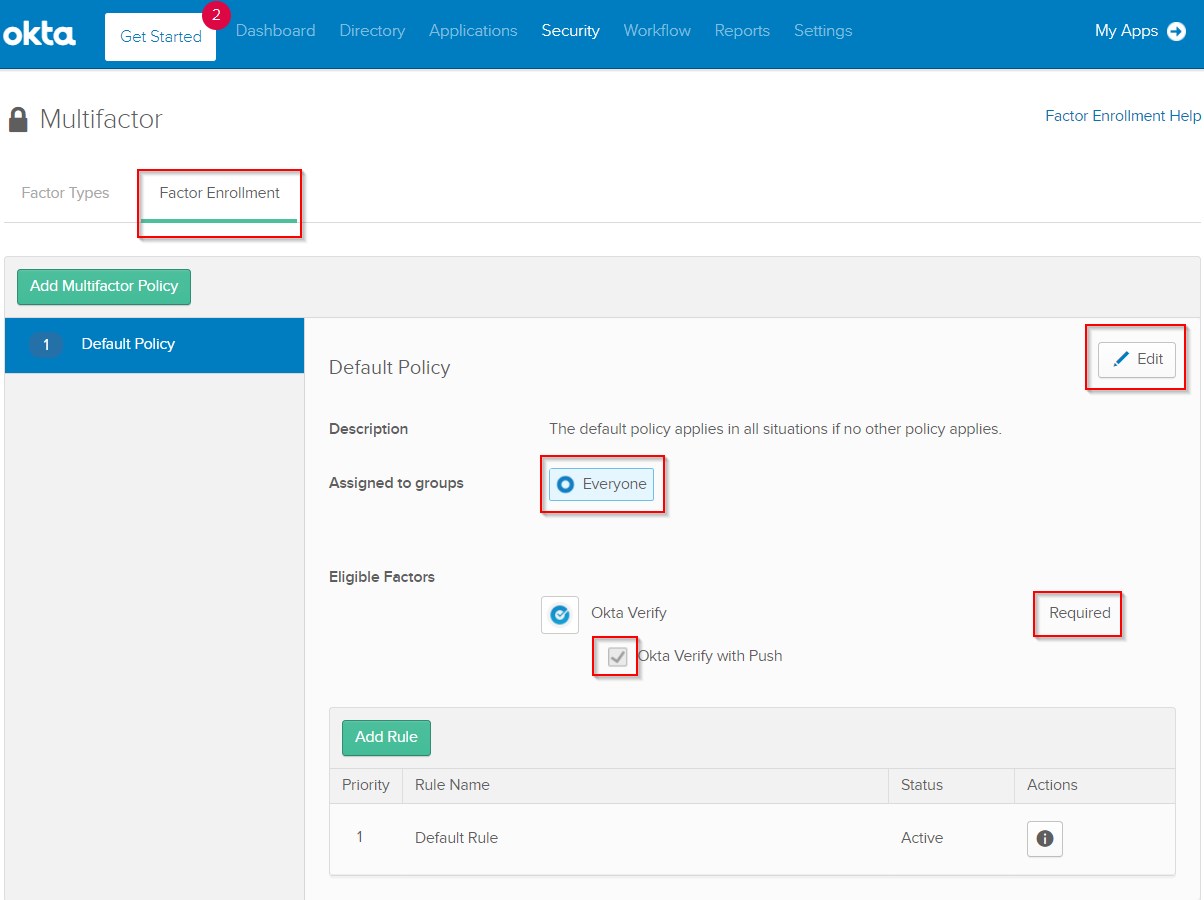
Okta Account and MFA setup
Okta Directory Groups and Users setup
| Say | Do | Show |
|
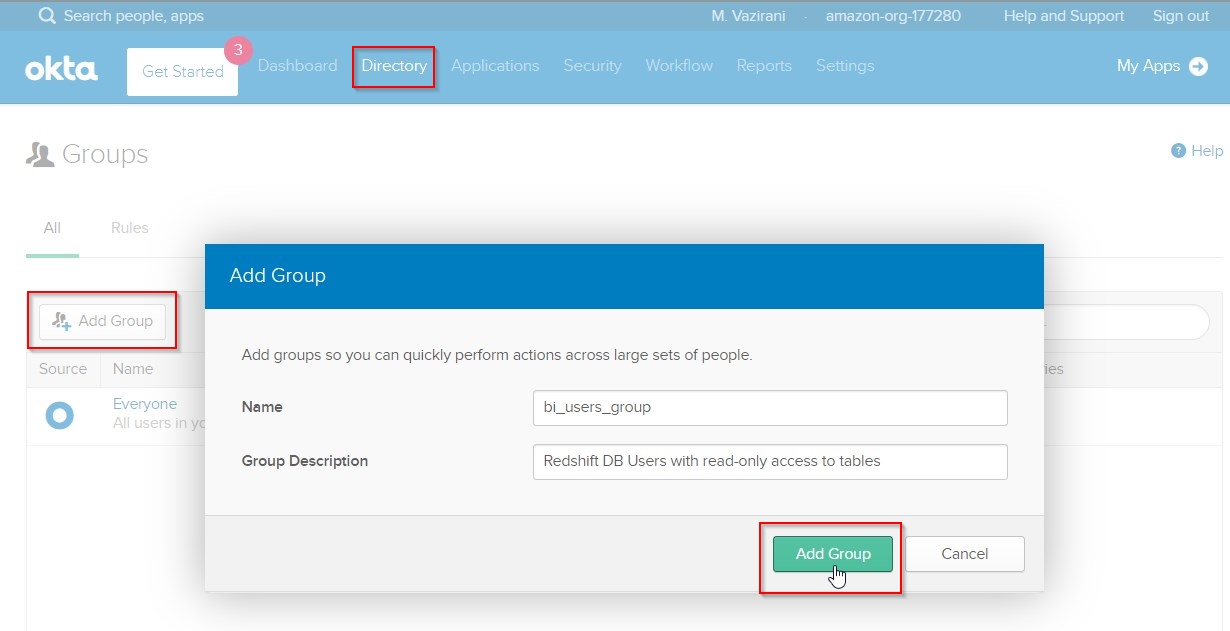
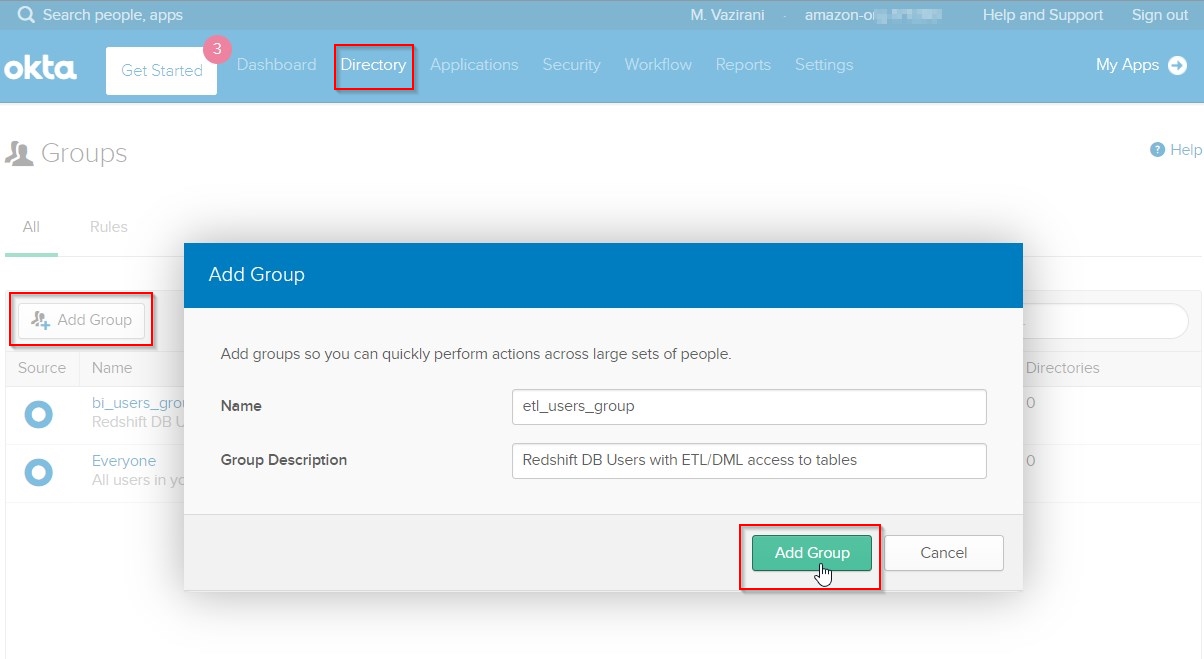
Create Directory Groups in Okta. For this demo, Rachel will be creating 2 groups of Redshift database users - one for BI users with only readonly access, and second for ETL users with read+write access to Redshift tables.
|
In the Admin Okta Portal, perform following steps:
- Hover over
Directory menu tab and click on Groups.
- Click
Add Group button, enter details for a new bi_users_group and click Add Group button to save it, as shown.
- Repeat the same for adding a new
etl_users_group as shown.
|
|
|
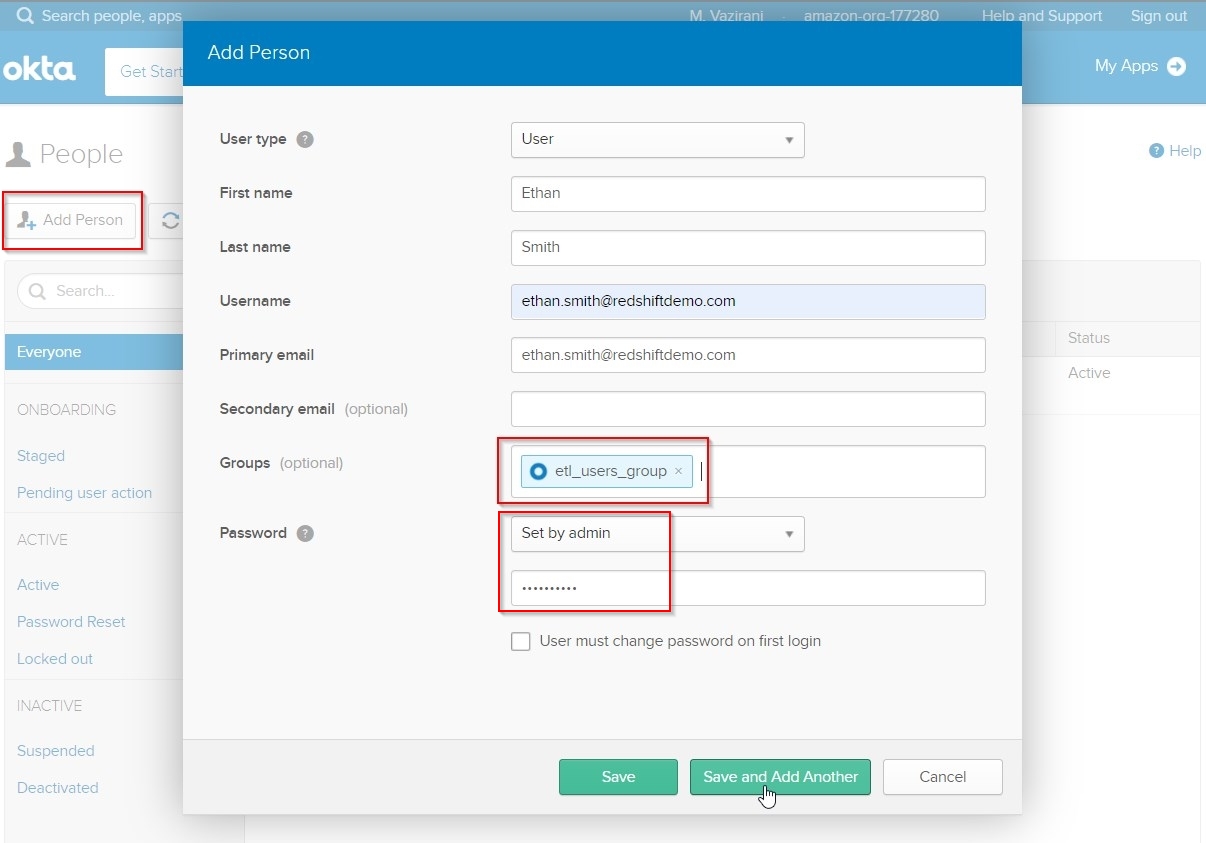
Create Directory Users in Okta. For this demo, Rachel will be creating 2 users - Beth, who is part of the BI group; and Ethan, who is part of the ETL team.
|
In the Admin Okta Portal, perform following steps:
- Hover over
Directory menu tab and click on People.
- Click
Add Person button, enter details for Ethan user mapped to etl_users_group, and enter an admin-assigned password, as shown.
- Repeat the same for adding
Beth user mapped to the bi_users_group Group as shown.
|

|
Okta SAML Application Configuration
| Say | Do | Show |
|
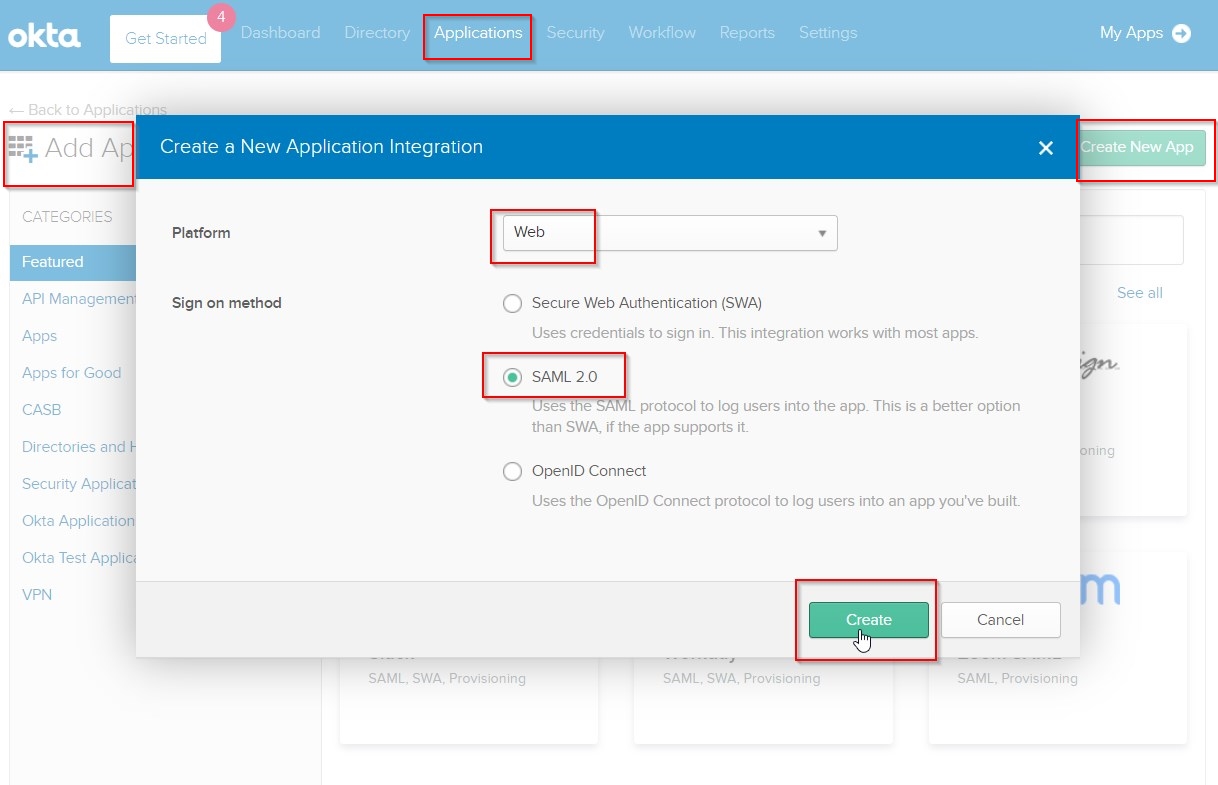
The next step is to setup a custom SAML 2.0 application in Okta for single sign-on with MFA to Amazon Redshift.
|
In the Admin Okta Portal, perform following steps:
- Click on
Applications menu tab, then click Add Application and Create New App button.
- Choose
Web as Platform, and SAML 2.0 as Sign-on method for the app. Click Create, as shown.
- Under
General Settings, give the app a Name like Amazon Redshift SSO with MFA and click Next.
|

|
|
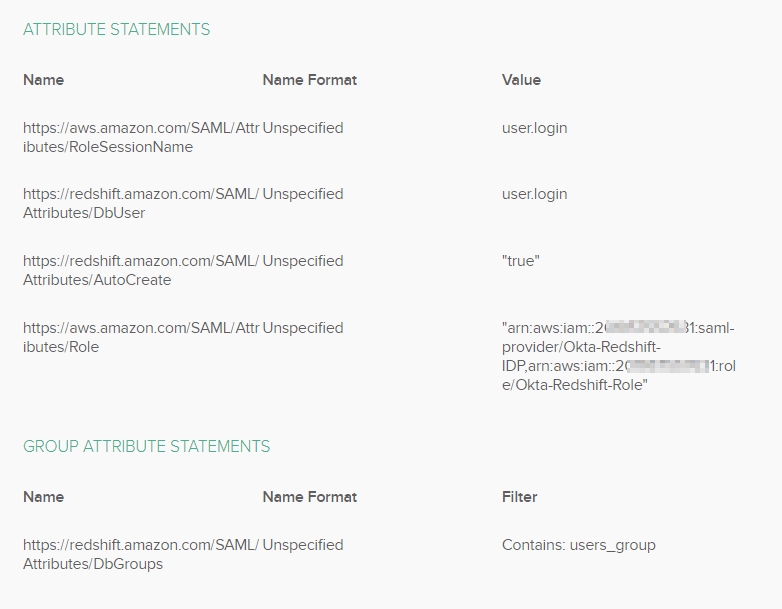
Next, Rachel will enter the SAML settings and custom SAML Attribute mappings.
|
- In the
Configure SAML –> SAML Settings , General section, set these properties as shown:
- Single sign on URL:
http://localhost:7890/redshift/
- Audience URI (SP Entity ID):
urn:amazon:webservices
- Name ID Format:
EmailAddress
- Scroll down and add the following custom Attribute and Group Attribute statements:
Attribute Statements:

https://aws.amazon.com/SAML/Attributes/Role   :   "arn:aws:iam::<<InfrastructureAccount>>:saml-provider/Okta-Redshift-IDP,arn:aws:iam::<<InfrastructureAccount>>:role/Okta-Redshift-Role"
https://aws.amazon.com/SAML/Attributes/RoleSessionName   :   user.login
https://redshift.amazon.com/SAML/Attributes/AutoCreate   :   "true"
https://redshift.amazon.com/SAML/Attributes/DbUser   :   user.login


Group Attribute Statements:
https://redshift.amazon.com/SAML/Attributes/DbGroups : Contains: users_group
-
Click on Next.
-
On the next screen, select the Okta Customer and Internal App options. Click on Finish, as shown.
|



|
|
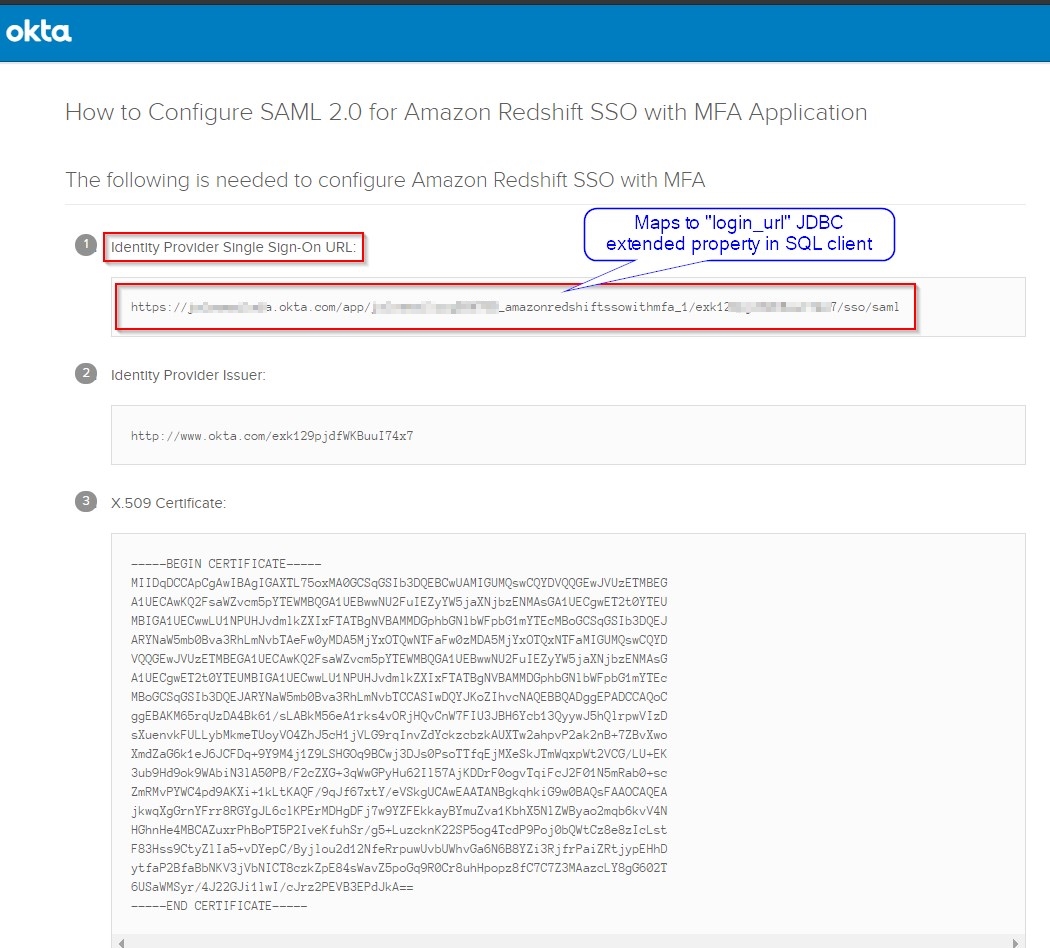
Next, Rachel will go into the applications’s SAML 2.0 setup instructions to copy the applications’s SSO URL, and save the iDP metadata XML.
|
In the Admin Okta Portal, perform following steps:
- Click on
Applications menu tab, then click on the Amazon Redshift SSO with MFA app you just created.
- Click on the
Sign On tab, and then click View Setup Instructions, as shown. This will open a new browser tab with setup instructions.
- Copy the SSO URL shown under
Identity Provider Single Sign-On URL:, as shown. Save this in a notepad for use later with the SQL client’s JDBC setup.
- Scroll down on to the last section on the same page. Copy the contents of the
Provide the following IDP metadata to your SP provider section and save that text as a local idp_metadata.xml file on your computer.
|


|
|
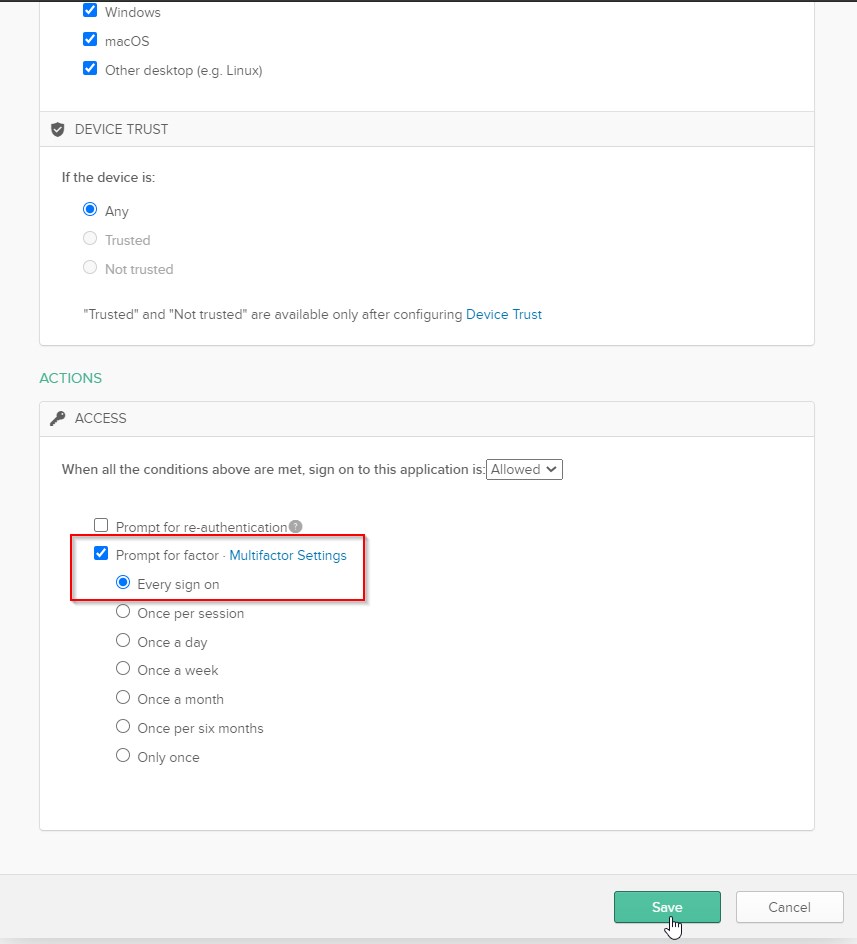
Next step is to add a Sign On Policy Rule to enforce MFA for logging in through this application.
|
- Go back to the
Sign On tab of the Amazon Redshift SSO with MFA app. Scroll down to Sign On Policy. Click on Add Rule as shown.
- Give this new rule a name like
Enable MFA for Redshift SSO.
- Then scroll down to
Actions section on same page, and enable Prompt for factor on Every sign on, as shown. This will make sure that users logging in to Redshift via this SAML app will first have to complete the two-factor MFA verification.
|


|
|
The final step that Rachel will take for this application setup is to assign it to the relevant Redshift database user groups.
|
In the Admin Okta Portal, perform following steps:
- Click on
Applications menu tab, then click on the Amazon Redshift SSO with MFA app you just created.
- Click on the
Assignments tab, and then click Assign dropdown, and click on Assign to Groups.
- Click on the
Assign button for the bi_users_group and etl_users_group groups, and then click on Done, as shown. This will allow all the users mapped to those 2 Redshift groups to have access to this SAML application.
|

|
AWS IAM SAML Federation Configuration
| Say | Do | Show |
|
Rachel will now create the IAM SAML Identity Provider and the IAM Role to be used by Okta’s SAML application. This will establish a trust relationship between the identity provider (Okta) and AWS.
|
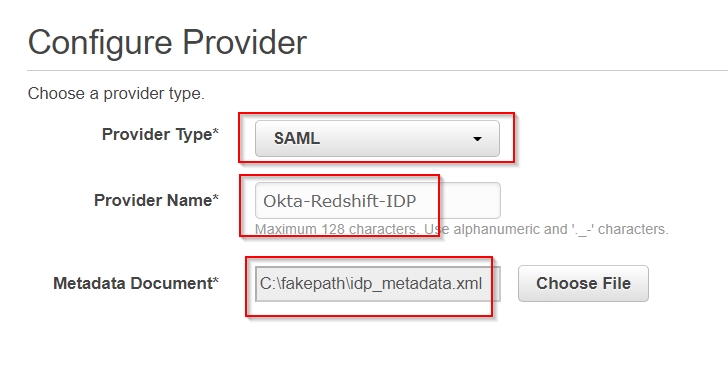
To create the SAML IAM identity provider:
- Go to the AWS Management console, sign in using your AWS credentials.
- Open the AWS Identity and Access Management (IAM).
- Choose
Identity providers.
- Click on
Create Provider.
- Choose
SAML for Provider Type.
- Choose the
idp_metadata.xml metadata xml file that you saved on your computer from the Okta portal’s SAML application’s setup instructions in an earlier step.
|

|
Next, Rachel will create the IAM Policy to attach to the IAM Role and IDP. Access privileges to Redshift and the database objects are controlled using this IAM Role and Policy. Please use the same Role name used to setup the application attributes in Okta: Okta-Redshift-Role
|
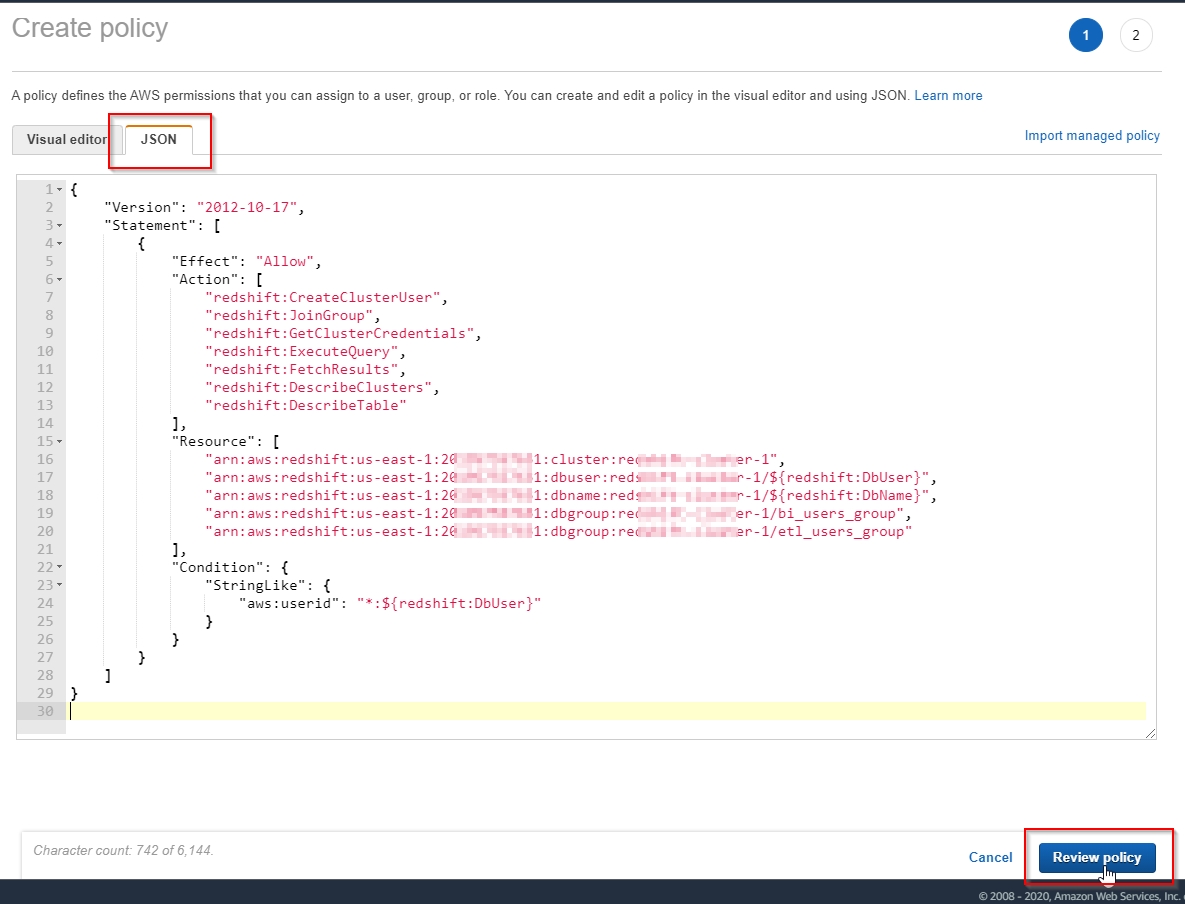
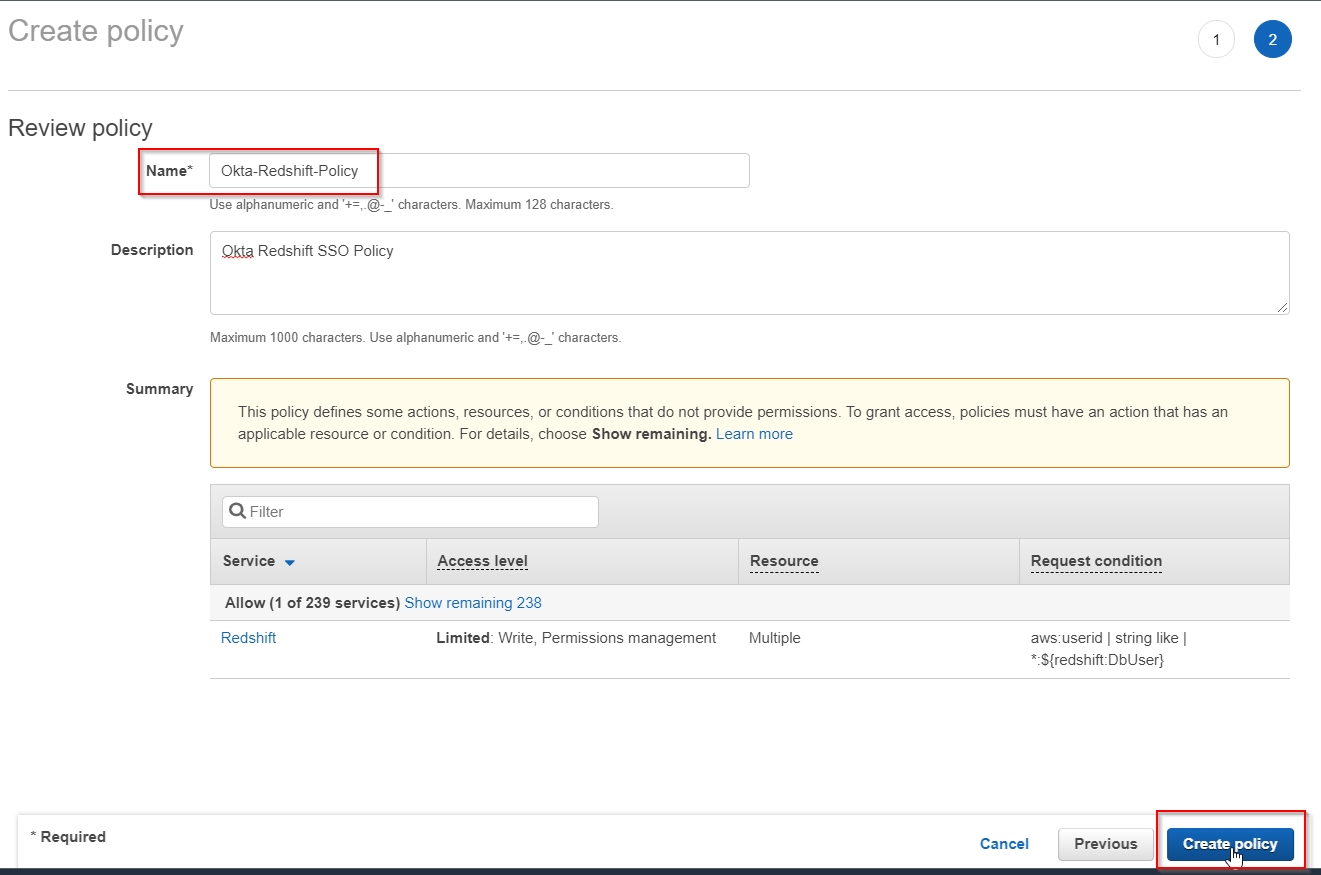
Create an IAM Policy with the appropriate Redshift privileges:
- In the AWS Identity and Access Management (IAM) console, choose “Policies” and click
Create policy, as shown.
- Click the JSON tab and use the JSON script below to create a new policy called
Okta-Redshift-Policy
Replace the tags in the JSON script below with the Output information you gathered earlier from Cloud Formation console before pasting the JSON.
{
    "Version": "2012-10-17",
    "Statement": [
        {
            "Effect": "Allow",
            "Action": [
                "redshift:CreateClusterUser",
                "redshift:JoinGroup",
                "redshift:GetClusterCredentials",
                "redshift:ExecuteQuery",
                "redshift:FetchResults",
                "redshift:DescribeClusters",
                "redshift:DescribeTable"
            ],
            "Resource": [
                "arn:aws:redshift:<your-region>:<<InfrastructureAccount>>:cluster:<<RedshiftClusterEndpoint>>",
                "arn:aws:redshift:<your-region>:<<InfrastructureAccount>>:dbuser:<<RedshiftClusterEndpoint>>/${redshift:DbUser}",
                "arn:aws:redshift:<your-region>:<<InfrastructureAccount>>:dbname:<<RedshiftClusterEndpoint>>/${redshift:DbName}",
                "arn:aws:redshift:<your-region>:<<InfrastructureAccount>>:dbgroup:<<RedshiftClusterEndpoint>>/bi_users_group",
                "arn:aws:redshift:<your-region>:<<InfrastructureAccount>>:dbgroup:<<RedshiftClusterEndpoint>>/etl_users_group"
            ],
            "Condition": {
                "StringLike": {
                    "aws:userid": "*:${redshift:DbUser}"
                }
            }
        }
    ]
}
|

|
Finally, Rachel will create the IAM Role and attach the Policy created earlier to this new Okta-Redshift-Role Role. This completes the AWS IAM SAML federation configuration.
|
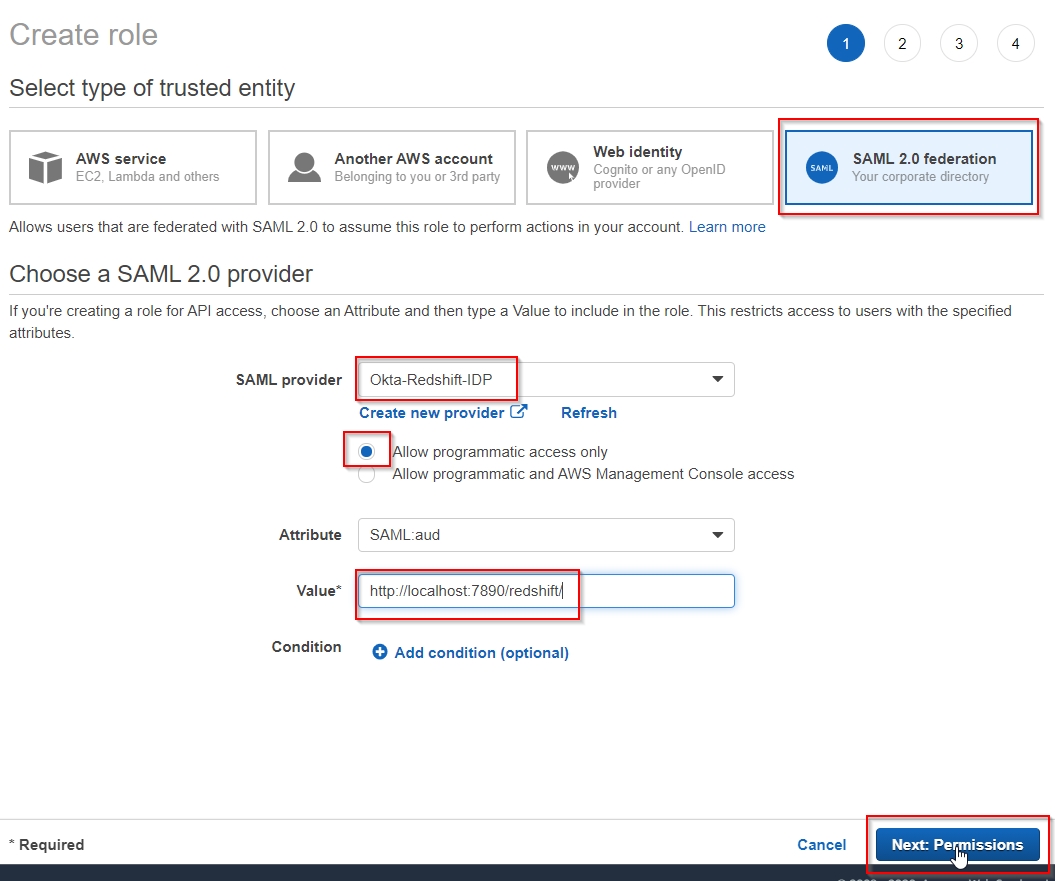
- In the AWS Identity and Access Management (IAM) console, choose
Roles and Create role, as shown.
- Create a
SAML 2.0 federation role by choosing the SAML provider Okta-Redshift-IDP you just created in the previous step.
- Set the
SAML:aud attribute value to: http://localhost:7890/redshift/ as shown.
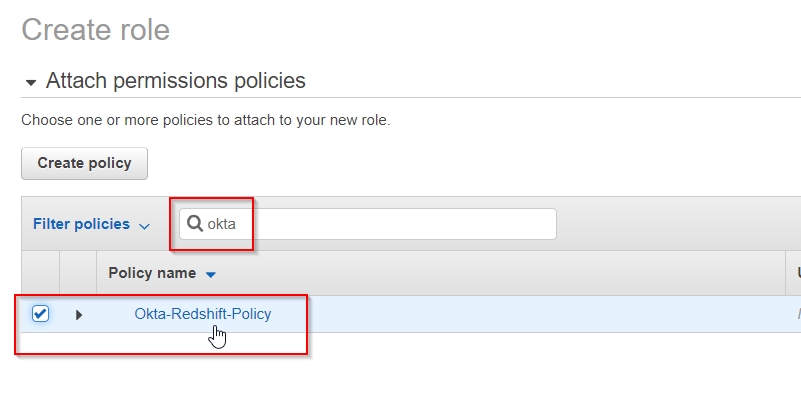
- Attach the
Okta-Redshift-Policy IAM Policy on this role on the next step, as shown.
- Call this new role
Okta-Redshift-Role on final review step, and click Create Role.
|


|
Amazon Redshift SQL Client Setup
| Say | Do | Show |
Now Rachel will first login to Redshift directly (non-federated) as an admin and create the database schema, objects and groups. These group names should match the directory group names used in Okta Directory setup. Then she will assign appropriate DB object grants to the groups. User assignment to groups is done only once in Okta directory; no need to assign users to groups in Amazon Redshift.
An alternative to installing on your own machine is to remote connect using RDP into the EC2 Windows instance created with the Cloud Formation template which already has SQL Workbench/J installed and Redshift drivers available to use right away.
|
Perform following steps in SQL Client:
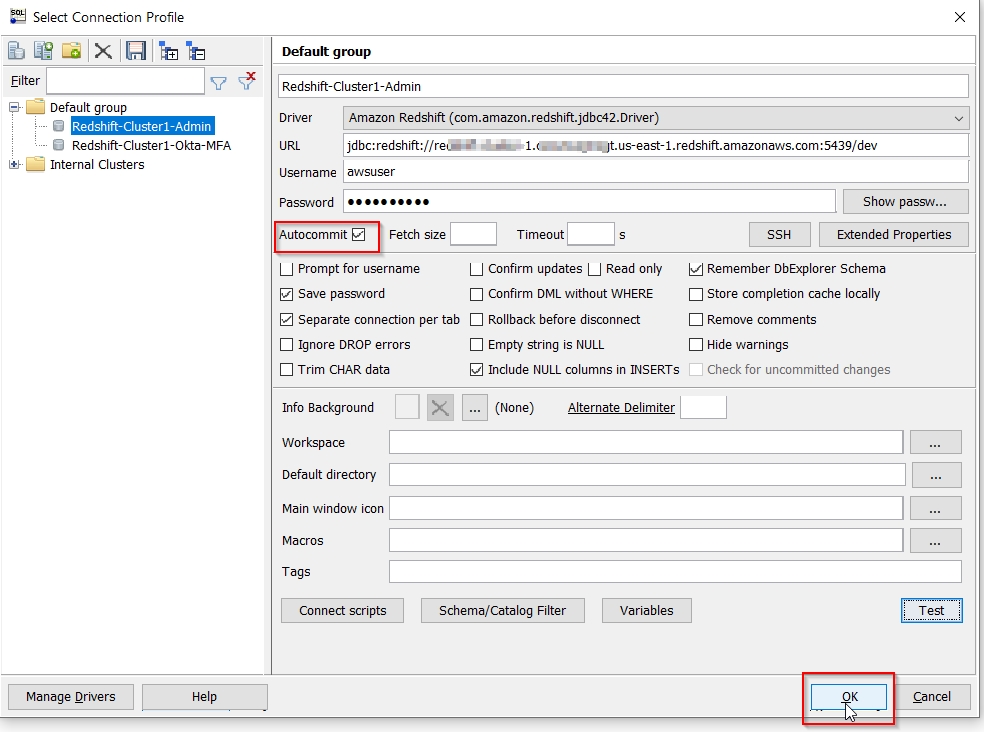
- Open SQL Workbench/J client, choose New Connection. Construct a JDBC connection URL for the Redshift admin session.
- Use the admin login («RedshiftClusterUser») and password («RedshiftClusterPassword»), check
Autocommit and press Ok to establish a new SQL session.
jdbc:redshift://<<RedshiftClusterEndpoint>>:<<RedshiftClusterPort>>/<<RedshiftClusterDatabase>>
|
|
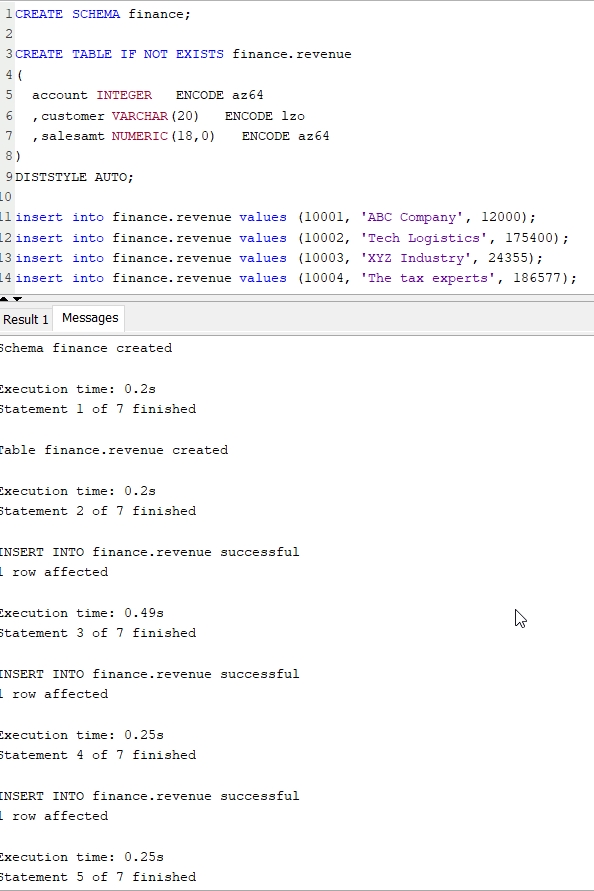
As admin, Rachel will execute SQL commands to set up the following environment:
- Create schema finance
- Create table finance.revenue
- Insert sample data into the tables, and test that data exists by querying the tables
|
Execute the following SQL script after connecting as admin to Redshift cluster as shown in previous step:
CREATE SCHEMA finance;

CREATE TABLE IF NOT EXISTS finance.revenue
(
	account INTEGER   ENCODE az64
	,customer VARCHAR(20)   ENCODE lzo
	,salesamt NUMERIC(18,0)   ENCODE az64
)
DISTSTYLE AUTO
;

insert into finance.revenue
values (10001, 'ABC Company', 12000);
insert into finance.revenue
values (10002, 'Tech Logistics', 175400);
insert into finance.revenue
values (10003, 'XYZ Industry', 24355);
insert into finance.revenue
values (10004, 'The tax experts', 186577);

select * from finance.revenue;
|
|
|
Next, Rachel will set up groups and privileges in Amazon Redshift
|
Using the same admin Redshift session, execute the script shown below to create groups that match the Okta group names, and grant the appropriate permissions to tables and schemas.
CREATE GROUP readonly;
CREATE GROUP readwrite;

ALTER DEFAULT PRIVILEGES IN SCHEMA finance
GRANT SELECT on TABLES to GROUP readonly;
GRANT USAGE on SCHEMA finance to GROUP readonly;
GRANT SELECT on ALL TABLES in SCHEMA finance to GROUP readonly;

ALTER DEFAULT PRIVILEGES IN SCHEMA finance
GRANT ALL on TABLES to GROUP readwrite;
GRANT USAGE on SCHEMA finance to GROUP readwrite;
GRANT ALL on ALL TABLES in SCHEMA finance to GROUP readwrite;
|

|
Rachel will now setup a new connection to Redshift using federated sign-on with Beth’s Okta IdP credentials. This will launch a browser session to authenticate Beth via Okta IdP, and also enforce MFA verification before granting her access to Redshift.
|
- Create a new SQL Workbench/J connection profile with JDBC URL in this format:
URL: jdbc:redshift:iam://<RedshiftClusterEndpoint>
Username and Password are not required in JDBC setting. Okta will prompt you for username and password in the web browser upon login.
- Click
Extended Properties, and add the following properties and values:
login_url : <Okta-SAML-Application's-SSO-URL-from-earlier-step>plugin_name : com.amazon.redshift.plugin.BrowserSamlCredentialsProvideridp_response_timeout : 180
- Click
Ok, save the new connection profile and then click Ok a second time on the Connection profile screen to launch the Okta browser authentication.
|


|
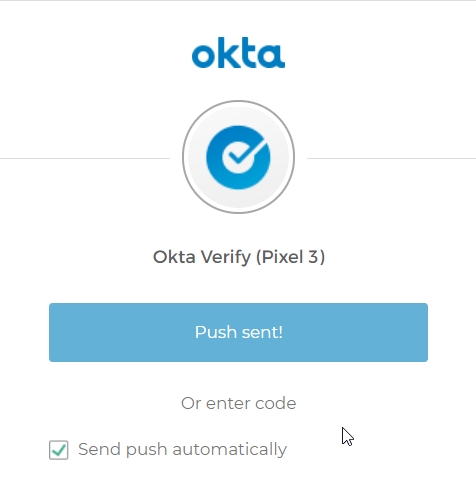
Complete Beth’s Okta browser login and first-time MFA setup/authentication to get access to Redshift.
|
- When you click
Ok to login from SQL Client in previous step, you will be redirected to the Okta application’s sign on page in browser.
- Enter Beth’s Okta username and password to login.
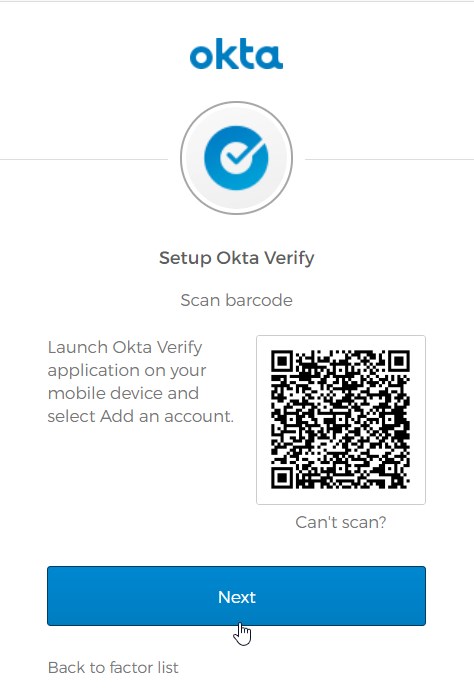
- Complete the first-time account setup and MFA setup for Beth by installing Okta Verify and scanning the QR code (as done in earlier step for Okta admin account during initial Okta setup).
- After successful MFA verification via Okta Verify, you will be redirected to the
http://localhost:7890/redshift/ page in browser, confirming successful authentication.
- You are now successfully connected to Redshift as Beth, who is part of the
bi_users_group group.
|


|
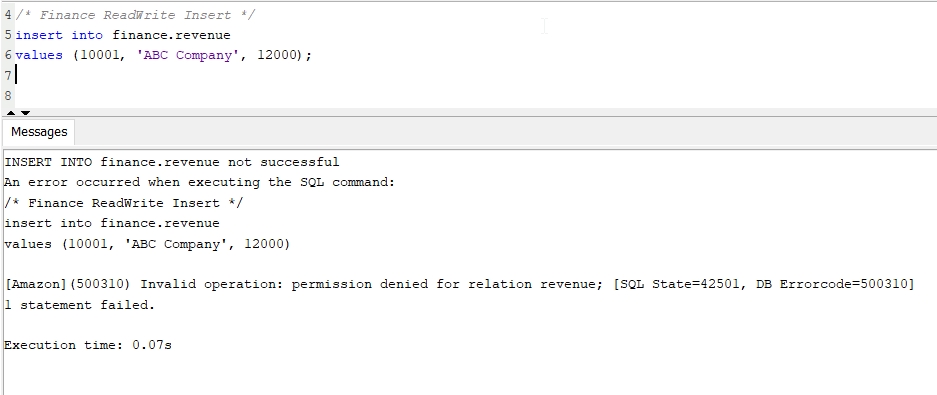
Confirm Beth’s database privileges by running both read-only and read-write SQL queries in the finance schema. Remember Beth was mapped to the bi_users_group in Okta, which is supposed to have only readonly privileges.
|
- After successful login as Beth in previous step, execute the below read-only SQL statement to test:
/* Finance ReadOnly Query */
select * from finance.revenue limit 10;
- Now, execute an
INSERT statement logged in as Beth:
/* Finance ReadWrite Insert */
insert into finance.revenue
values (10001, 'ABC Company', 12000);
- Confirm that Beth was able to execute just the first
Select statement, but NOT the second Insert statement.
|

|
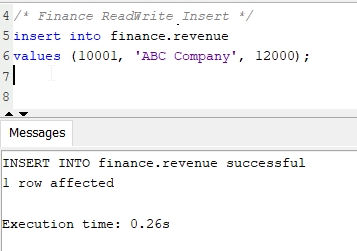
Repeat the previous step, but this time login using Ethan's Okta credentials instead of Beth. Remember Ethan was mapped to the etl_users_group in Okta, which is supposed to have both read & write privileges.
|
- Disconnect/close Beth’s SQL session. Reconnect using the same connection profile, but this time login as Ethan in the Okta application’s browser login page.
- Complete the first-time account setup and MFA setup for Ethan, and verify MFA using Okta Verify app.
- After successful login as Ethan, execute the below
INSERT statement:
/* Finance ReadWrite Insert */
insert into finance.revenue
values (10001, 'ABC Company', 12000);
- Confirm that Ethan was able to the
Insert statement successfully, since he is part of the etl_users_group group.
|
|
Before you Leave
Be sure to close out your Okta trial so you don’t get charged.
If you are done using your cluster, please think about deleting the CFN stack or to avoid having to pay for unused resources do these tasks:
- pause your Redshift Cluster
- stop the Oracle database
- stop the DMS task

