Federation using AD
Demo Video

Client Tool
This demo will use a browser to access the AWS Console. You will also need to a SQL Client configured. This demo will use EC2 ADFS AMI. The screenshots for this demo will leverage the EC2 AMI. Be sure to complete the BI Tool setup before proceeding.
Before you Begin
Ensure you have access to the AWS Console and an existing Redshift cluster with permissions to modify it. Capture the following parameters from the launched CloudFormation template as you will use them in the demo.
https://console.aws.amazon.com/cloudformation/home?region=us-east-1#/stacks?filteringText=&filteringStatus=active&viewNested=true&hideStacks=false
- RedshiftClusterEndpoint
- InfrastructureAccount
Challenge
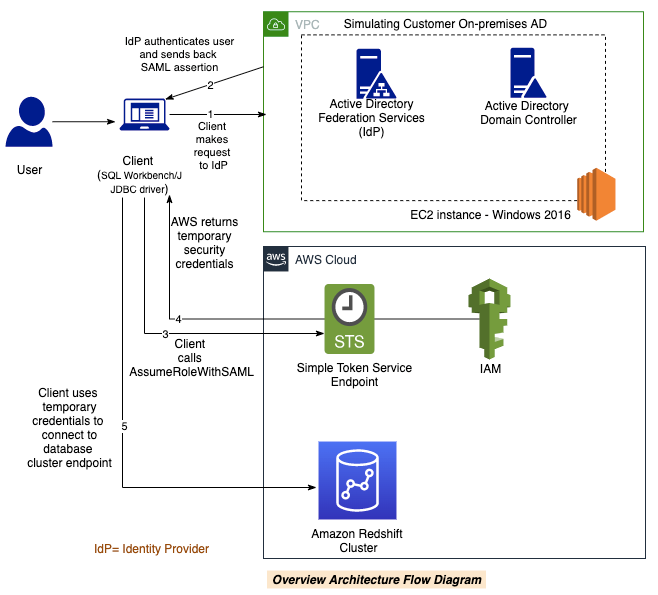
Rachel (Security Engineer) has been tasked to enable federated single sign-on for the business users and setup various groups and privileges for the database objects. This will help provide a seamless user experience for the user, while also helping centralized management and governance of permission and authentication for hundreds of users at Red Imports LLC. Rachel will need to implement the following workflow to allow users to login to Redshift using SSO.
- User logs in using JDBC/ODBC SQL Client
- The IdP authenticates using Corp Username/Password and returns a SAML assertion.
- Calls STS to assume role with SAML
- STS Returns Temp Credentials
- Uses Temp Credentials to get Temp cluster credentials
- Connect to Amazon Redshift using temp credentials
Part 1 ADFS Server Setup
- ADFS SSO Setup WorkFlow
- Setup domain controller and AD FS
- Install AD FS
- Configure federation in AD FS
- Setup claim rules
- Configure custom claim rules
- Test SAML federation using web browser
Part 2 Amazon Redshift Setup
- Setup SQL Client
- Connect to Amazon Redshift and create Schema and Tables
- Grant privileges to database groups
- Connect using federated authentication and test user access
Part 1: ADFS Server Setup
Setup domain controller and AD FS
Complete the preparation steps in SSO Considerations before proceeding.
| Say | Do | Show |
|---|---|---|
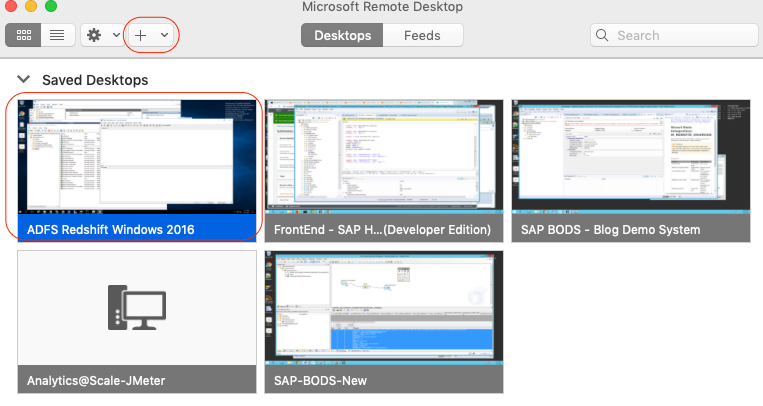
| Once you have the domain controller EC2 server up and running, now you can Use an RDP client from your desktop to connect the EC2 instance using the administrator user and password from previous step. |
Use an RDP client (Microsoft Remote Desktop) from your desktop to connect the EC2 instance using the administrator user and password from previous step. |
|
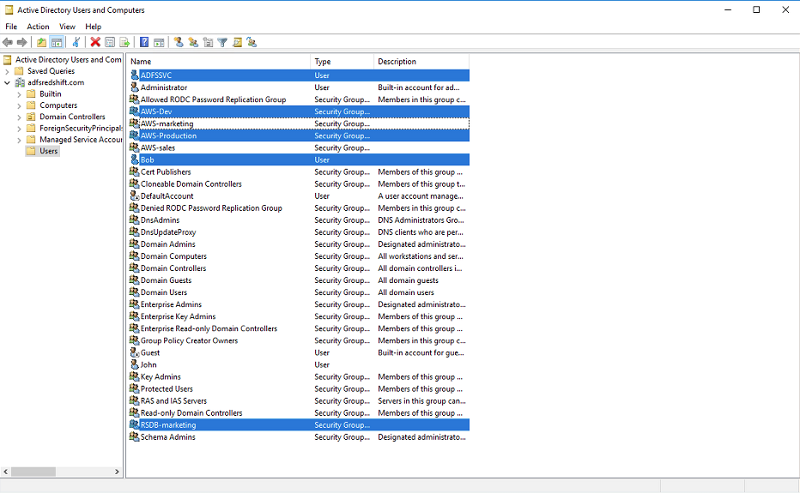
| Create test users and groups in AD FS using the Windows “Active Directory Users and Computers” application or using command prompt by entering the following code (this walkthrough creates the user Bob, which you use again in Part 2): |
Go to windows command prompt in the Windows EC2 instance which you connected using RDP. Execute the commands below to create the users and groups:
|
|
Install AD FS
| Say | Do | Show |
|---|---|---|
| On the same Windows 2016 EC2 instance, install the AD FS 2016 role using PowerShell |
From command line execute the command to install the AD FS application
|

|
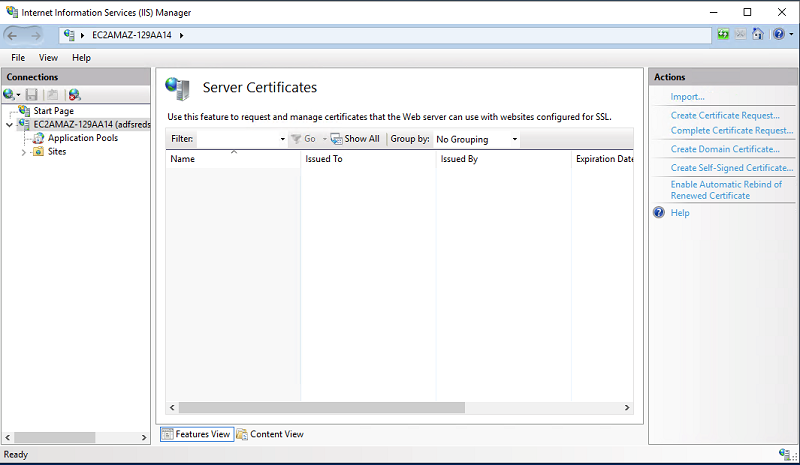
| To create the self-signed certificate, use PowerShell to install and configure the IIS |
From windows command line execute the following command
|
|
Configure federation in AD FS
| Say | Do | Show |
|---|---|---|
| Configure AD FS federation |
On the Windows 2016 EC2 instance
You can ignore the warning message to promote this server to domain controller. This doesn’t interfere with the setup because as the AD FS is working at this point and the server is already a domain controller. |

|
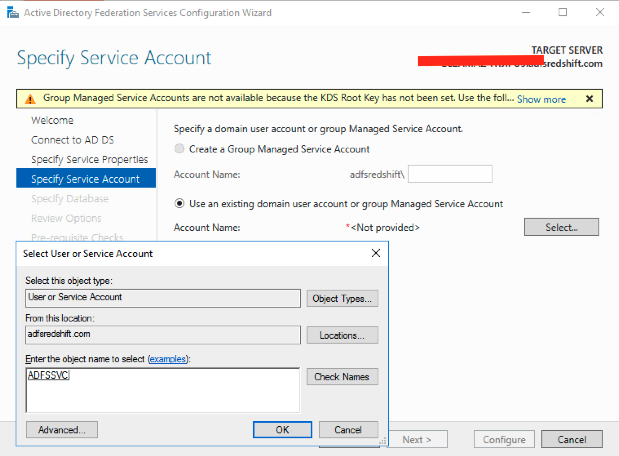
| Select Create the first federation server in a federation server farm. |
|
|
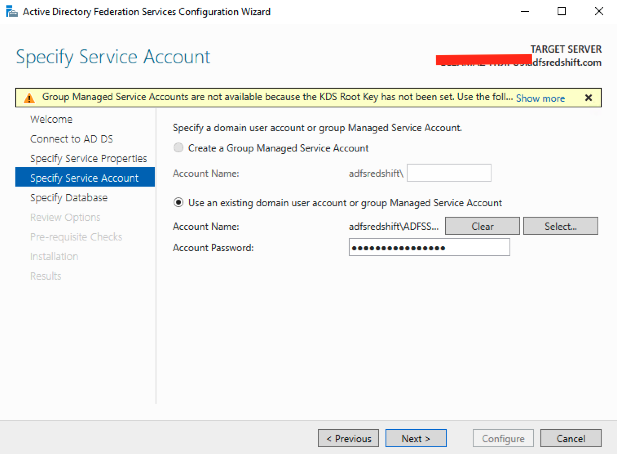
| Enter the password for the service account – ADFSSVC that you created earlier, in previous step |
Enter the password for the service account – ADFSSVC that you created earlier, in previous step. Choose Next
|
|
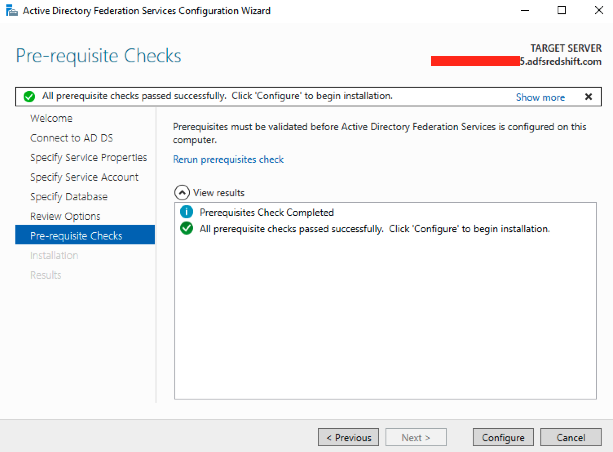
Choose Next two more times. Review and run the prerequisite checks and choose Configure
|
|
|
| After you RDP back into the Windows 2016 EC2 instance, download the federation metadata from AD FS. |
To capture the hostname, under Windows Administrative Tools
|
Download AD FS metadata
| Say | Do | Show |
|---|---|---|
|
Internet Explorer on the EC2 instance generated by the CloudFormation template is, by default, in Enhanced Security configuration, so may not be available to use.
You may choose to install any other browser or disable Enhanced Security for Internet Explorer. |
From Google Chrome, enter the following URL with the hostname from the previous step:
If you receive an error message, choose the advance icon and then choose Proceed to download the file. Copy the |
Configuring AWS as the relying party with ADFS
| Say | Do | Show |
|---|---|---|
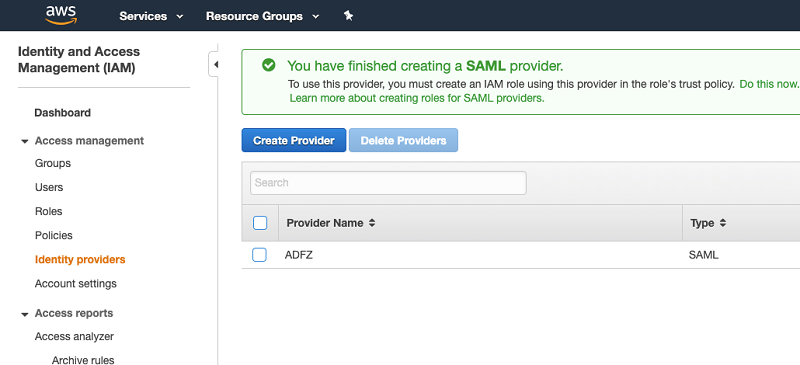
| To configure AWS as the relying party, you first need to create the SAML provider and federation role, and create and attach IAM policies. |
To create the SAML provider, complete the following steps:
|
|
Creating a SAML federation role
| Say | Do | Show |
|---|---|---|
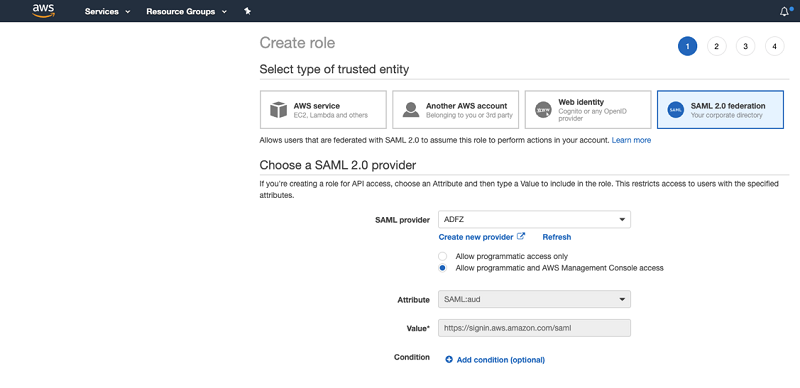
| You can now create a SAML federation role. |
On the IAM console, choose Roles:
|
|
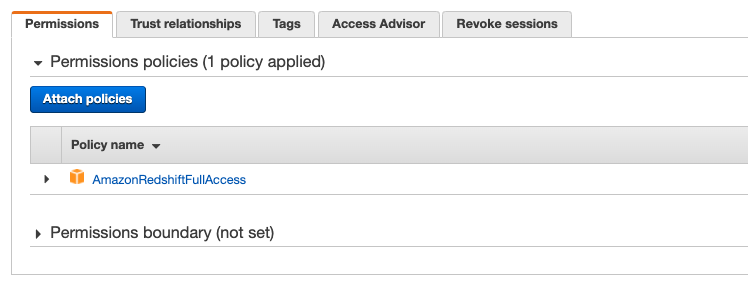
| Complete creation of the role with the below steps |
|
|
Creating an IAM policy
| Say | Do | Show |
|---|---|---|
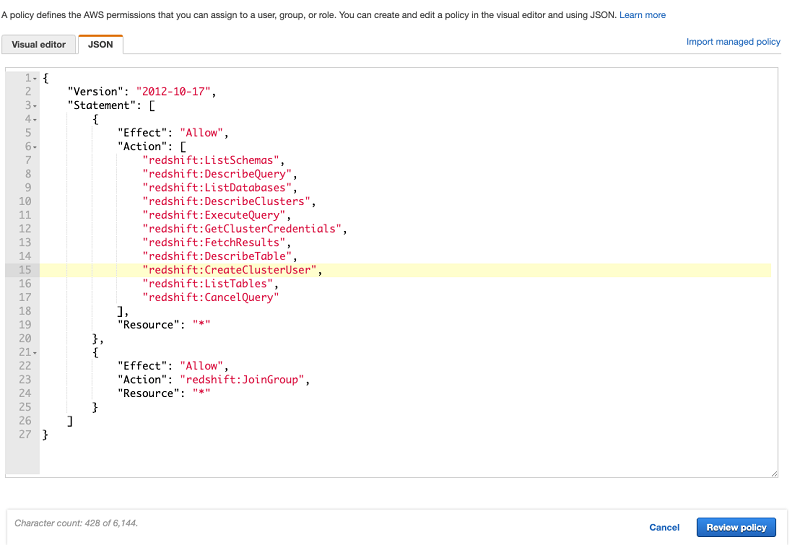
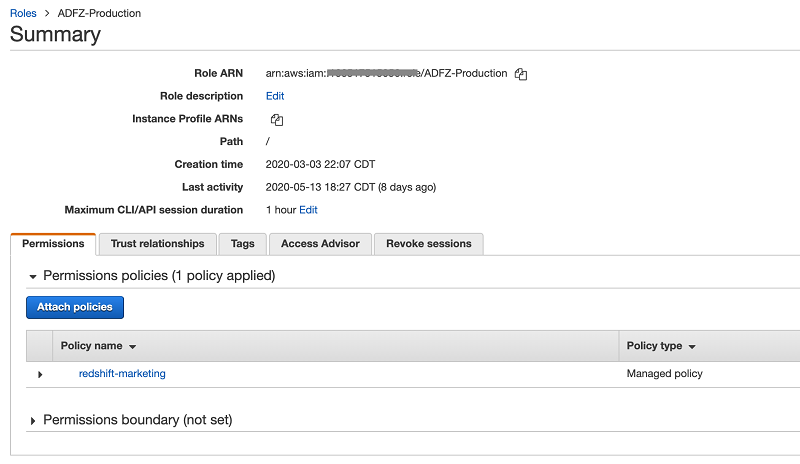
| For the ADFZ-Production role, you now create an IAM policy. | On the IAM console, choose Policies. Choose Create policy. |

|
| On the JSON tab, enter the following policy: The GetClusterCredentials Redshift API with AWS credentials to get the temporary database credentials. This API creates the user and adds it to a specified DB group, so you also need to provide redshift:CreateClusterUser and redshift:JoinGroup permissions to the IAM role. See the following code: |
|
|
| Ideally, development and production IAM roles are in two different accounts. The Resource section here is set to be open with *, but in a production environment, you should specify the exact resource you want to control with the policy. |
|
|
Configuring AWS as the relying party
| Say | Do | Show |
|---|---|---|
| To complete configuring AWS as the relying party, go back to RDP on Windows 2016 EC2 instance. | In the AD FS management application, choose Add Relying Party Trust. |
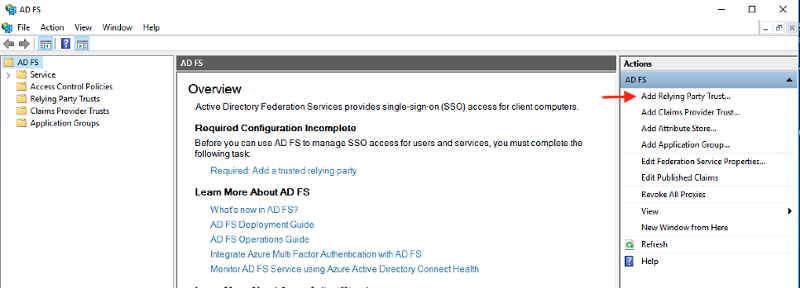
|
| Complete the steps shown |
|
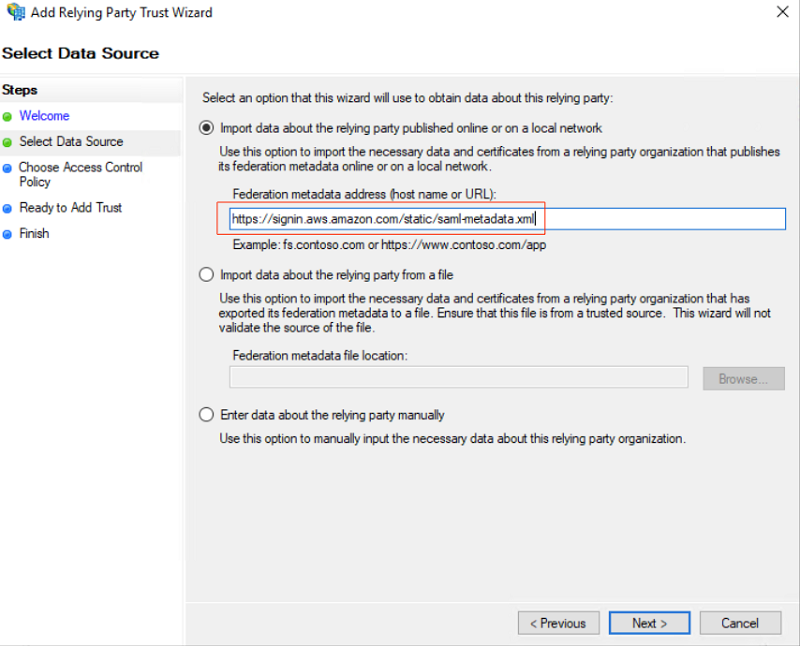
|
Configure claim rules
| Say | Do | Show |
|---|---|---|
| AD FS uses a claims-based identity model and issues a token that contains a set of claims as part of its function as federation services. Claim rules govern the decision with regards to claims that AD FS issues. Claim rules and all server configuration data are stored in the AD FS configuration database. AD FS makes issuance decisions that are based on claims and other contextual information by taking one set of claims as input, performing transformations, and returning a different set of claims as output. For this walkthrough, you set up two standard claim rules and three custom claim rules. Configuring standard claim rules After you choose Close in the previous step, you are redirected to a window to define the claim rules. If this doesn’t happen, you can return to the AD FS management console on the Windows 2016 EC2 instance, choose Relying Party Trusts, and choose Edit Claim Issuance Policy. To add a rule for NameID, complete the following steps: |
|
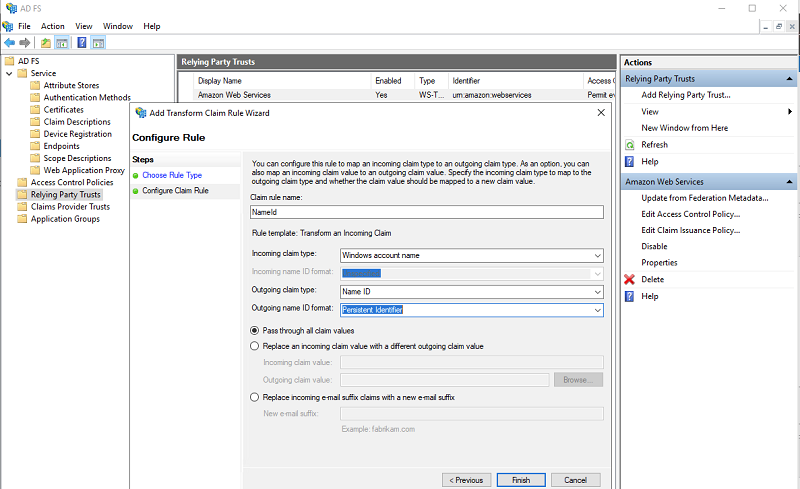
|
| You now add another rule for RoleSessionName. |
|
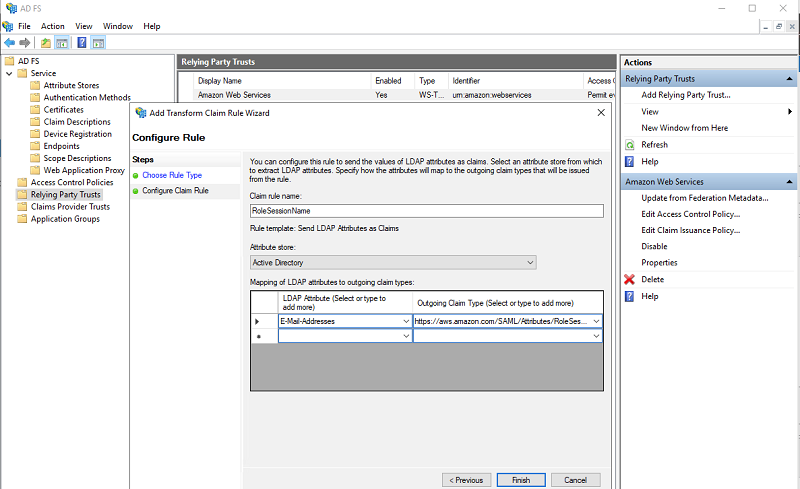
|
Configure custom claim rules
| Say | Do | Show |
|---|---|---|
|
By using a custom claim rule, you can create rules with more complex logic than a standard rule template. You use custom rules to send claims based on values that are extracted from a custom attribute store for AD groups, DB groups, and roles.
To add a custom rule for your AD group, complete the following steps: |
Follow the previous steps to create the rule Roles.
|

|
| You now add a third custom rule for the database group DBGroups mapping of an AD group RSDB-marketing to a database group marketing, which you create later in Amazon Redshift in Part2. |
Follow the previous steps to create the rule DBGroups.
Enter the following custom rule:
Choose Finish. In this claim rule, you take an AD group starting with the name RSDB- and remove the prefix. The remaining string (marketing), matches the database group name. This allows the user after SAML authentication to join the database group with same name, which is only valid during the session window. This allows the user to access the resources allowed by the database group marketing, which is defined at the database level. Confirm the five rules are correct and choose Ok. |
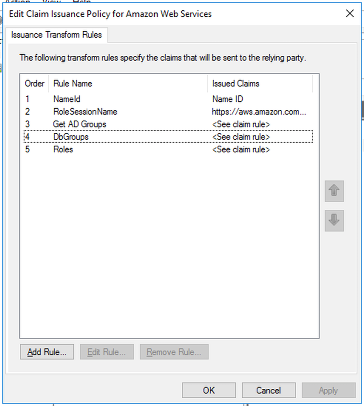
|
Test SAML federation using web browser
| Say | Do | Show |
|---|---|---|
| Before starting your test, run the following code using PowerShell: |
Run the following code using PowerShell:
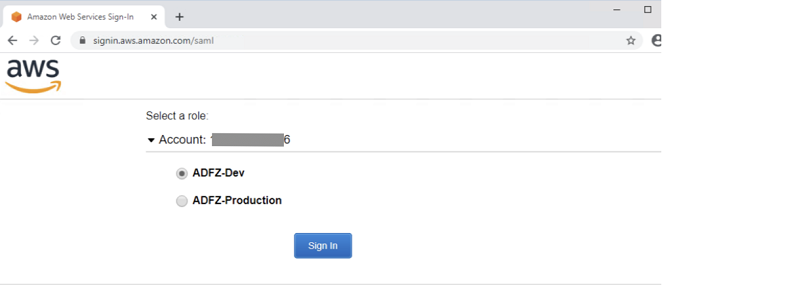
To test your federation, complete the following steps:
|
|
Part 2 Amazon Redshift Setup
This demo walks you through setting up an Amazon Redshift cluster and federating database user authentication with AWS Identity and Access Management (IAM) and Amazon Redshift. You use the user you set up in your AD in Part 1 (Bob) to authenticate using AD FS and control access to database objects based on the group the user is assigned to.
You also learn how to set up SQL Client (SQL Workbench/J) and an Amazon Redshift JDBC driver to connect to a database cluster using the database user authentication method and the AD FS federated authentication method.
Prerequisites and Architecture
This demo assumes the steps in Part 1 is completed. If you have launched the demo Cloudformation template, the setup involved in Part 1 will already be configured In Part 2, you will use the Demo Amazon Redshift cluster for federated authentication with AD FS to connect from a JDBC SQL client tool. You follow a detailed step-by-step process of using Amazon Redshift database authentication to simplify the credential management of database users and reuse what you may already have on premises. You can also integrate Amazon Redshift group-level privileges with federation.
Setup SQL Client
| Say | Do | Show |
|---|---|---|
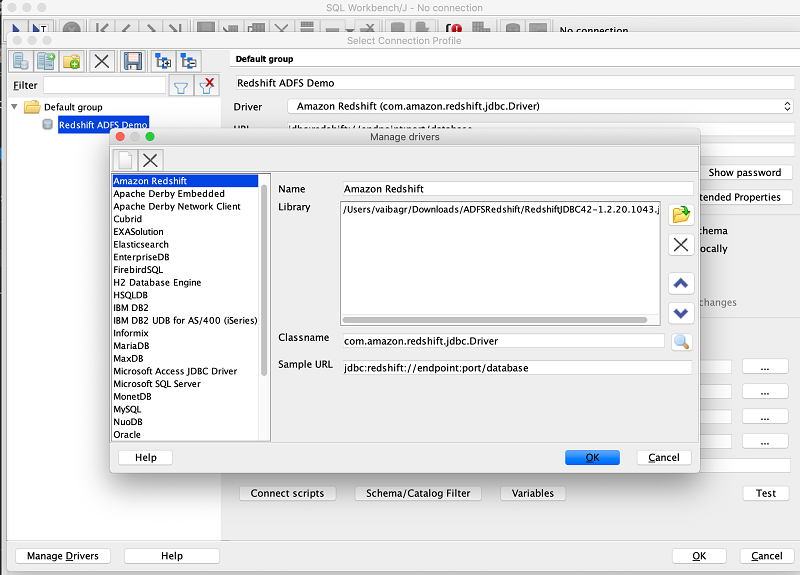
| Before you get started, download the latest Amazon Redshift JDBC driver with AWS SDK. You use this for JDBC driver-based authentication in SQL Workbench/J. |
|
|
Connect to Amazon Redshift and create Schema and Tables
| Say | Do | Show |
|---|---|---|
| To set up federated access, you take a two-step approach: connecting with the superuser and connecting using federated authentication. For this walkthrough, you create database objects, groups, and users and assign proper privileges to the groups on the database objects they are allowed to access. You should receive a successful connection message, as in the following screenshot. |
Choose New Connection.
Construct a JDBC connection URL for the database standard user:
jdbc:redshift://«redshiftclusterendpoint».redshift.amazonaws.com:5439/dev?ssl=true&UID=username&PWD=password
You can find the value for redshiftclusterendpoint on the Amazon Redshift console, under Properties, Endpoint. The username and password are the values you provided when you created the cluster. Choose Test. |

|
Connect as awsuser (a superuser).
From SQL Workbench/J, enter the following commands to set up the following environment:
|
|
Grant privileges to database groups
| Say | Do | Show |
|---|---|---|
| You can now set up appropriate privileges for the sales and marketing groups. Groups are collections of users who are all granted privileges associated with the group. You can use groups to assign privileges by job function. For example, you can create different groups for sales, administration, and support and give the users in each group the appropriate access to the data they require for their work. You can grant or revoke privileges at the group level, and those changes apply to all members of the group, except for superusers. |
Enter the following SQL queries to grant access to all tables in the sales schema to the sales group and access to all tables in the marketing schema to the marketing group:
|
Connect using federated authentication and test user access
| Say | Do | Show |
|---|---|---|
|
You can pass the URL information in the connection profile two different ways:
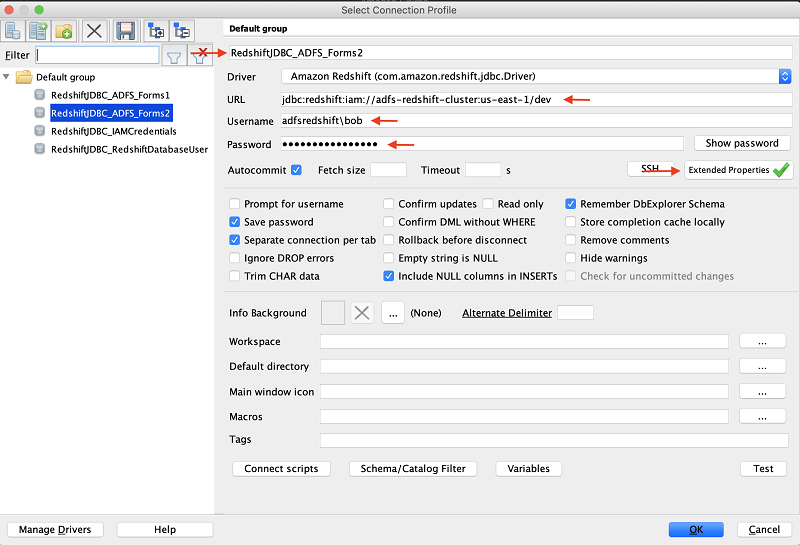
Specify the Amazon Redshift cluster endpoint with the port (for this use case, the driver doesn’t need to run the DescribeClusters API because everything is already available): jdbc:redshift:iam//«your redshift cluster endpoint»/dev Specify the cluster ID and Region (for this use case, the driver calls the DescribeClusters API and Get-Cluster-Credentials as additional steps): jdbc:redshift:iam://«cluster id:region»/dev The rest of the parameters are specified in the Extended Properties configuration. |
For this walkthrough, you use the second method.
|
|
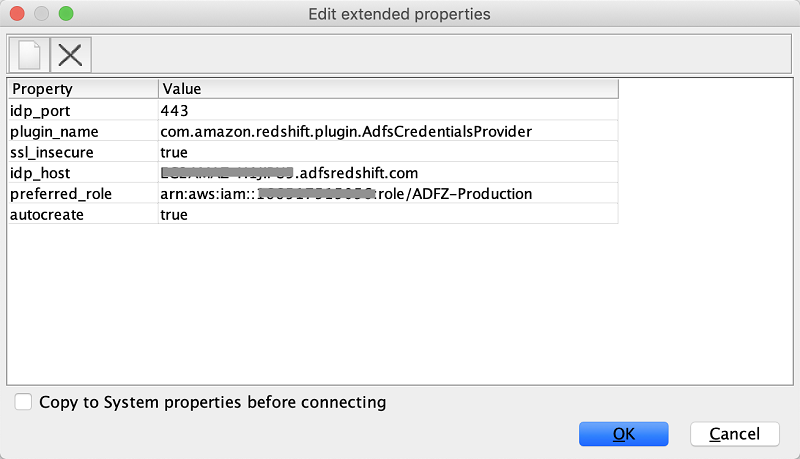
| The extended properties section allows you to defind the IdP host and the IAM role to be used for authentication Setting AutoCreate= True creates the AD user Bob in the Amazon Redshift database the first time without password settings. The authentication is temporary using the SAML configuration you completed in Part 1. You can also set the AutoCreate property with IdP configuration. For more information, see JDBC and ODBC Options for Creating Database User Credentials. |
Setup the below values in the extended properties section
Provide the following values and Choose Test. You should see a successful connection, and can start using SQL Workbench/J to query Amazon Redshift cluster as user Bob. The message indicates Connection to endpoint successful
|
|
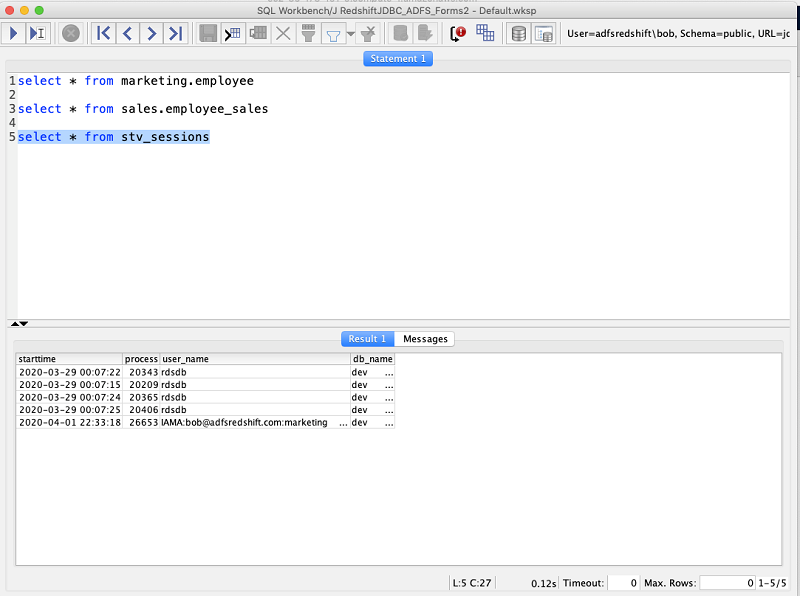
| With this connection profile, run the following query to test SAML authentication and query privilege control: The output shows that the user bob@adfsredshift.com was authenticated using AD FS. The user also joined the marketing group as enforced by the AD FS DbGroups claim rule and the policy associated with the ADFZ-Production role, which the user assumes during this session. |
|
|
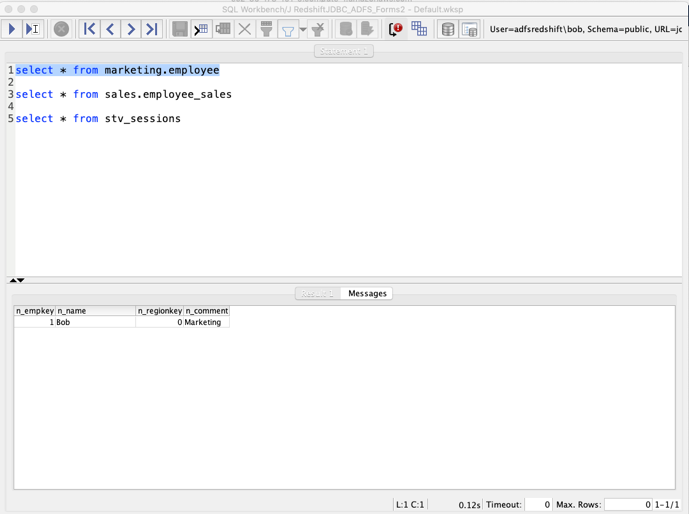
| Now you can test the group level access control by running queries on the two tables in different schemas. First, execute a query on a table in marketing schema “marketing.employee” The output shows that AD user Bob is part of the AD group RSDB-marketing, which was mapped to the DB group marketing. This database group had select access to the schema marketing and all tables in that schema. Therefore, the user could successfully query the table through SQL Workbench/J. |
|
|
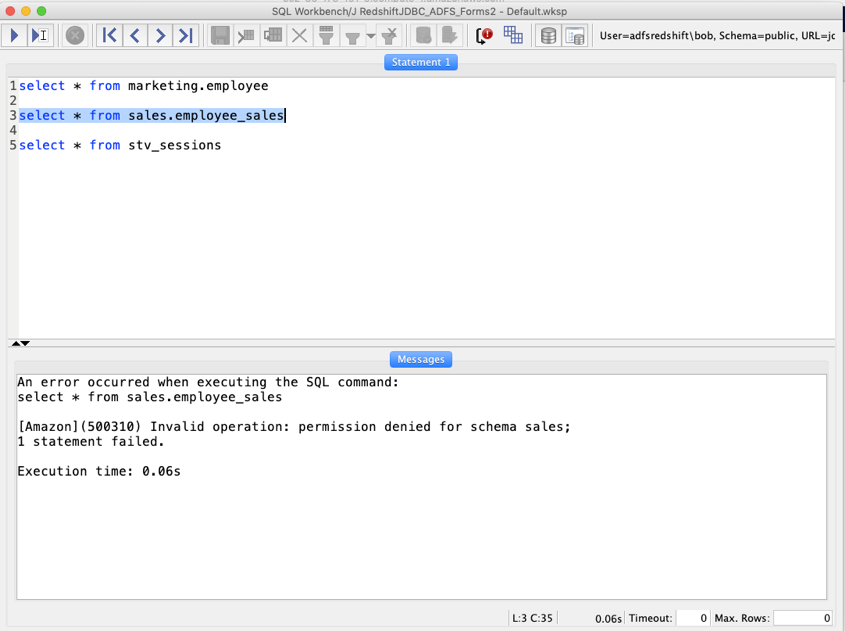
Next, execute a query on a table in sales schema sales.employee
The output shows that Bob is only part of the AD group RSDB-marketing. Due to the way the claim rule is set up, Bob doesn’t have access to the database group sales, and therefore the query returns with a permission denied error.
|
To run a query against the sales schema, enter the following code:
|
|
Before you Leave
If you want to avoid incurring charges, delete the CloudFormation stack on the console.
If you are done using your cluster, please think about deleting the CFN stack or to avoid having to pay for unused resources do these tasks:
- pause your Redshift Cluster
- stop the Oracle database
- stop the DMS task
- delete the EC2 created