Oracle Migration
Demo Video

Before you Begin
Capture the following parameters from the launched CloudFormation template as you will use them in the demo.
https://console.aws.amazon.com/cloudformation/home?region=us-east-1#/stacks?filteringText=&filteringStatus=active&viewNested=true&hideStacks=false
- EC2DeveloperPassword
- EC2HostName
- RedshiftClusterDatabase
- RedshiftClusterEndpoint
- RedshiftClusterPassword
- RedshiftClusterPort
- RedshiftClusterUser
Client Tool
If you do not have a Remote Desktop client installed, you can use the instructions at this link to do so.
Challenge
Marie has been asked to migrate Red Imports’ on-premises Oracle data warehouse to Amazon Redshift in their AWS Account. The Oracle data warehouse hosts business critical applications in PL/SQL. She also needs to make sure that both Oracle and Redshift data warehouses are in sync until all legacy applications are migrated to Redshift. Marie will need to convert DDL structures and the PL/SQL code into Redshift and perform full data load from Oracle to Redshift. Marie will also need to setup ongoing updates from Oracle to Redshift to keep the data in synch. Marie will accomplish these tasks by doing the following:
Note: To enable ongoing replication with Oracle, log miner must be enabled. This is not needed if only performing a one-time load. See AWS Documentation for more details.
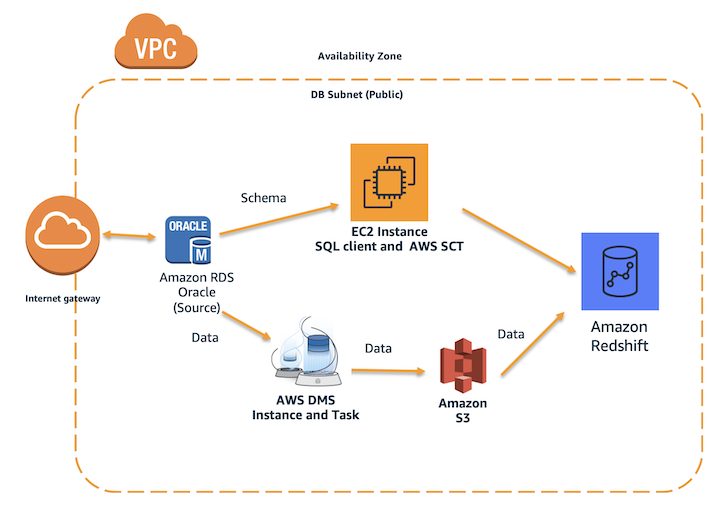
Convert the Schema
| Say | Do | Show |
|---|---|---|
|
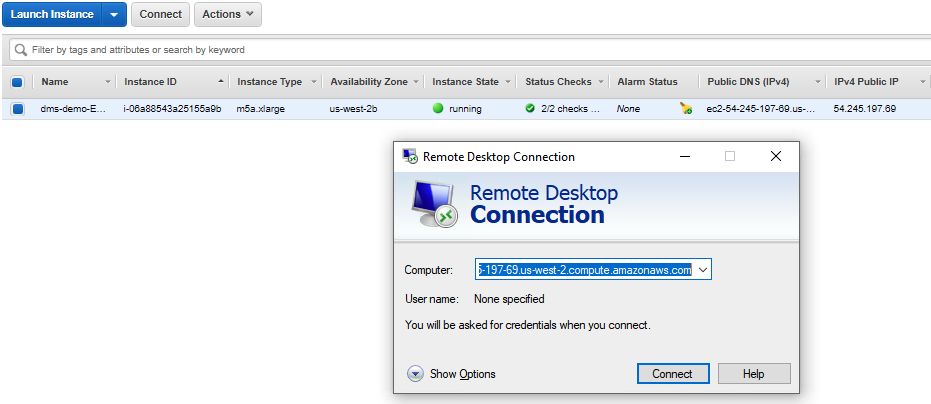
Marie logs into her workstation, in which she has already installed the required tools like schema conversion tool for the migration, SQL Workbench to connect to Redshift, Oracle SQL Developer to connect to Oracle Replace the value for <EC2HostName> and <EC2DeveloperPassword> with the value previously determined. |
The cloud formation template deploys a Windows EC2 instance, with required drivers and softwares for AWS SCT, SQL Workbench and Oracle SQL Developer. Before the demo, please note down all relevant parameters from the CloudFormation output that you’ll need to use in the subsequent steps.
|
|
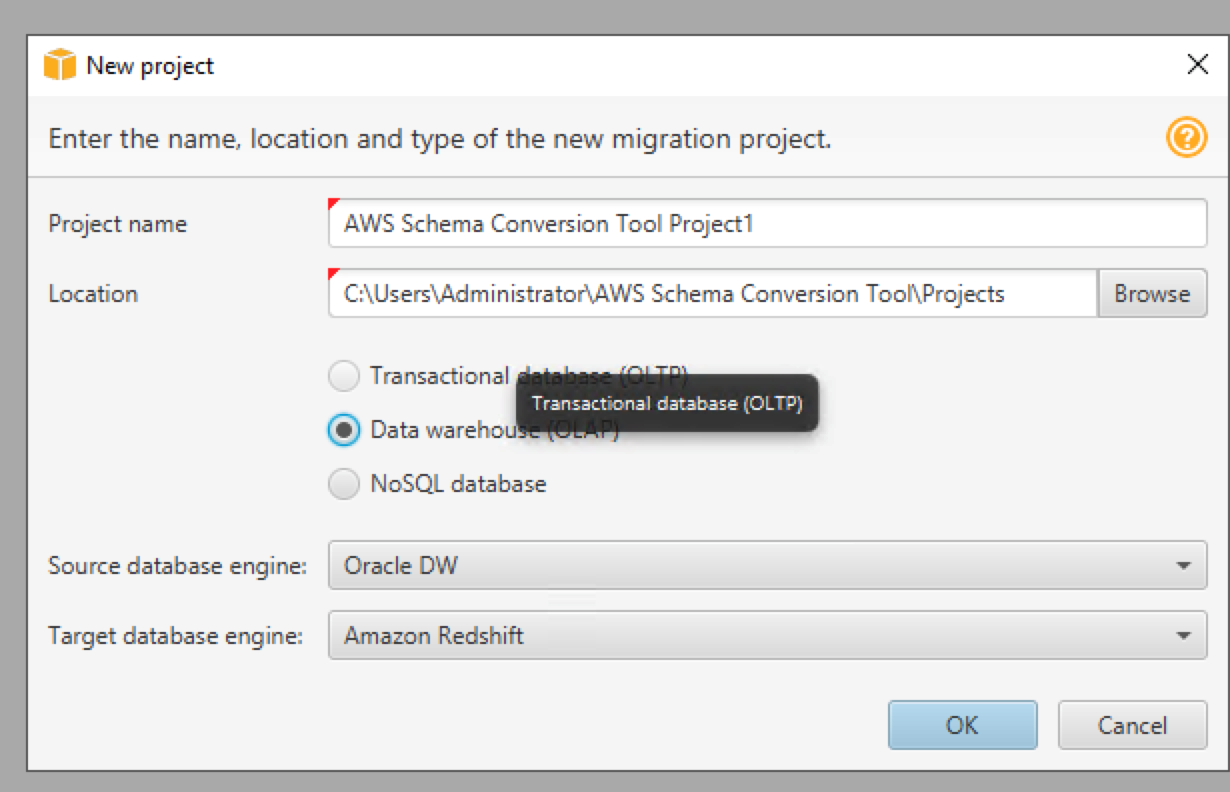
Once logged in, she opens AWS Schema Conversion Tool and initiates a new project.
She will select OLAP as it’s a data warehousing migration from Oracle to Redshift
|
Open AWS SCT using the taskbar shortcut and click
|
|
| Now, she needs to configure the connectivity for the Oracle source system |
Click Connect to Oracle DW and Input below parameters:
Click |
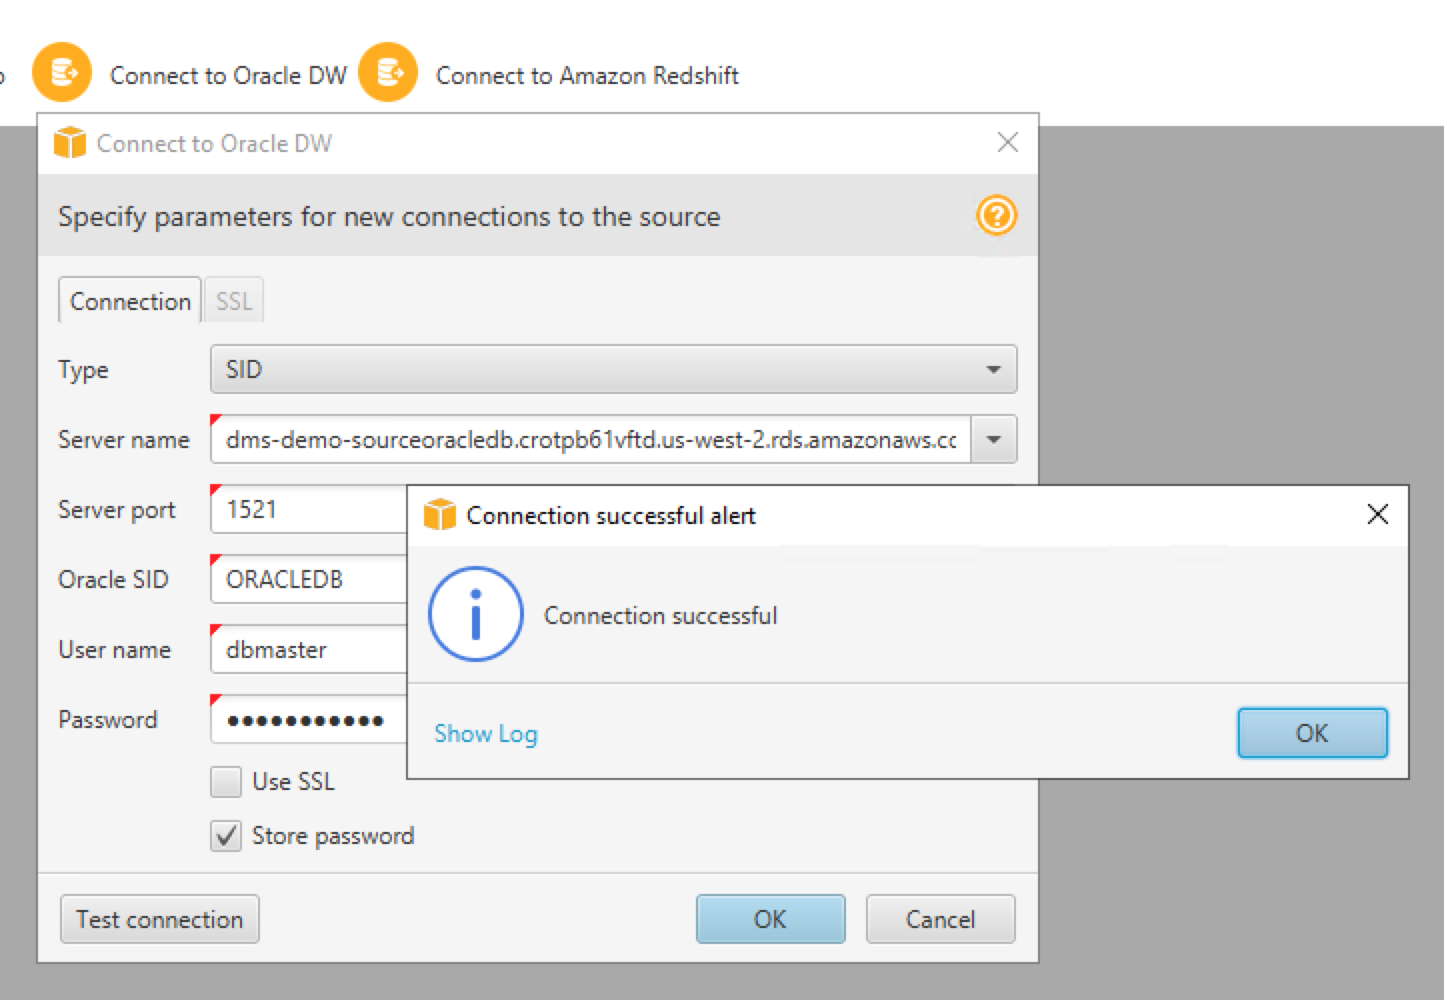
|
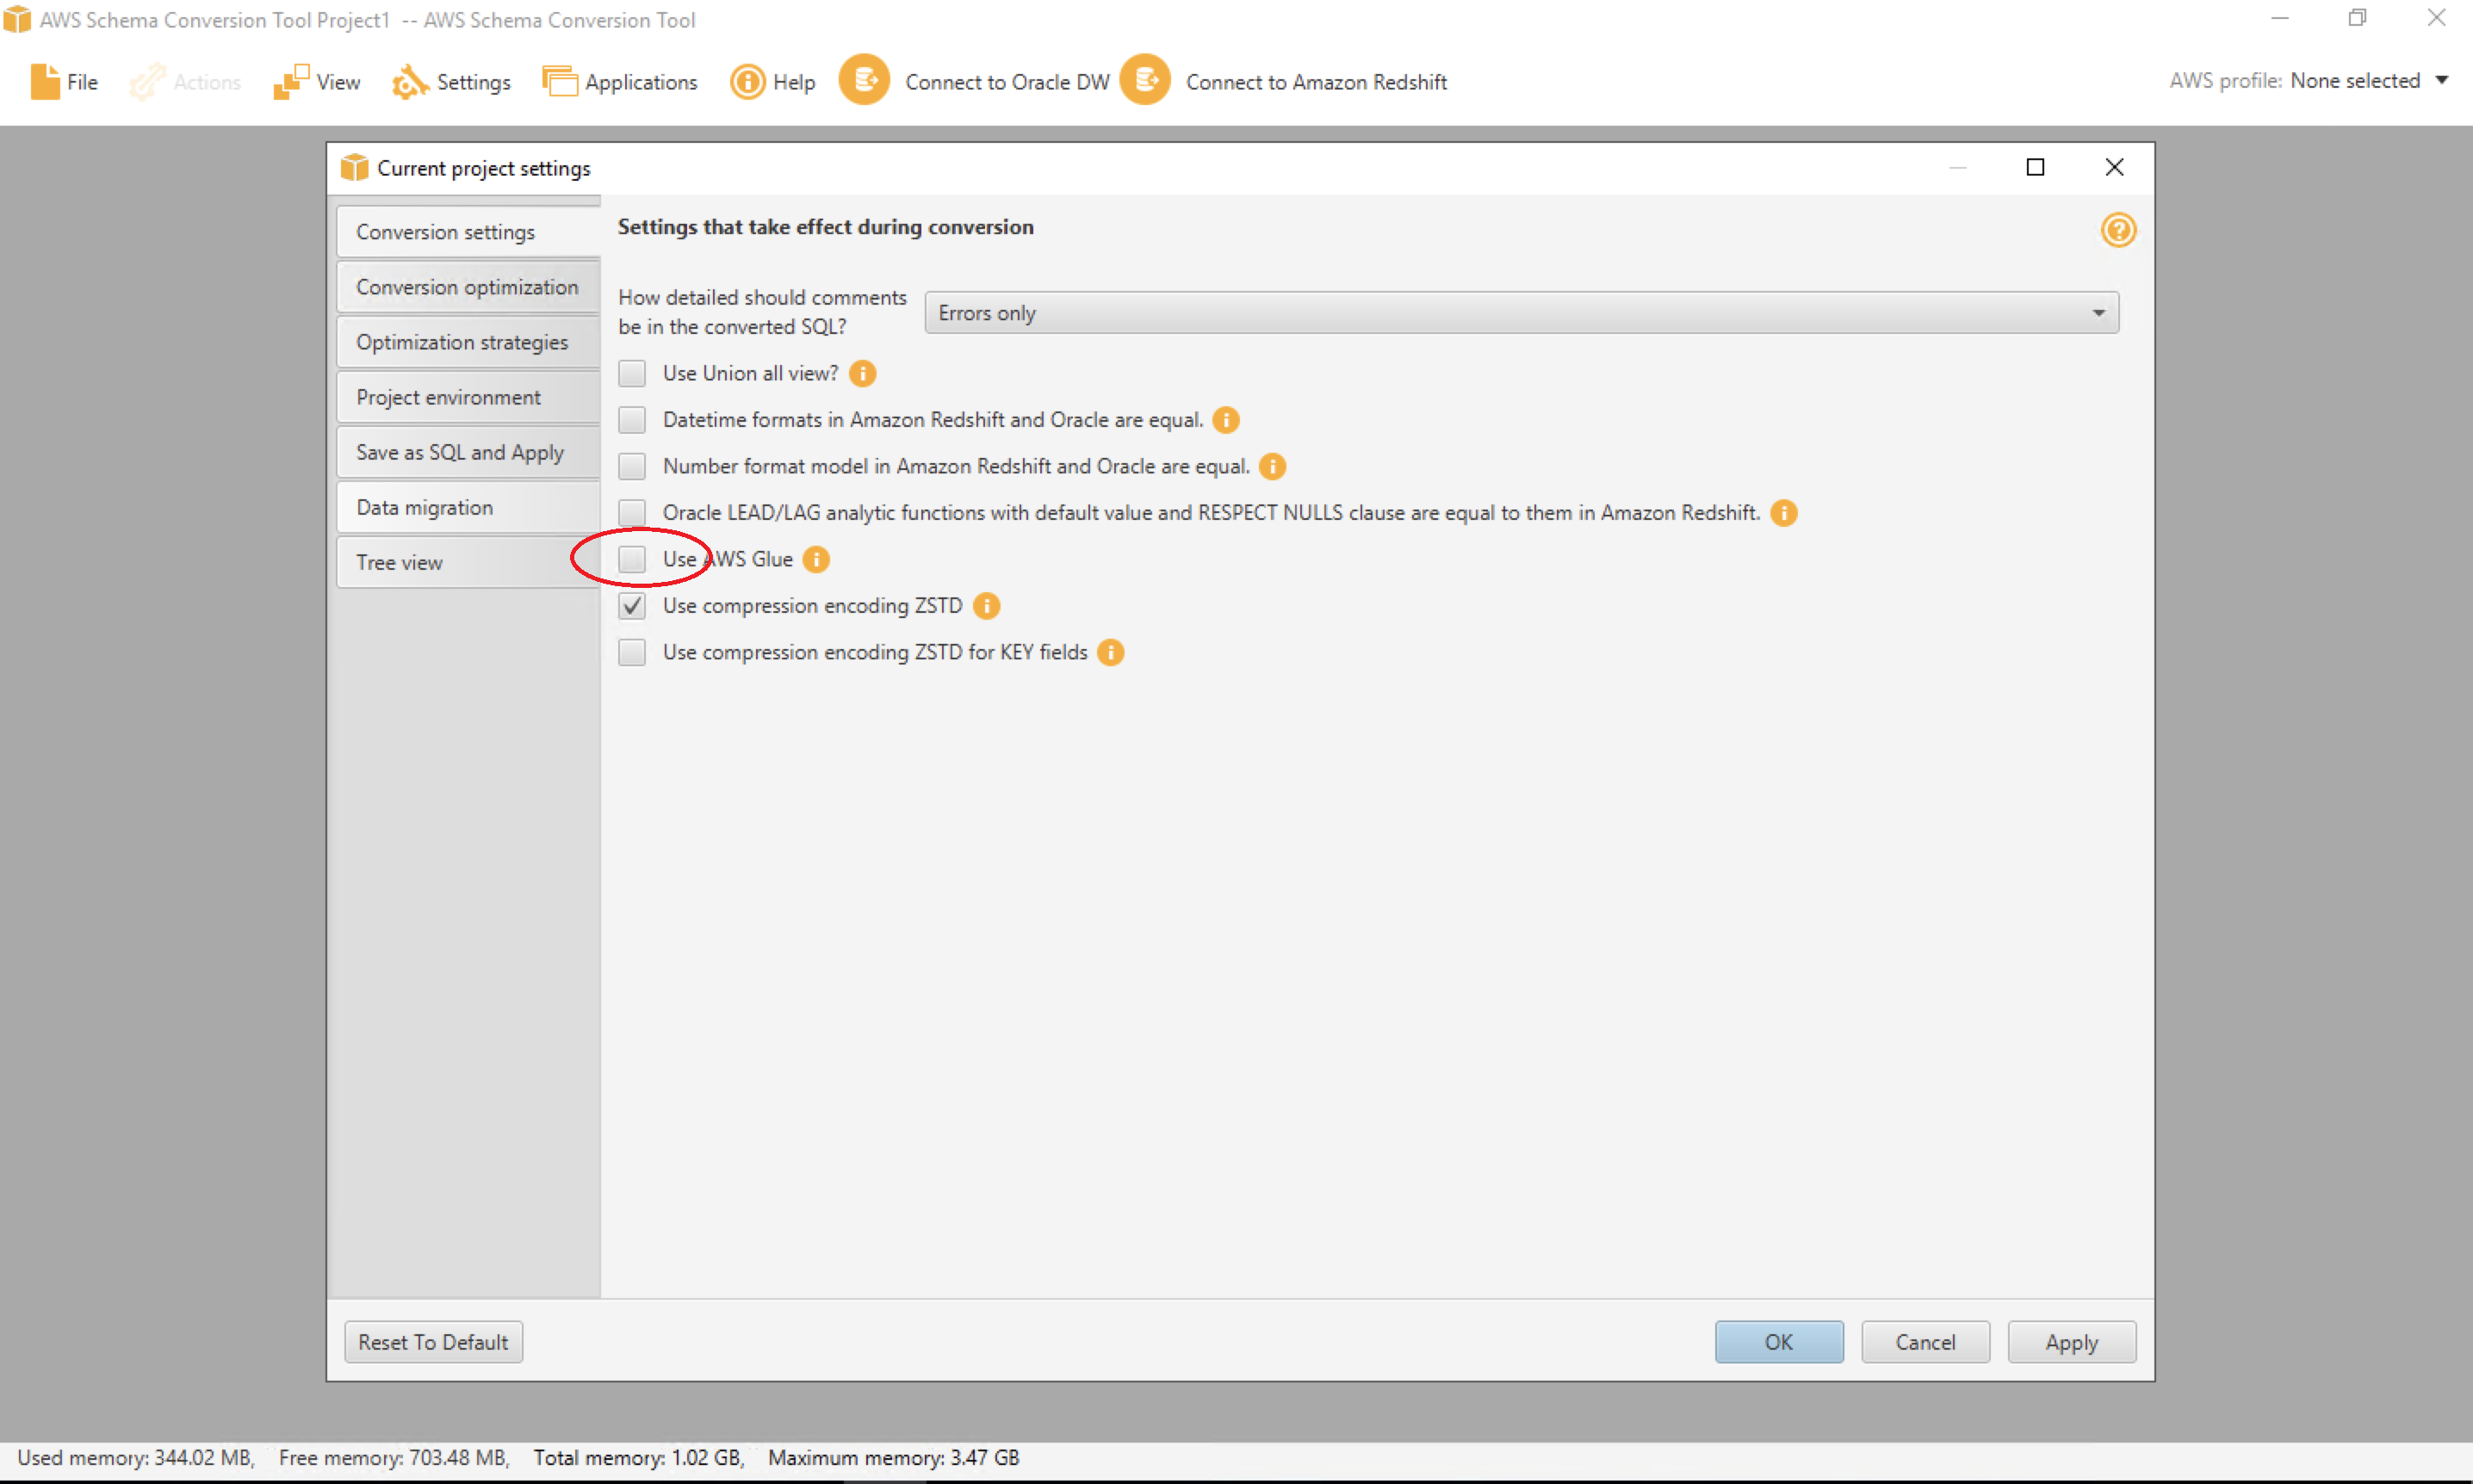
| By default, AWS SCT uses AWS Glue as ETL solution for the migration. Marie may not be using it for now. So, let’s disable it. |
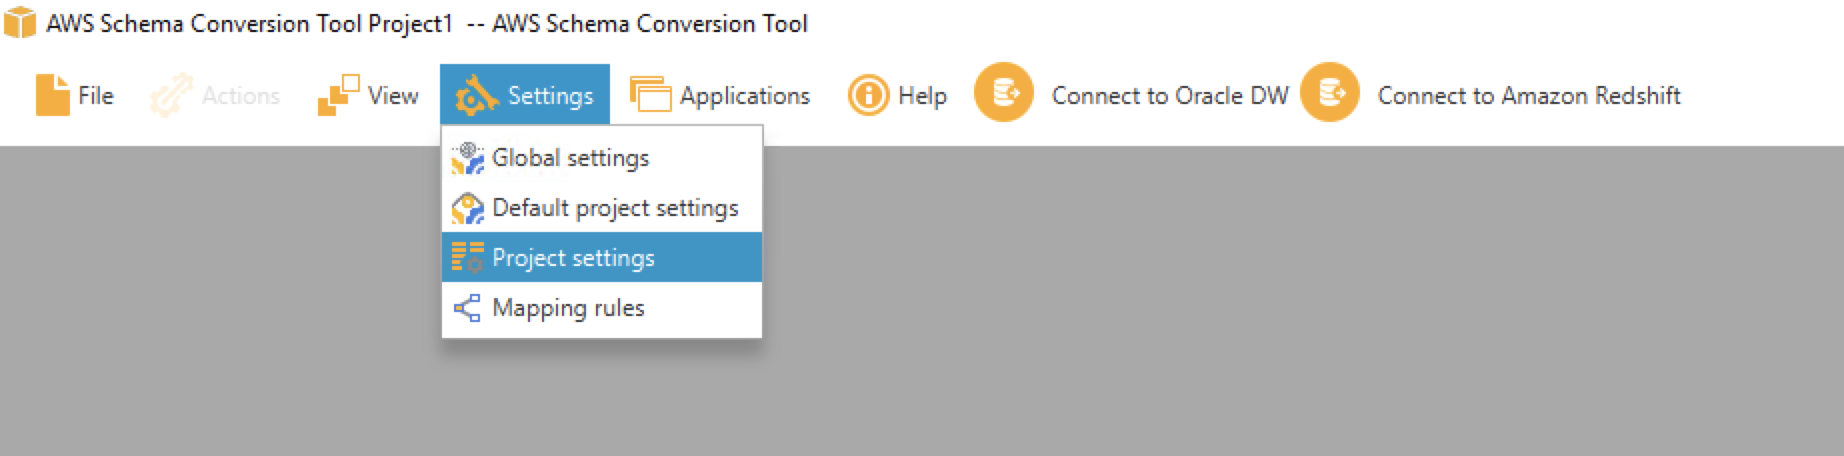
Click Settings then select Project Settings
|
|
| Marie will disable AWS Glue |
Uncheck Use AWS GlueClick OK after that
|
|
|
Now, she needs to configure the connectivity for the target system, Redshift
Replace the value for <RedshiftClusterEndpoint> ,<RedshiftClusterPort> ,<RedshiftClusterDatabase> , <RedshiftClusterUser> and <RedshiftClusterPassword> with the value previously determined. |
Input below parameters in the connection Tab:
click |

|
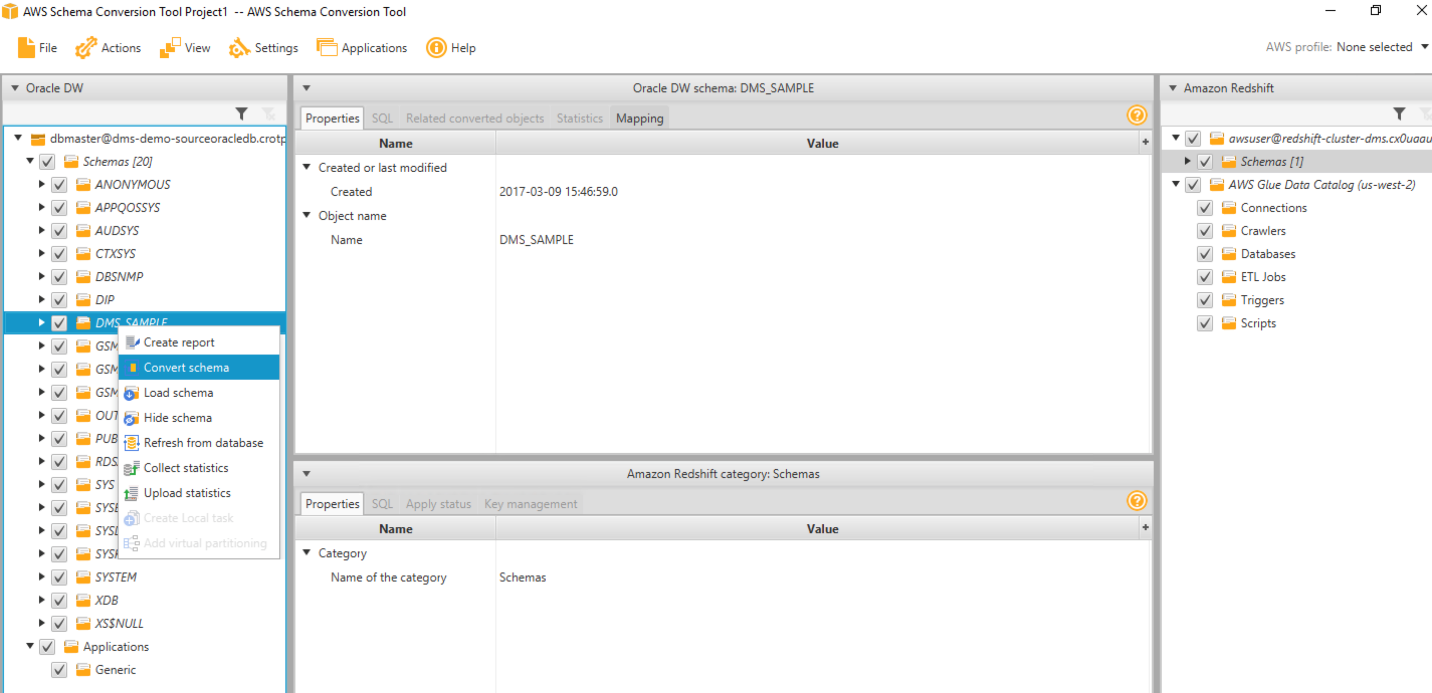
On the left hand side, she can see all objects in Oracle and on the right hand side, all Redshift objects. She may now convert the Oracle schema DMS_SAMPLE
|
Right click DMS_SAMPLE schema on the right hand object list and click convert schema
Click the default options |
|
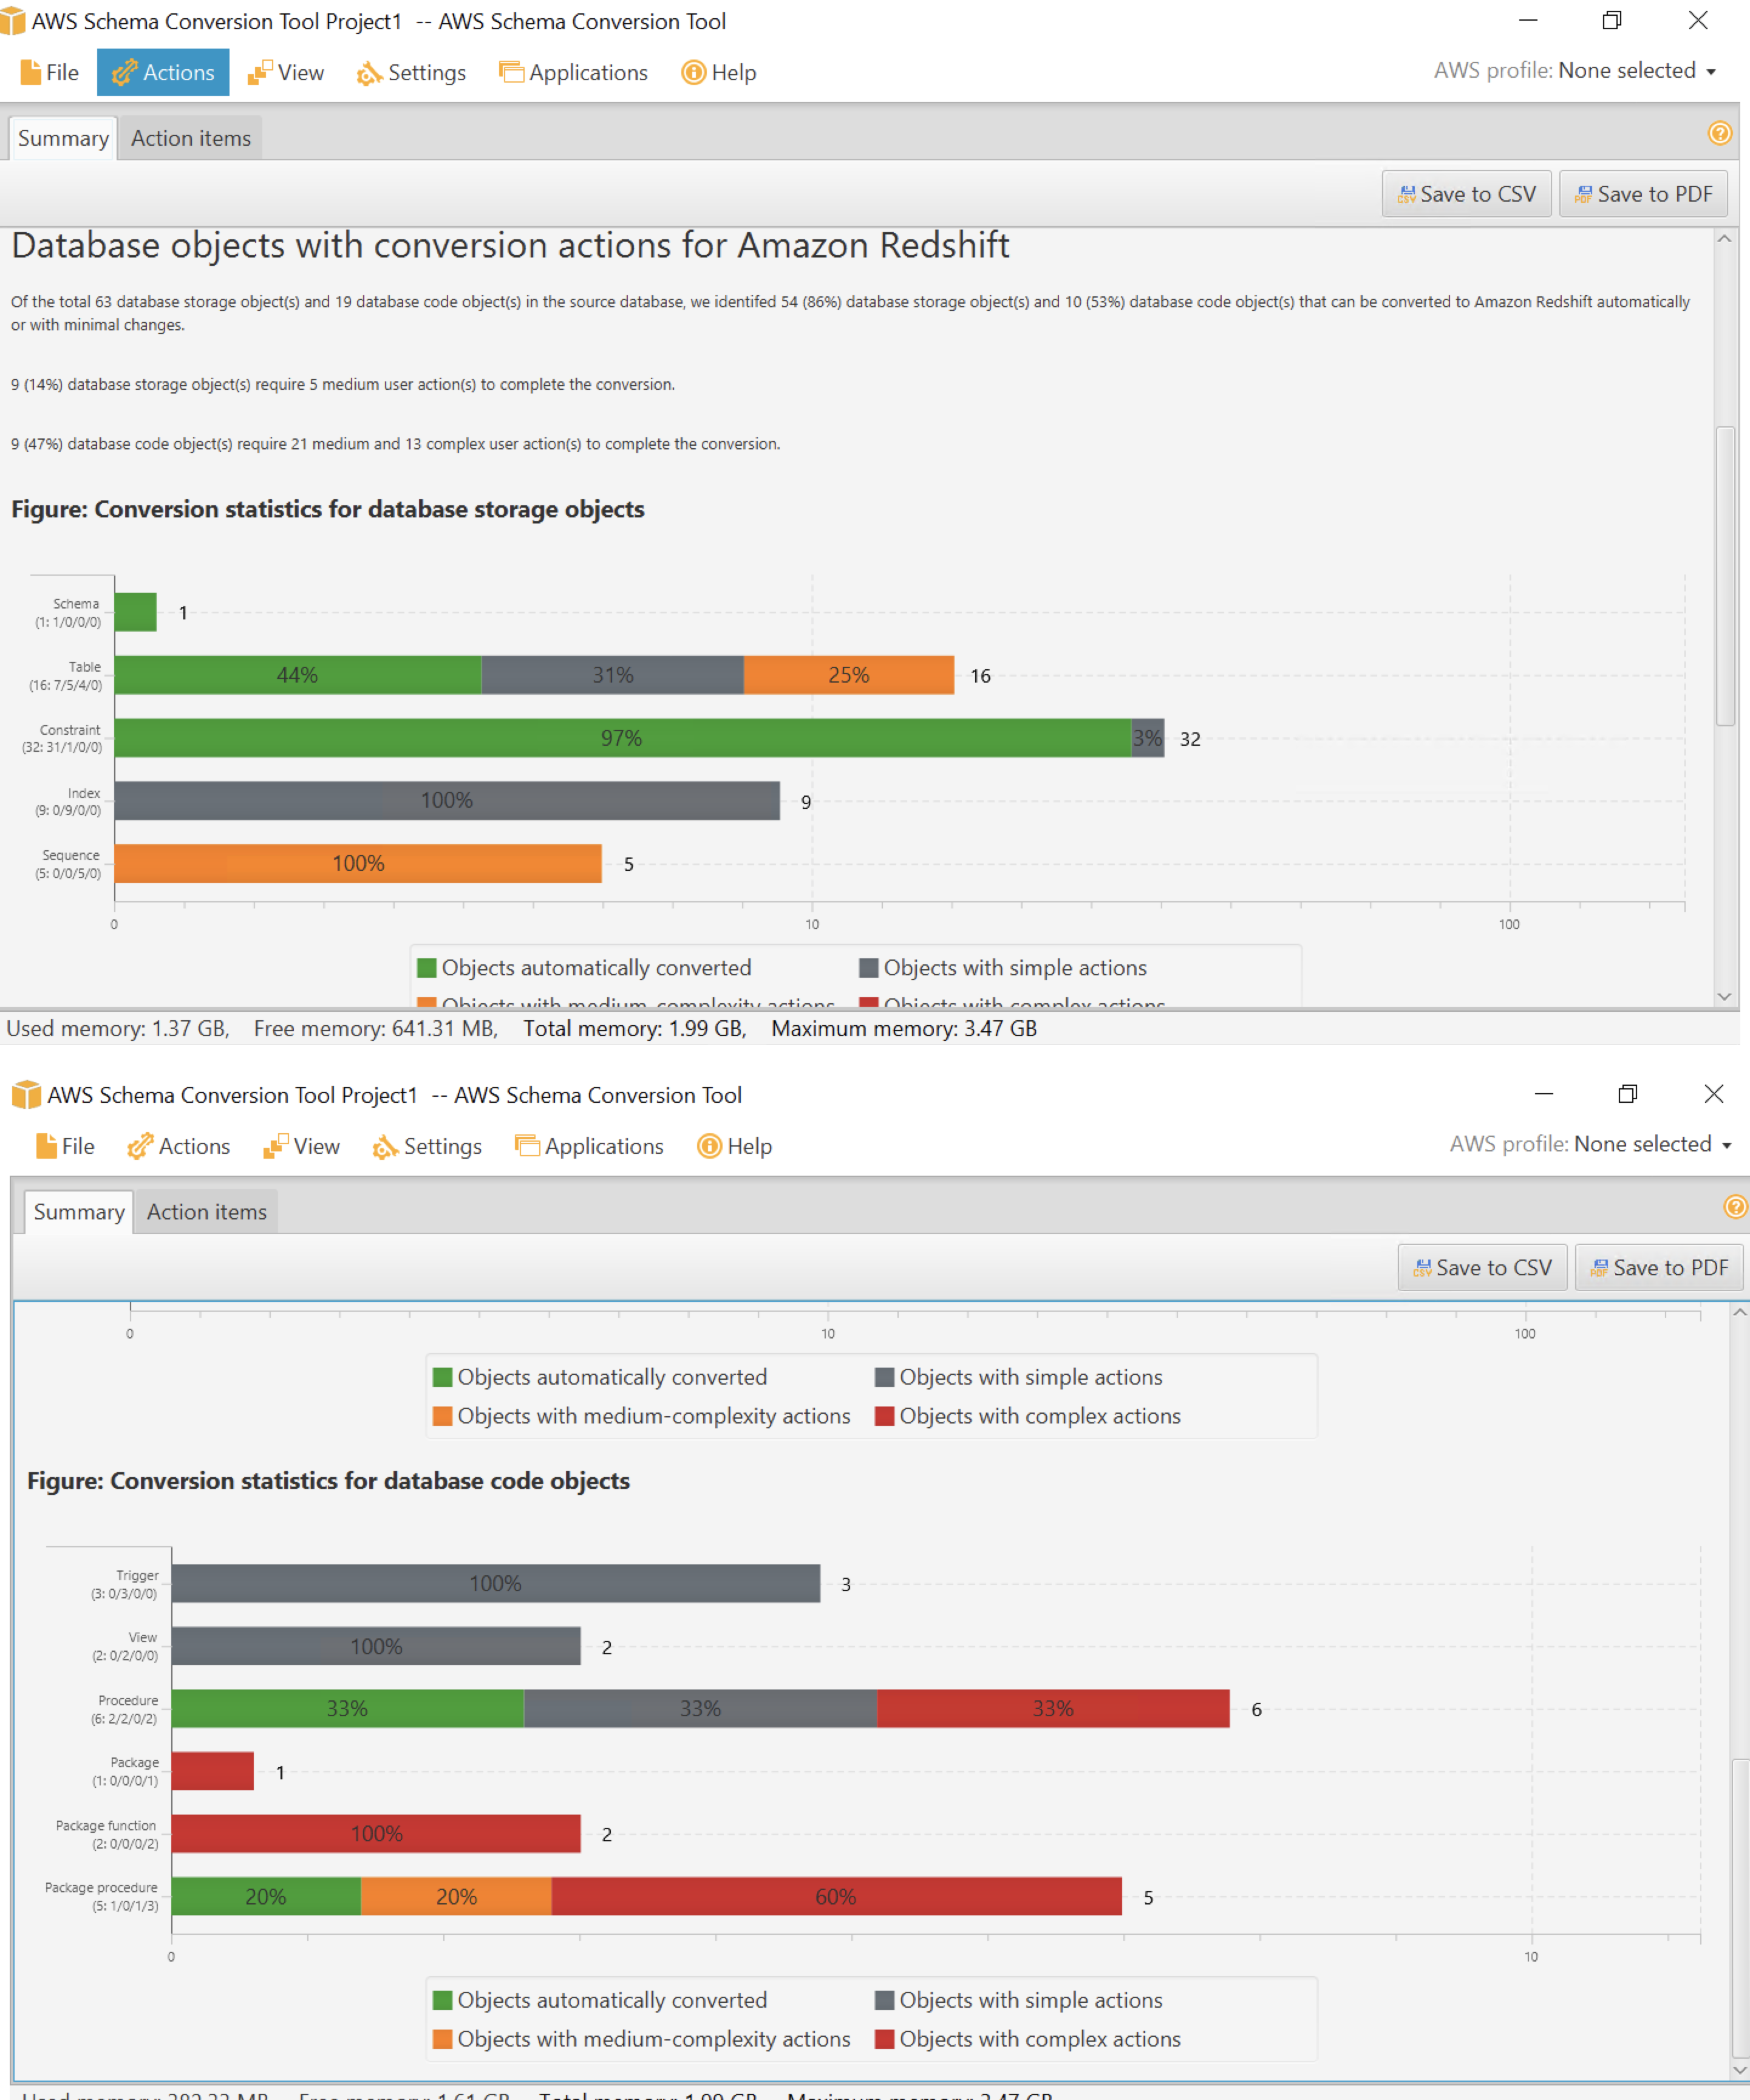
| All Oracle objects got converted to Redshift syntax now. But there are some objects showing in Red here, which essentially means that SCT couldn’t fully migrate these objects. she can view an assessment summary for the migration |
Click View > Assessment Report View
|
|
AWS SCT produces an executive summary describing the overall migration effort.
This summary describes which objects could and couldn’t be migrated successfully using SCT. If she clicks Action Items page, it also shows what action Marie needs to take to migrate the unsuccessful objects
|
Click Action Items tab to show the action items
|
|
|
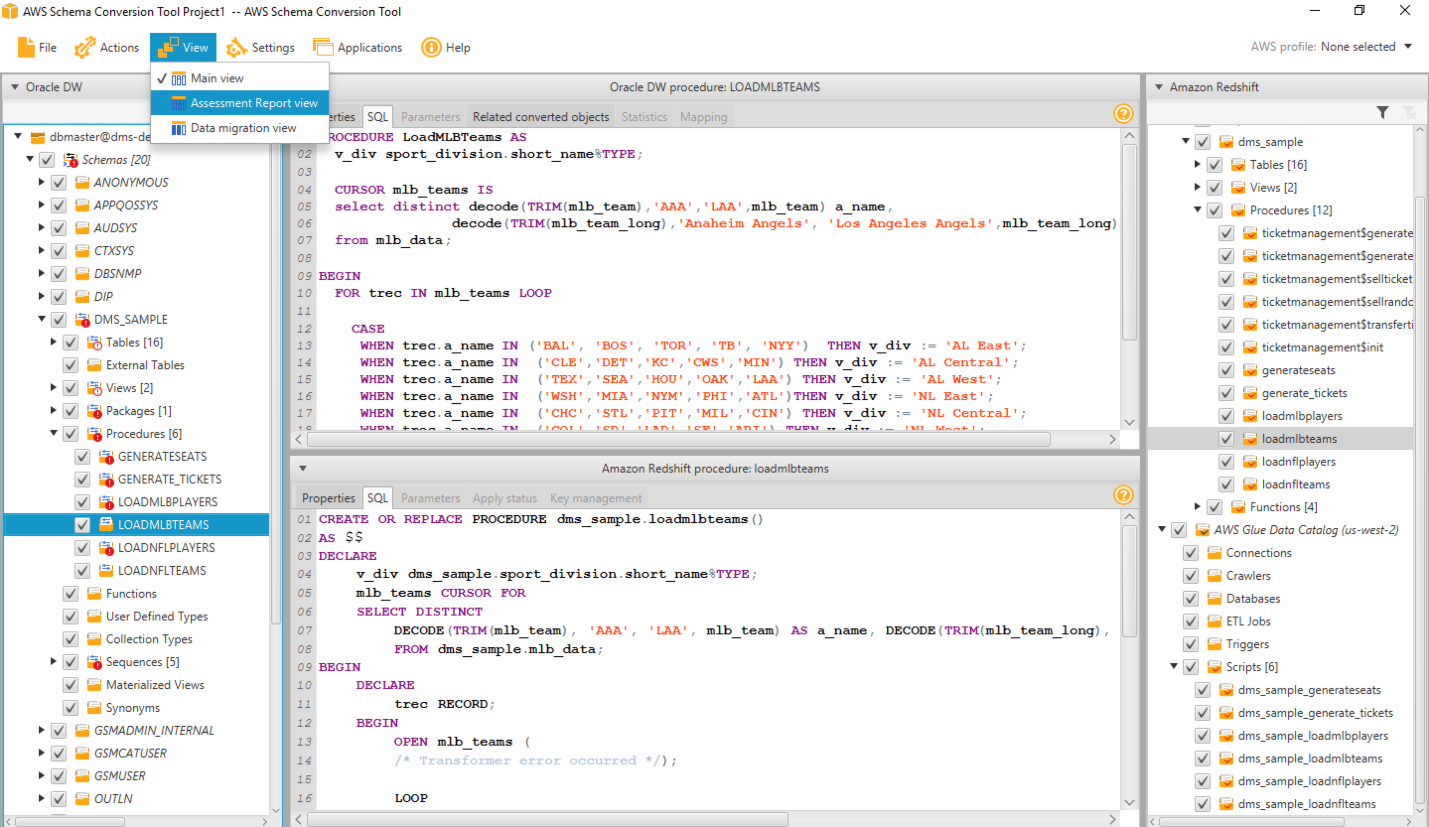
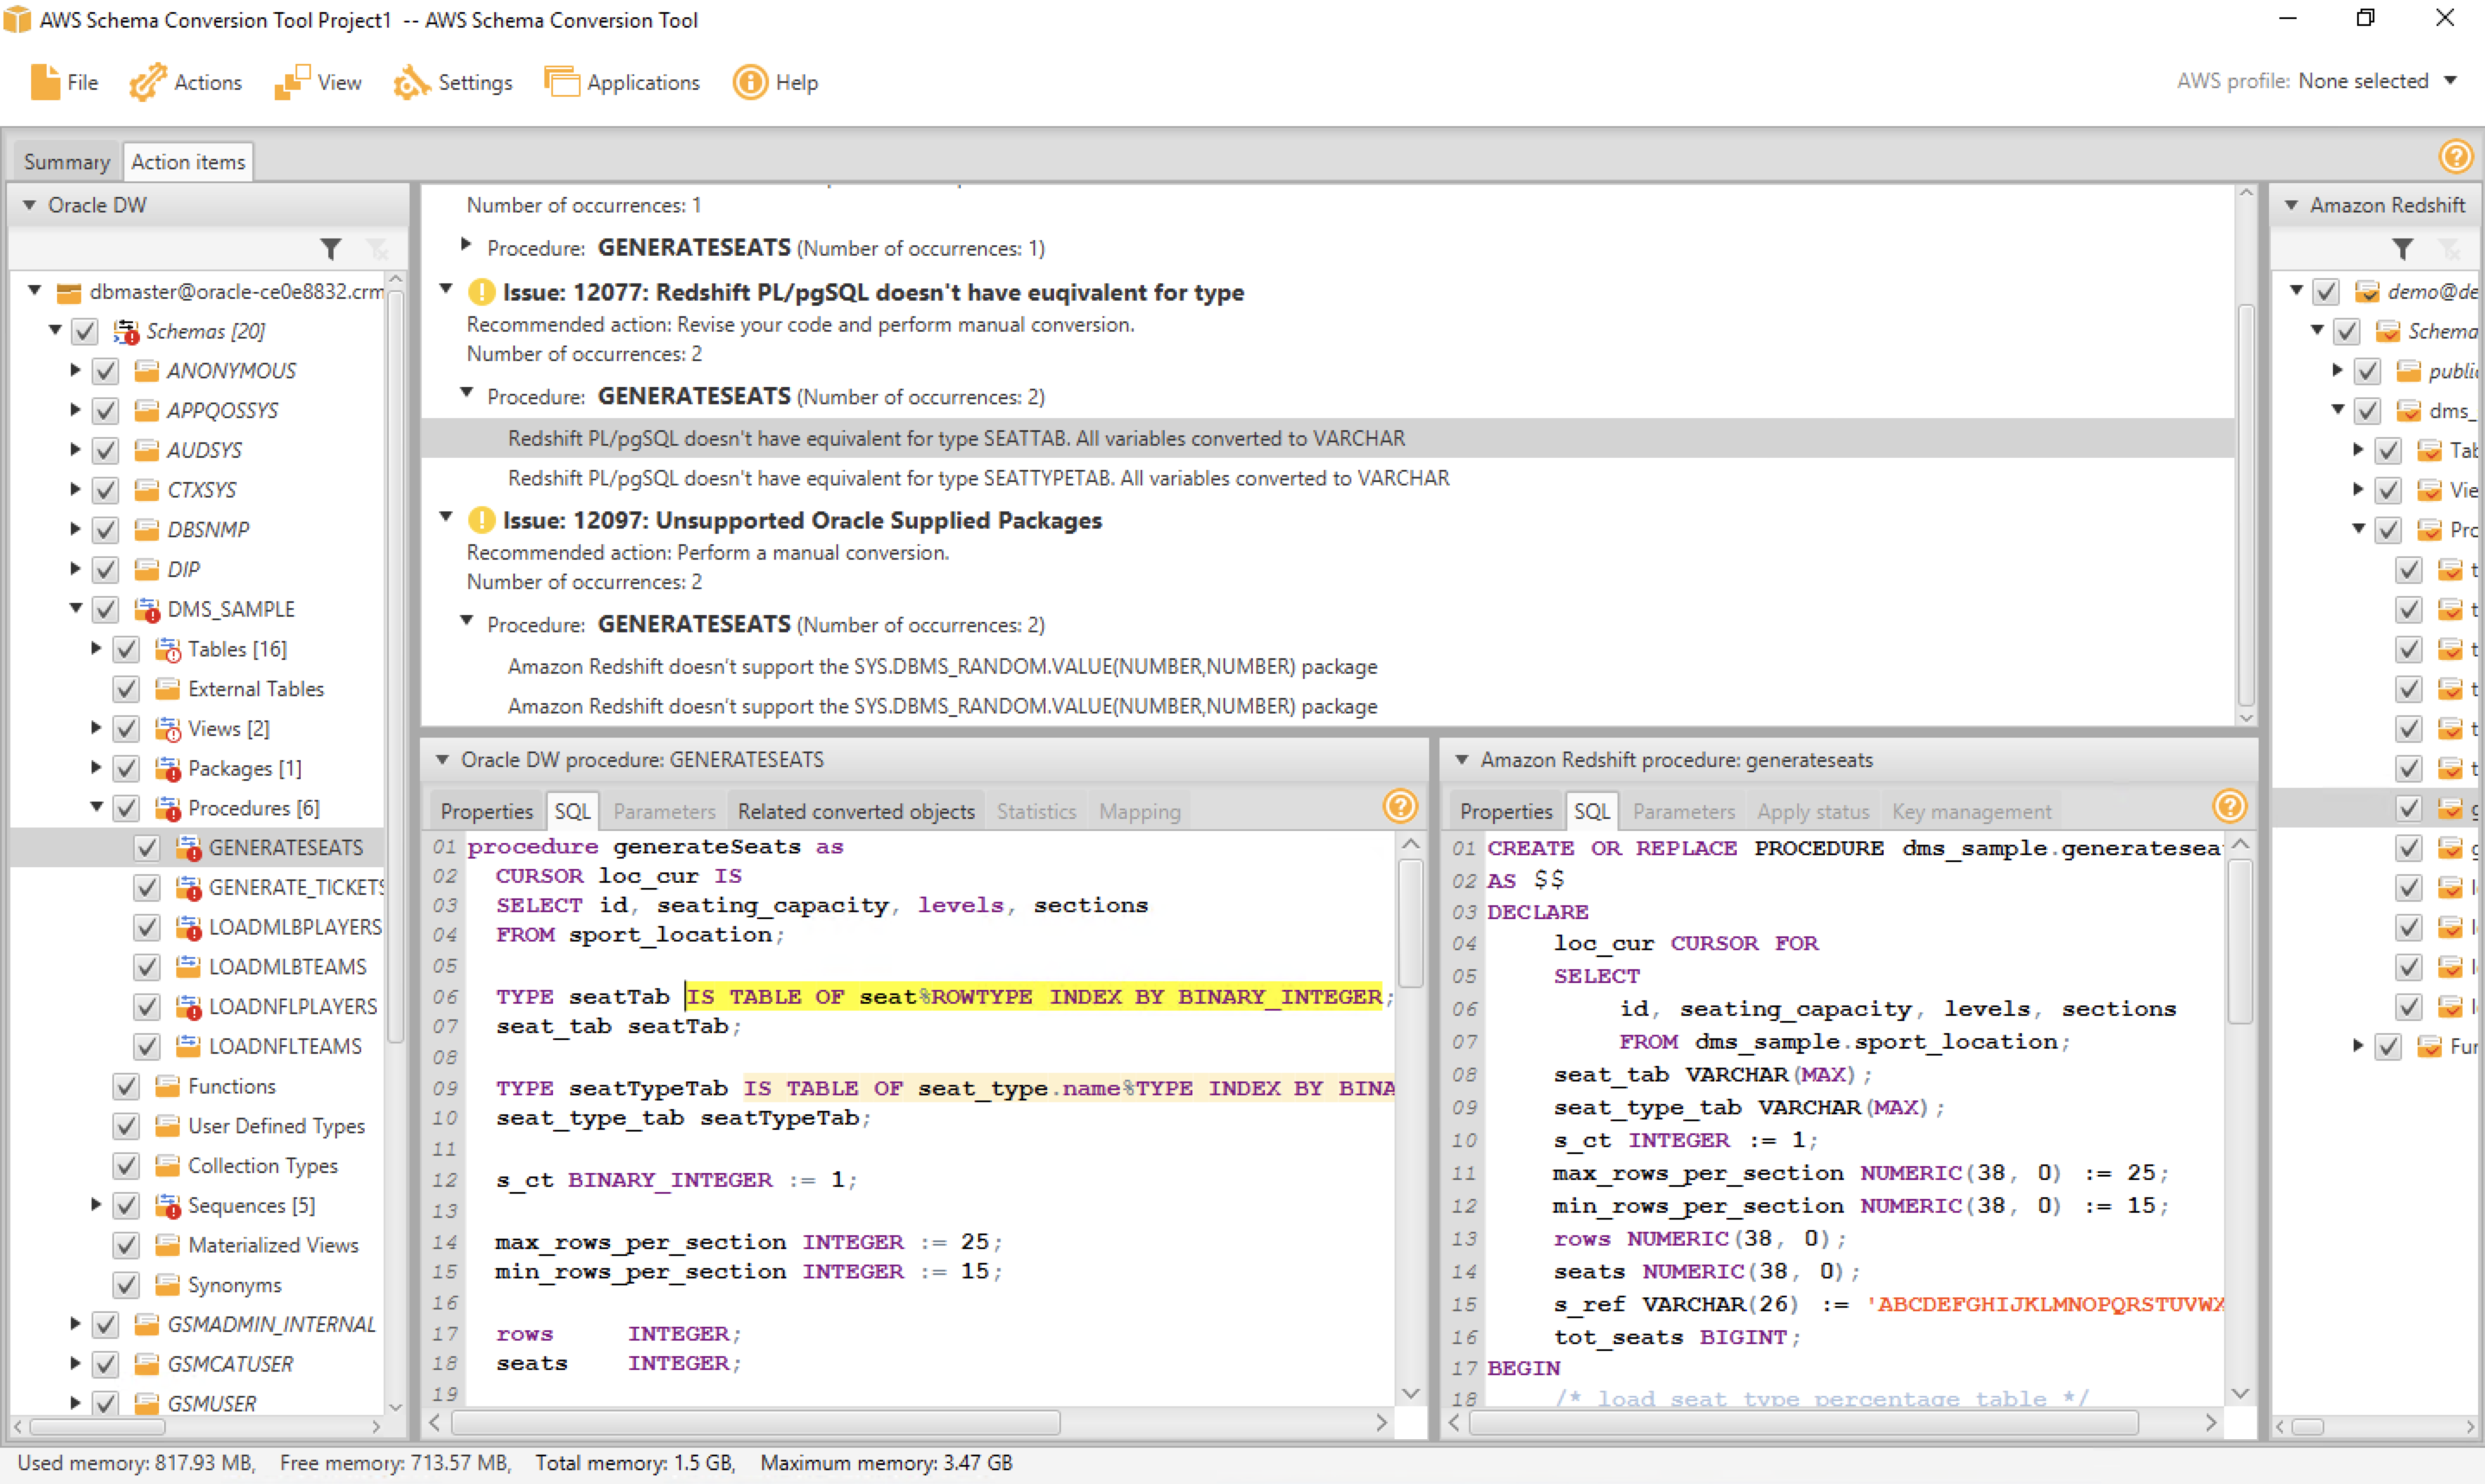
Let us examine a stored procedure code and select any procedure code.
It shows Oracle/Redshift code side by side and also highlights all code that could not be migrated. On the top action items screen, you can also see the automated recommendations on how to resolve these code migrations. For example, we can see that PL/SQL tables were used in this code, which is a vendor specific code and hence SCT could not convert it properly. Marie would need to manually fix the code now as auto converted by SCT is using varchar(max), which may not be an appropriate solution to convert these vendor specific code. |
Select the first stored procedure generateSeats and explain various tabs shown on the screen
|
|
Now, to save the successfully migrated objects in Redshift, he’ll click dms_sample on the right hand side and click apply to database. This will create all these structures in Redshift side.
|
Right click dms_sample on the right hand side Redshift tab and click apply to database.
Click the default options |

|
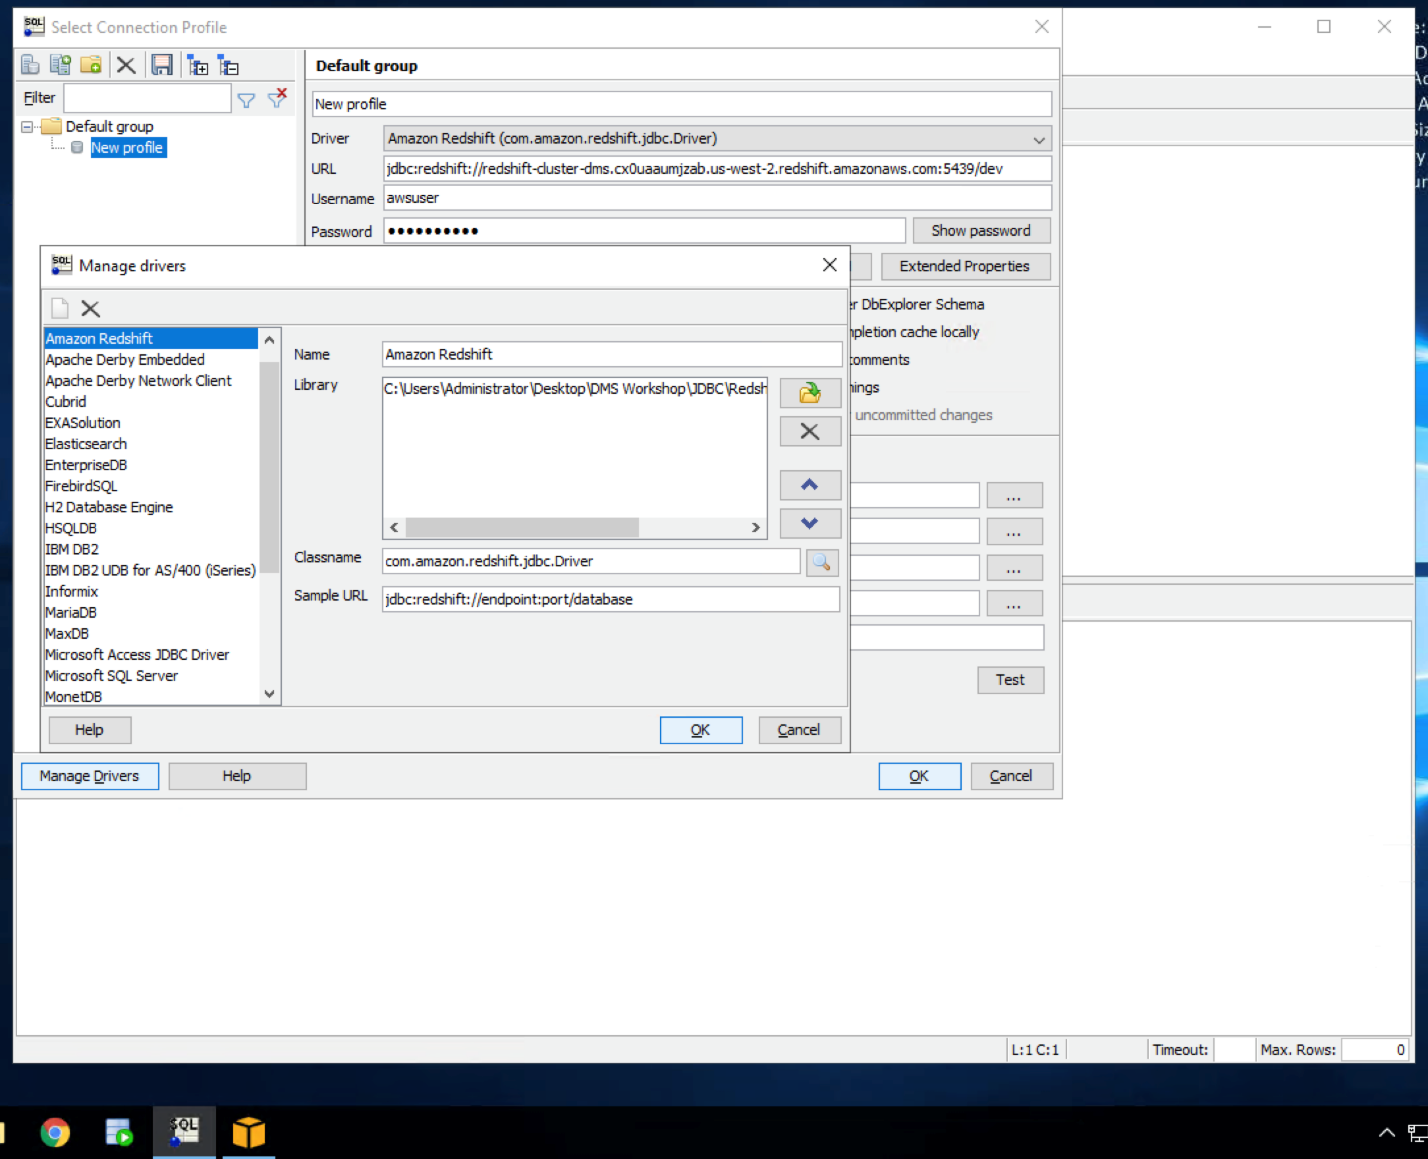
| Now, Marie may verify that in Redshift using any IDE like SQL workbench, which is an open source JDBC IDE. Here, she will need to provide the driver path for Redshift. |
Open SQL workbench from the taskbar shortcut, which opens the new connection window. In that, click Manage Drivers in bottom left hand corner and select Redshift. Correct the driver path as
|
|
|
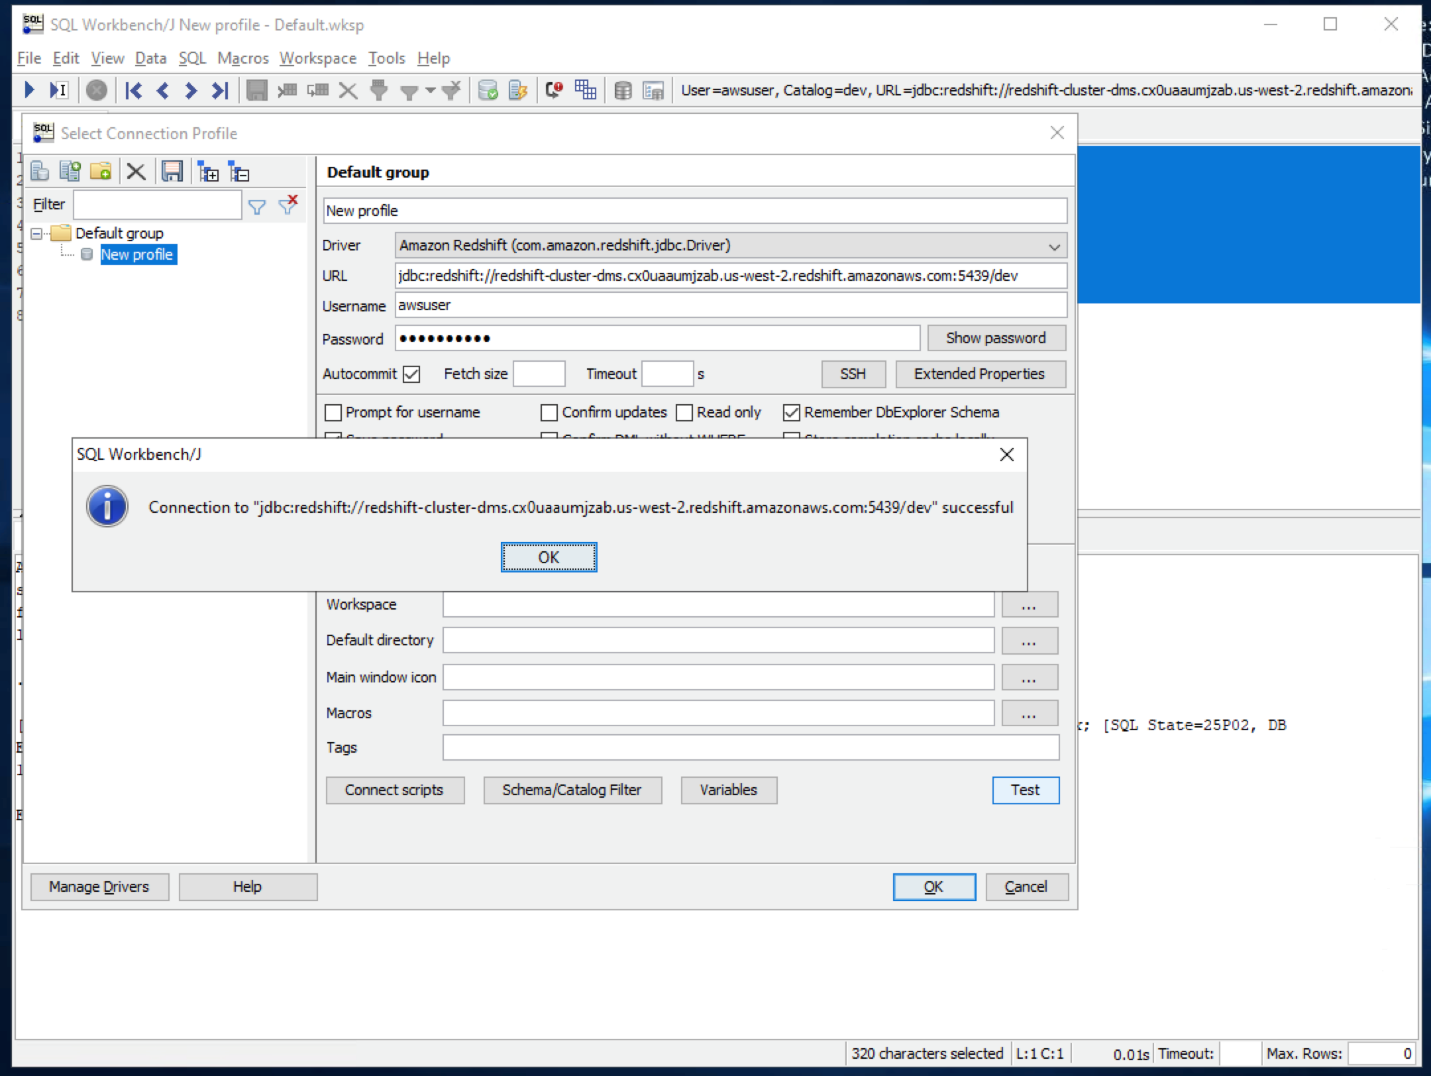
Then provide the connectivity settings
Replace the value for <RedshiftClusterEndpoint> ,<RedshiftClusterPort> ,<RedshiftClusterDatabase> , <RedshiftClusterUser> and <RedshiftClusterPassword> with the value previously determined. |
On the connectivity screen, select inputs: Click |
|
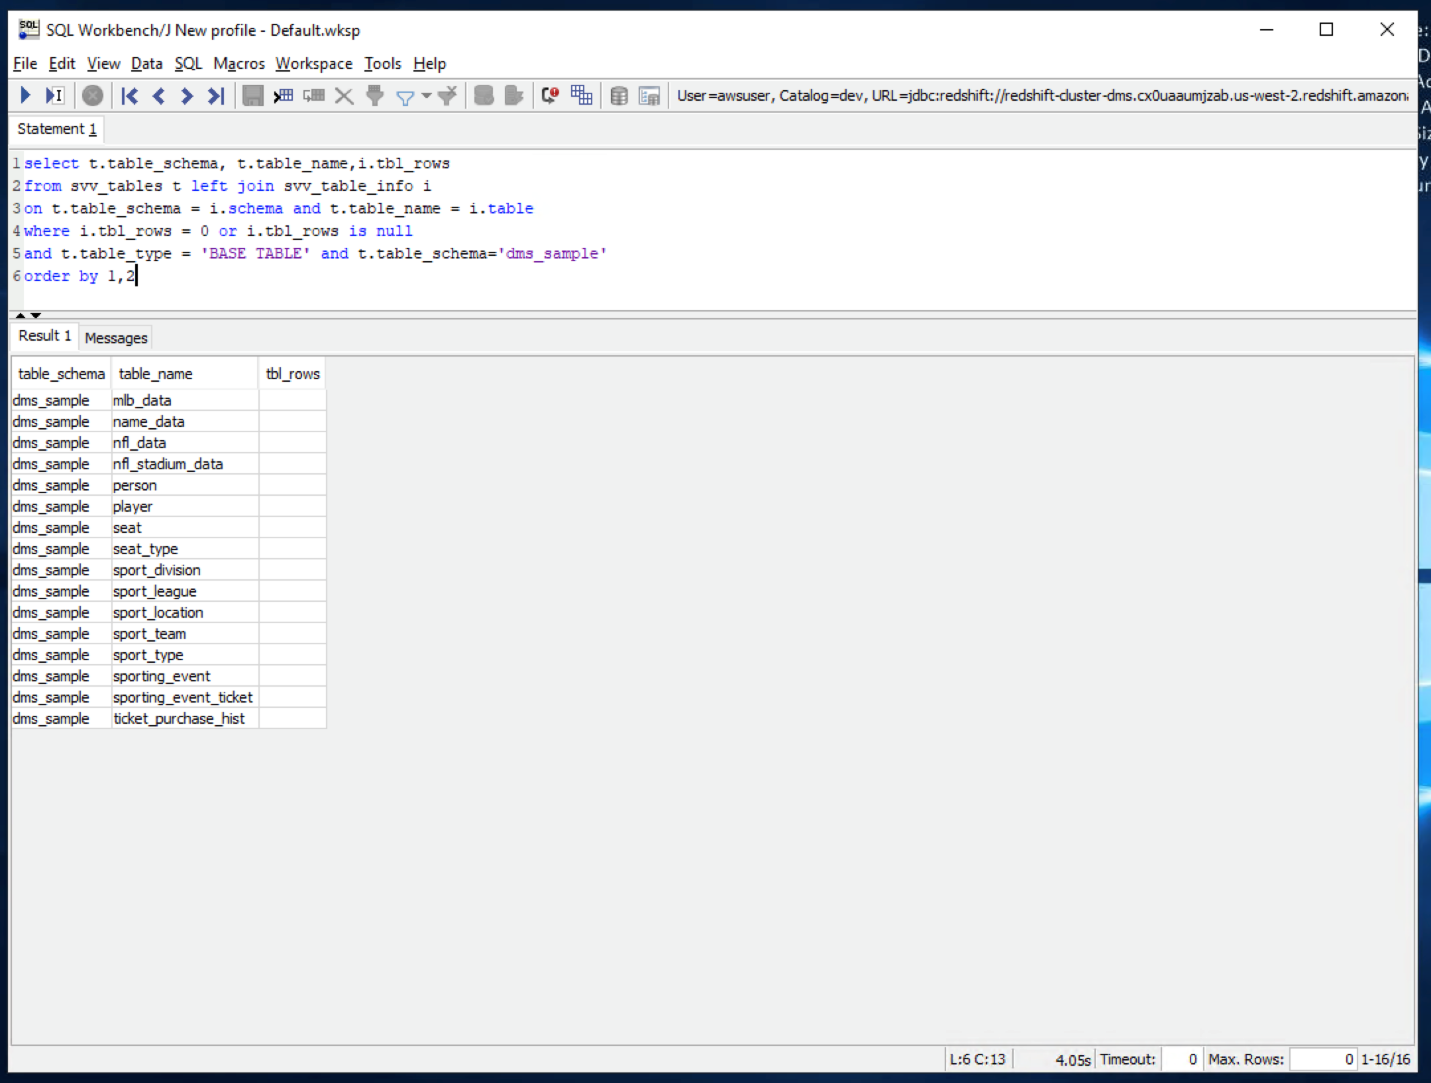
Let us see what are the tables in our dms_sample schema.
All these tables got successfully created in this Redshift schema, but there are no records in it. AWS SCT took care of code conversion from Oracle syntax to Redshift syntax. Next, she will migrate data from Oracle to Redshift using a service called AWS Database Migration Service (DMS) |
Open SQL workbench and execute below query:
|
|
| Before that, let us connect to Oracle and verify the dataset in Oracle |
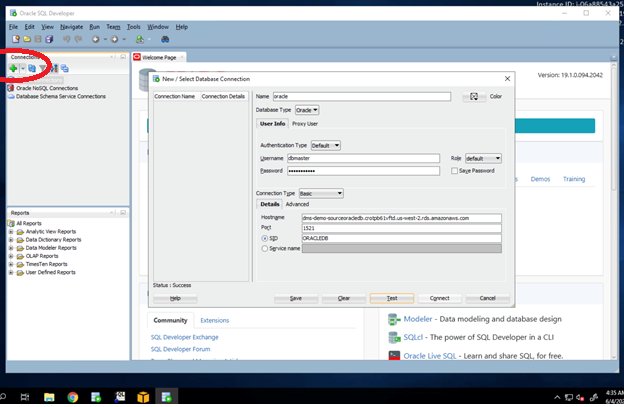
Open Oracle SQL Developer from the taskbar shortcut and click new connection button on left hand top side. Input below parameters:
Click |
|
| Let us check these tables in Oracle using Oracle SQL Developer. She can see decent amount of records for this NFL ticketing dataset. To migrate these records, he’ll be using AWS Database Migration Service |
Open Oracle SQL Developer and execute this query:
|
Migrate the data
| Say | Do | Show |
|---|---|---|
| Now, Marie opens her Browser and logs in to AWS console and opens DMS Service. Here she has already created a task to replicate all existing data and also ongoing changes from Oracle to Redshift. |
Open Browser and login to AWS console. Navigate to AWS DMS service and click Database migration tasks. You should be able to see a task in Ready state.
|

|
| Now, she will run the migration, which will migrate all existing data from Oracle to Redshift and then also take care of Change data capture(CDC) to cater ongoing changes. This should take about 10 minutes to complete. |
Select the replication task > click Action > restart/resume
|

|
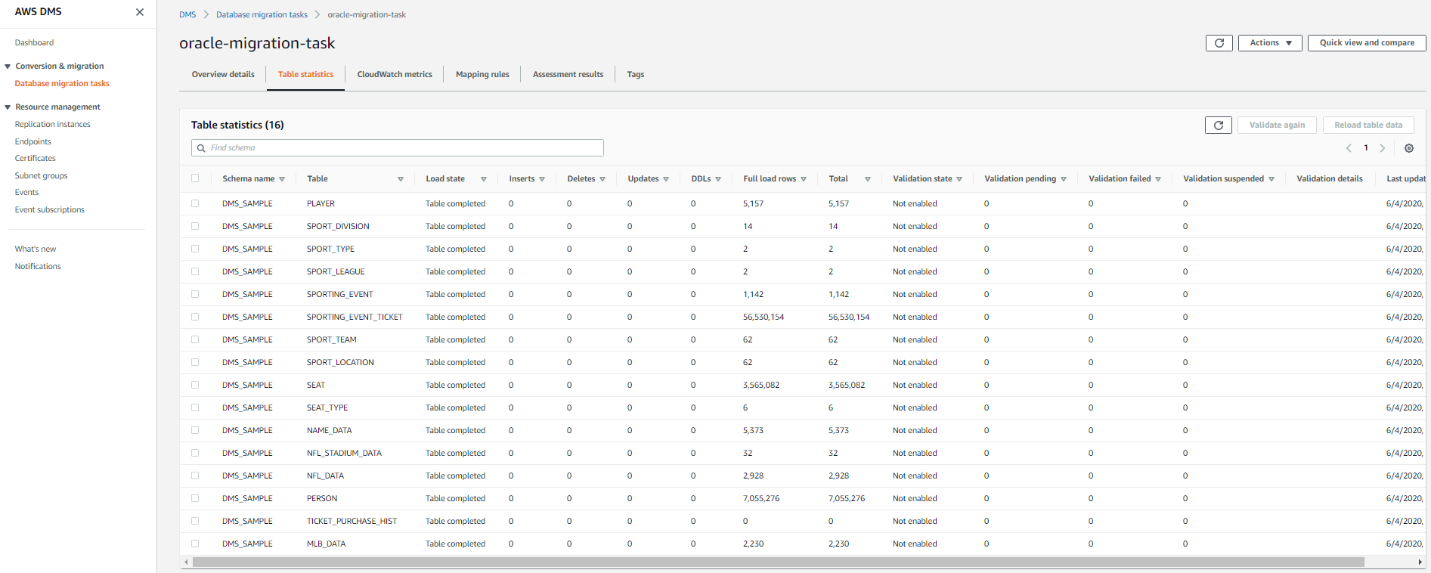
| If Marie wants to view the statistics of what data is getting transferred, she can go to this summary page allows him to view the statics of how many records are getting transferred via DMS |
Click full load task and click table statistics
|
|
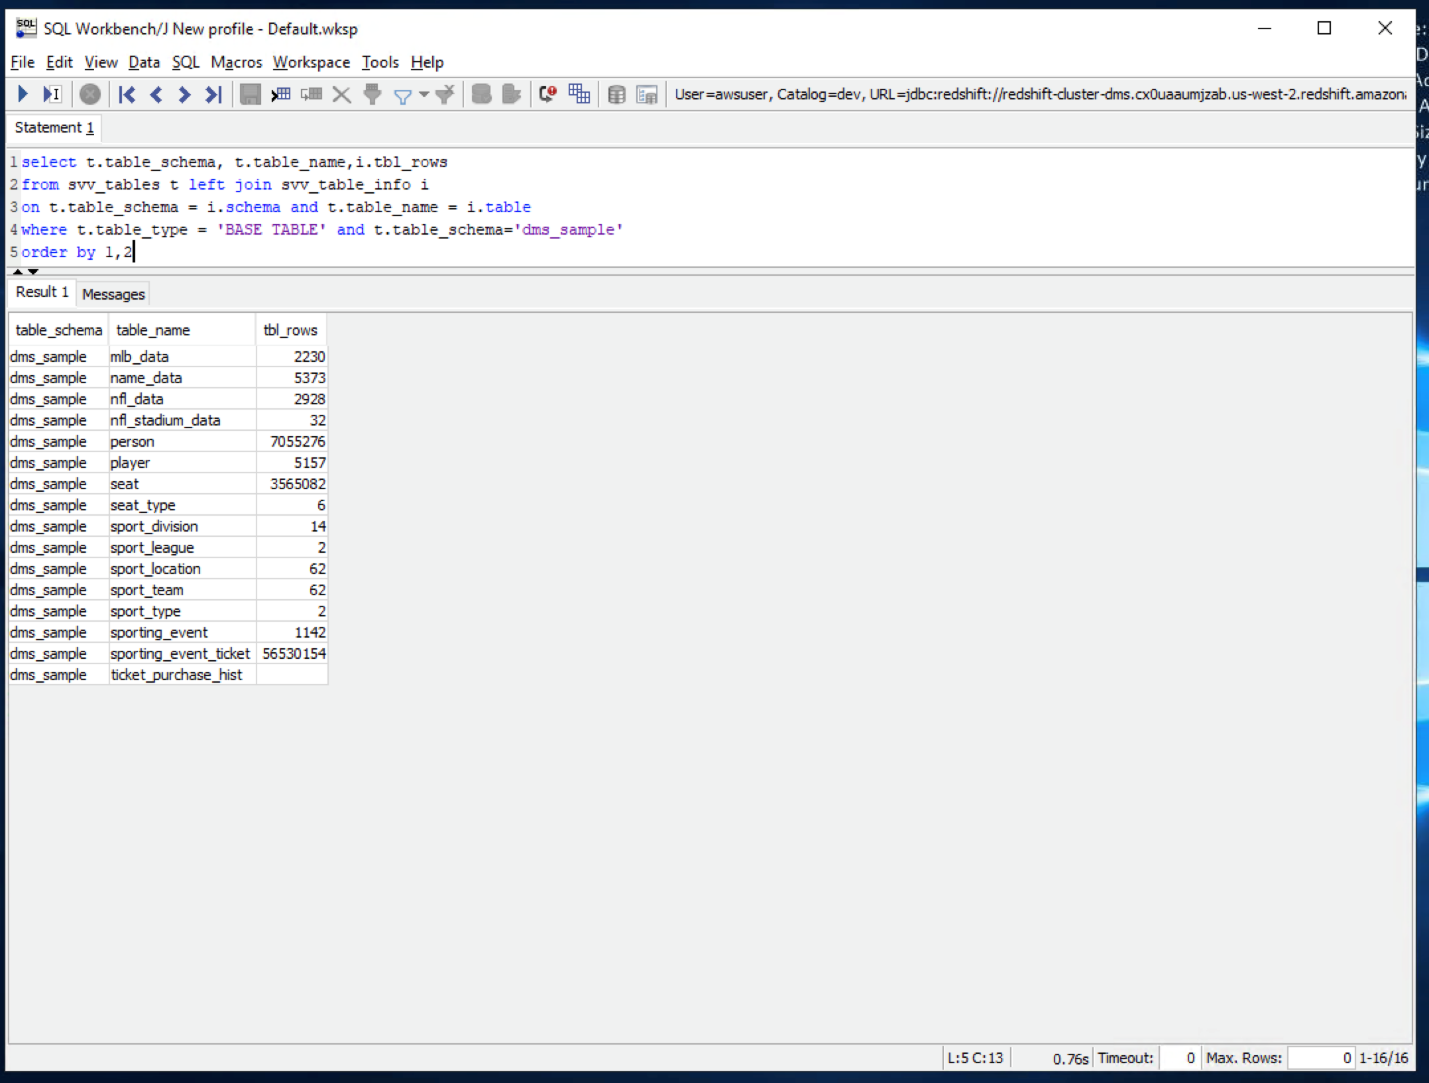
| She may verify the same in SQL workbench. She can see all these tables got loaded with data in Redshift |
Execute the same command executed earlier in SQL workbench to view the record count
|
|
Keep the data in sync
| Say | Do | Show |
|---|---|---|
|
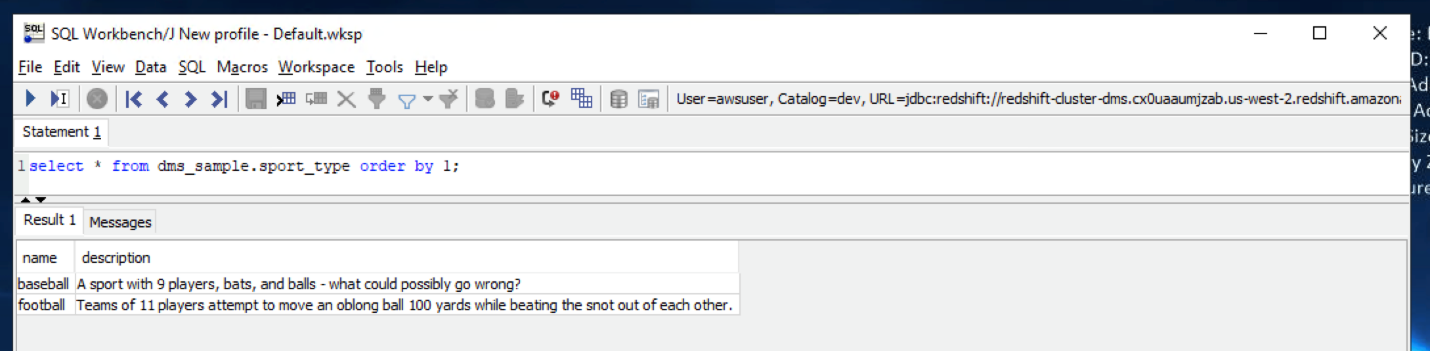
Now, Marie wants to verify the change data capture functionality.
She has a table |
Execute below command in SQL workbench to view sport_type table
|
|
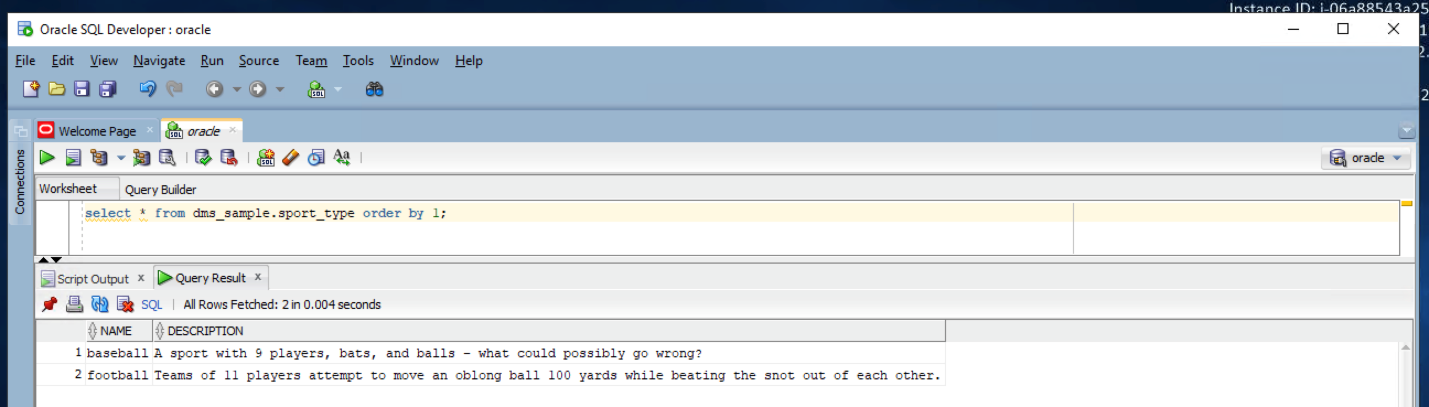
| She can view this table in Oracle as well. This also shows 2 records only |
Execute below command in Oracle SQL Developer to view sport_type table
|
|
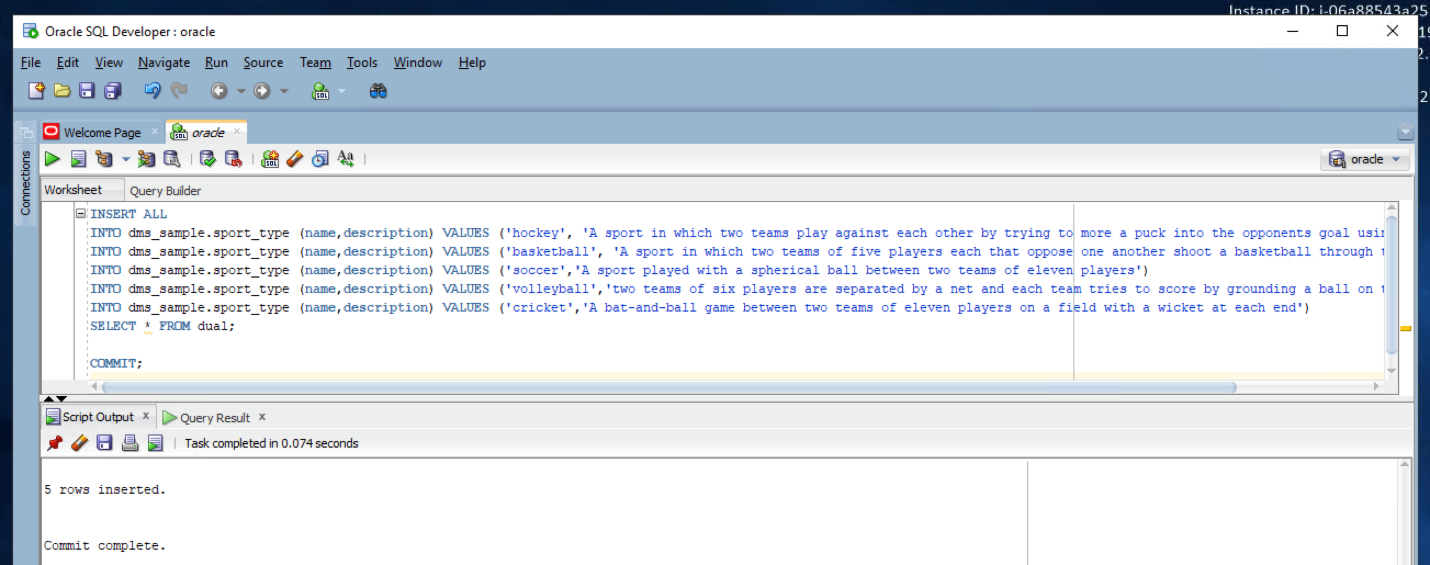
Marie wants to confirm that the CDC process is operational. For that she will insert some records in the sport_type table in Oracle.
|
Execute below command in Oracle SQL Developer to insert five records in sport_type table
|
|
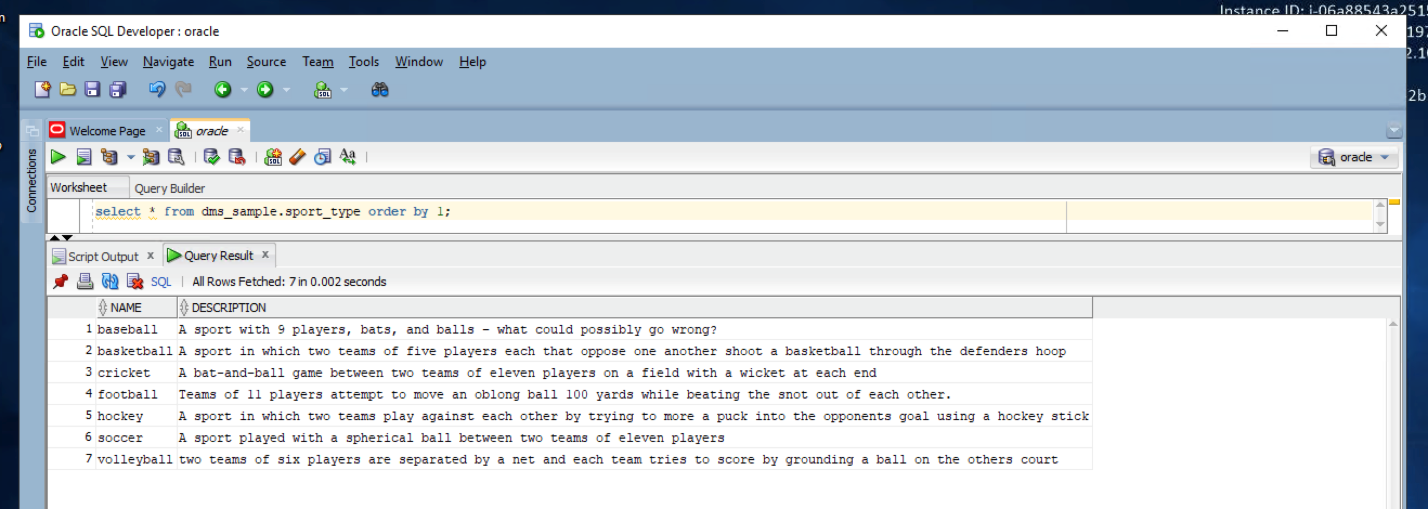
| Whe she views the table again, she should see seven records in total now |
Execute below command in Oracle SQL Developer to view sport_type table
|
|
| When she goes back to Redshift, she should see the seven newly inserted records there too |
Execute below command in SQL workbench to view sport_type table
|
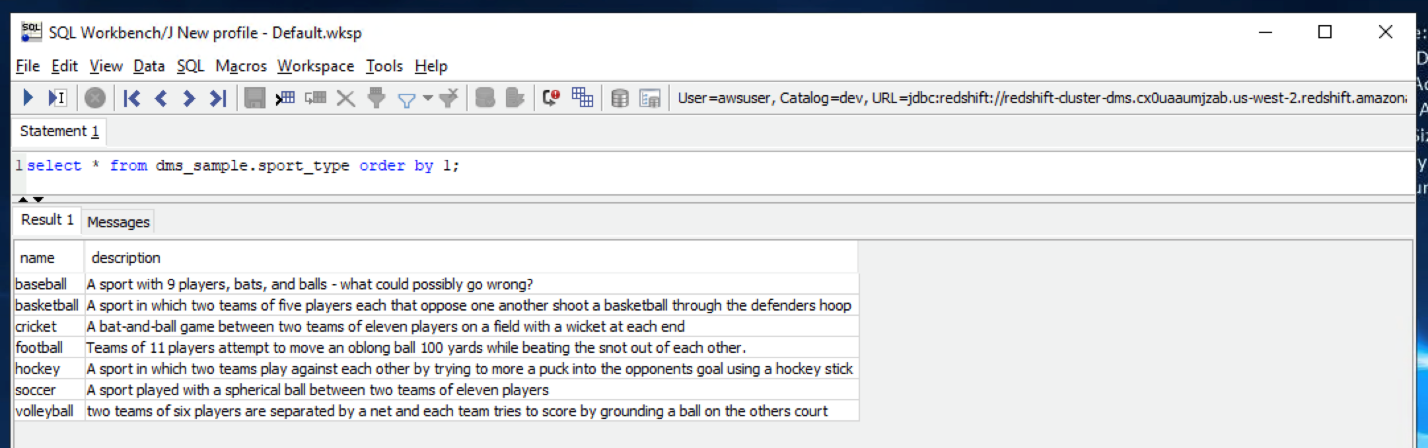
|
| If I want to view the logs of the CDC process, she gets to see a nice tabular metrics in the DMS console |
Navigate to DMS service in AWS console and Select the Ongoing Replication task and click table statistics
|

|
Before you Leave
To reset your demo, drop the tables created by executing the following SQL statement in Redshift.
drop table if exists dms_sample.person cascade;
drop table if exists dms_sample.ticket_purchase_hist cascade;
drop table if exists dms_sample.sporting_event_ticket cascade;
drop table if exists dms_sample.sporting_event cascade;
drop table if exists dms_sample.seat cascade;
drop table if exists dms_sample.sport_type cascade;
drop table if exists dms_sample.sport_location cascade;
drop table if exists dms_sample.sport_team cascade;
drop table if exists dms_sample.sport_league cascade;
drop table if exists dms_sample.sport_division cascade;
drop table if exists dms_sample.seat_type cascade;
drop table if exists dms_sample.player cascade;
drop table if exists dms_sample.name_data cascade;
drop table if exists dms_sample.nfl_stadium_data cascade;
drop table if exists dms_sample.nfl_data cascade;
drop table if exists dms_sample.mlb_data cascade;
Execute the following SQL on Oracle to delete the inserted records:
delete from dms_sample.sport_type where name in ('hockey', 'basketball', 'soccer', 'volleyball', 'cricket');
If you are done using your cluster, please think about deleting the CFN stack or to avoid having to pay for unused resources do these tasks:
- pause your Redshift Cluster
- stop the Oracle database
- stop the DMS task