Federation using PingOne
Demo Video

Client Tool
This demo will use a browser to access the AWS and Ping Consoles. You will also need to a SQL Client configured.
Before you Begin
Ensure you have access to the AWS Console and an existing Redshift cluster with permissions to modify it. Capture the following parameters from the launched CloudFormation template as you will use them in the demo.
https://console.aws.amazon.com/cloudformation/home?region=us-east-1#/stacks?filteringText=&filteringStatus=active&viewNested=true&hideStacks=false
- RedshiftClusterEndpoint
Challenge
Rachel has been tasked to enable federated single sign-on for the Redshift users. This will help provide logging in capabilities for the users without requiring an additional login and password for Redshift. Users will be able to login using their existing enterprise credentials. This is also a good Information Security best practice that helps centralize management and governance of permissions, access, identity and authentication for the users at Red Imports LLC. To accomplish this task she will perform the following tasks:
- Ping Identity groups and users setup
- Ping Identity application configuration
- AWS IAM SAML federation configuration
- Amazon Redshift SQL client connectivity test

PingIdentity groups and users setup
| Say | Do | Show |
|---|---|---|
| Create a PingIdentity account and create the users and groups and assign the users to the groups they belong and authorized to access. | You can setup a free trial “PingOne for Enterprise” account at https://www.pingidentity.com/en/trials/p14e-trial.html |
|
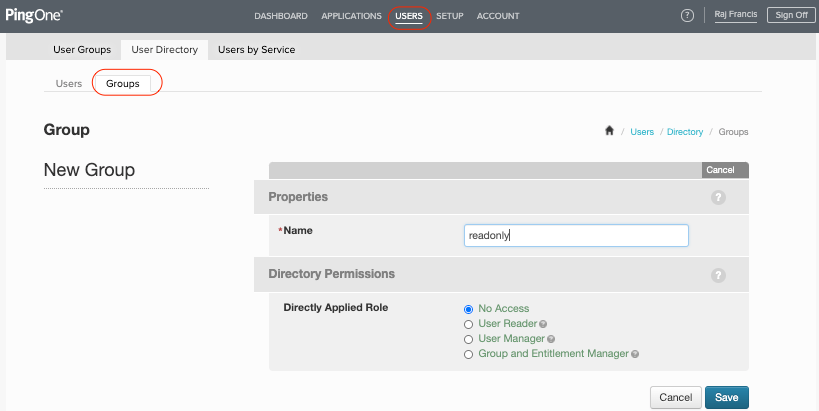
| Create Groups and Users in PingOne. You can create the Groups and Users under the “User Directory” option. You can setup the groups according to the read/write access privileges or by business functions in your organization to control access to the database objects. In this post we will see how you can setup groups based on “ReadOnly” and “ReadWrite” privileges across all functions. |
Follow the steps below to create the groups and users.
|

|
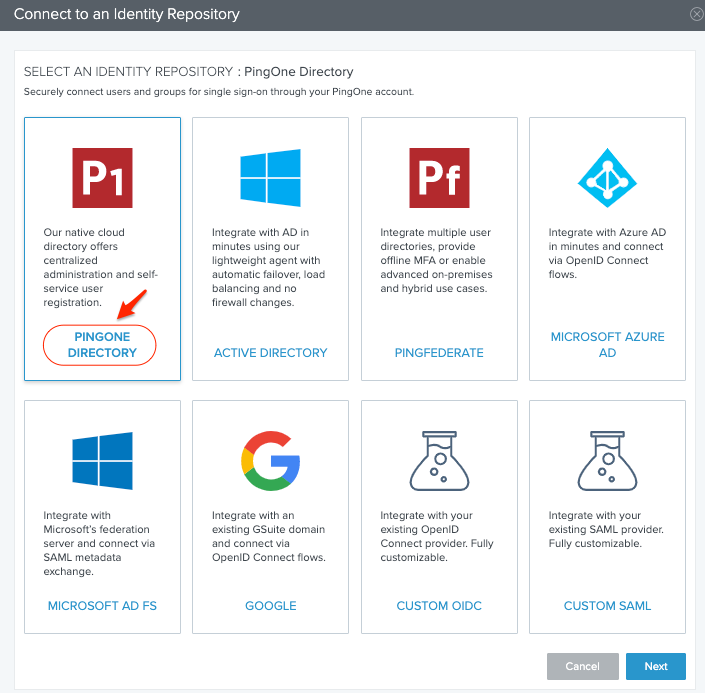
You will be connected to the PingOne repository and should see a message Configured
|
Choose PingOne and click Next
|

|
| Now you can create the groups based on which you want to manage your users and assign users to the groups |
|

|
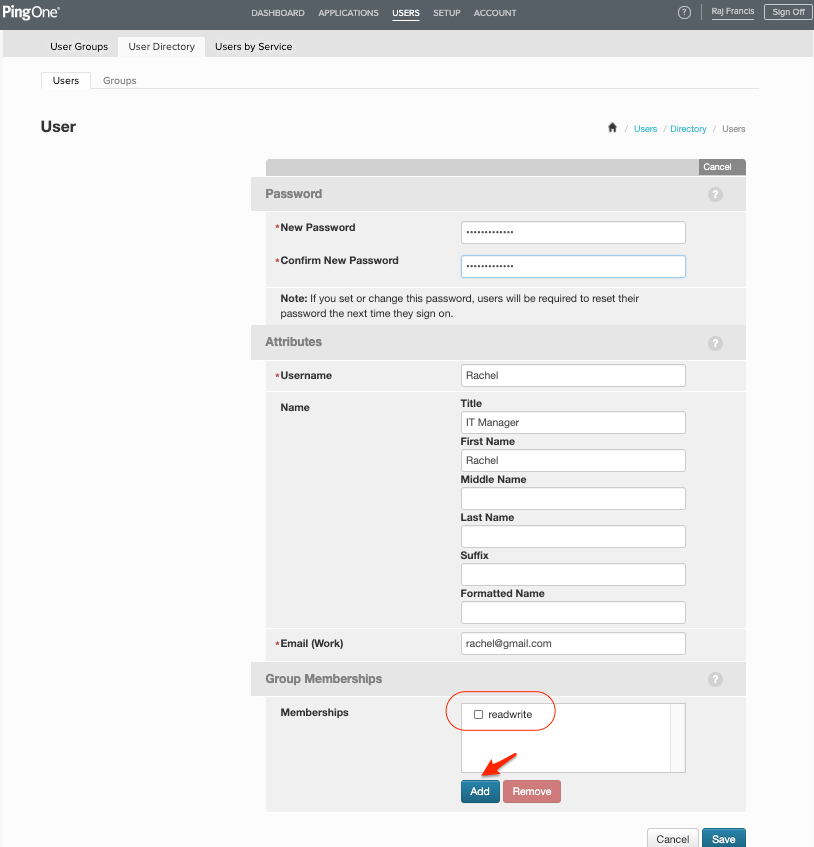
| Lets add users to these groups |
Users tabAdd Users button to create the usersBob and RachelGroup MembershipsAdd and select readonly group for Bob and readwrite for Rachel
|

|
PingIdentity Application Configuration
| Say | Do | Show |
|---|---|---|
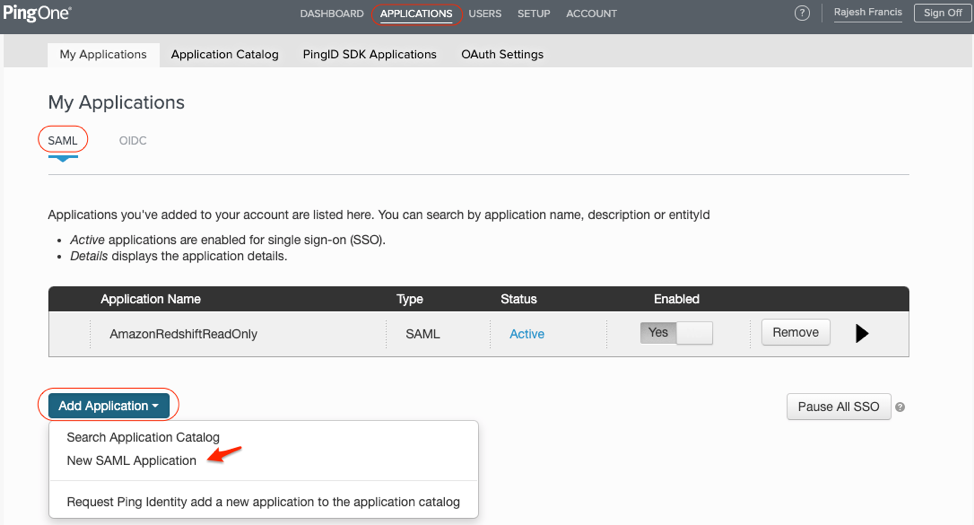
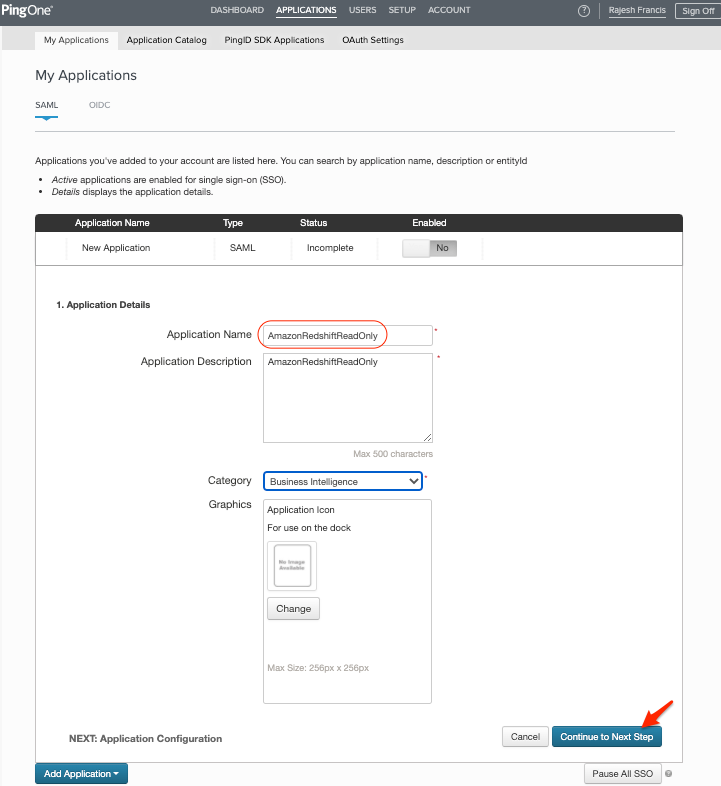
The next step is to setup the application in Ping for the Amazon Redshift. Since we decided to control access through two groups, ReadOnly and ReadWrite, we will create two applications. |
In the Application Configuration section, set the properties as below:
|
|
| Next you will setup the Application Configuration. |
In the Application Configuration section, set the properties for Assertion Consumer Service and Entity ID as below.
|

|
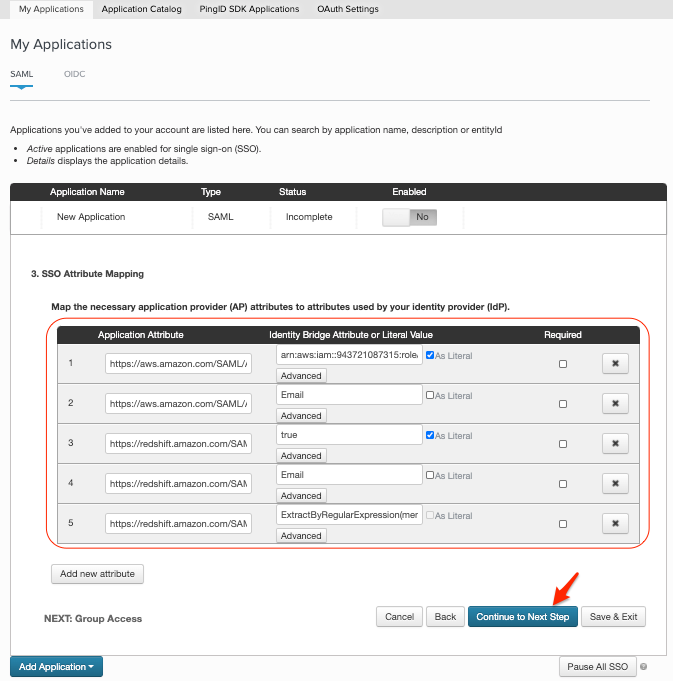
| The next step is to setup the SSO Attribute Mapping pingreadwriterole => IAM Role name (you will use this role name in next step to create the IAM Role) pingreadwriteprov => Identity Provider name in IAM where the metadata will be imported (you will use this Provider name in next step to create Identity Provider and import the Metadata downloaded from this PingIdentity Application configuration) |
In the SSO Attribute Mapping screen set the properties of the various Application Attributes as shown below:
For
|
|
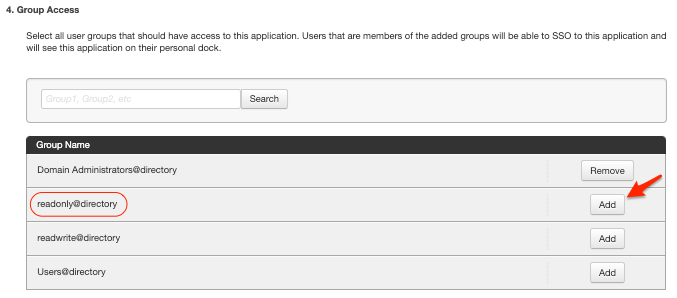
Next you will setup the right group access to the application. For the first application we will provide readonly access, so we will add readonly group
|
For group access, select the list of groups that are accessible by this Application. Users that are members of these groups added, will be able to SSO to this application |
|
Review the Application configuration and download the SAML Medata data and name it ping-saml-readonly.xml. We will use this file when we create the IAM Identity Provider in AWS IAM console.
|
In the Review screen, under section SAML Medata data, download the SAML Metadata, and save the file; name it |

|
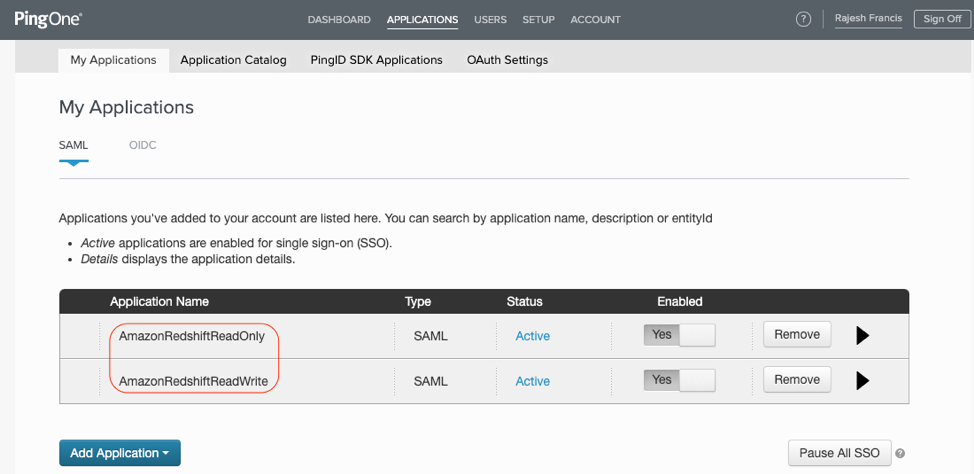
Repeat steps above and create the second application. Name the second application AmazonRedshiftReadWrite and download the SAML Metadata and name the file ping-saml-readwrite.xml. You should see the two Application names in My Applications screen.
|
The only difference is in the SSO Attribute Mapping step. For |
|
AWS IAM SAML Federation Configuration
| Say | Do | Show |
|---|---|---|
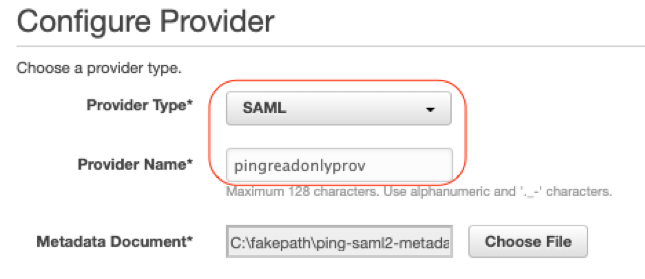
We will now setup the IAM SAML identity provider and the role(s) used in pingidentityreadonly and pingidentityreadwrite applications, to establish a trust relationship between the identity provider and AWS. You need to create two IAM identity providers, one for each application.
|
To create the SAML IAM identity providers:
|

|
Repeat the steps above in the IAM console, to create Identity Provider pingreadwriteprov, choosing the metadata xml file that you downloaded from the AmazonRedshiftReadWrite application. Now you will have two Identity providers setup for ping pingreadonlyprov and pingreadswriteprov
|
|

|
Create the IAM role and policy for the groups. Access privileges to database objects for specific user groups are controlled using IAM roles. You will separate IAM roles with policies to map to each of the groups defined in PingIdentity These roles will allow the user to access Amazon Redshift through the identity provider. Please note to use the same role name used to setup the applications in PingOne: pingreadonlyrole and pingreadwriterole
The group membership lasts only for the duration of the user session, and there is no CreateGroup permission because groups need to be manually created and granted DB privileges in Amazon Redshift. |
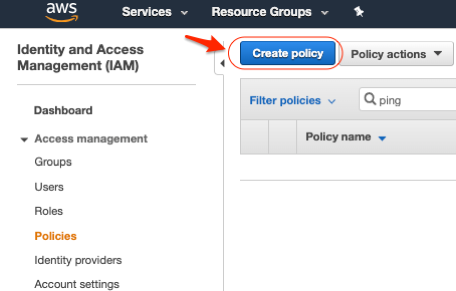
Before you create the role, create the policies with the appropriate joingroup privileges:
|
|
| Use the below JSON scripts for the policy definitions for the previous step |
pingreadonlypolicy
|

|
Now you will create the Roles and attach the policies created earlier to the two roles pingreadonlyrole and pingreadwriterole.
|
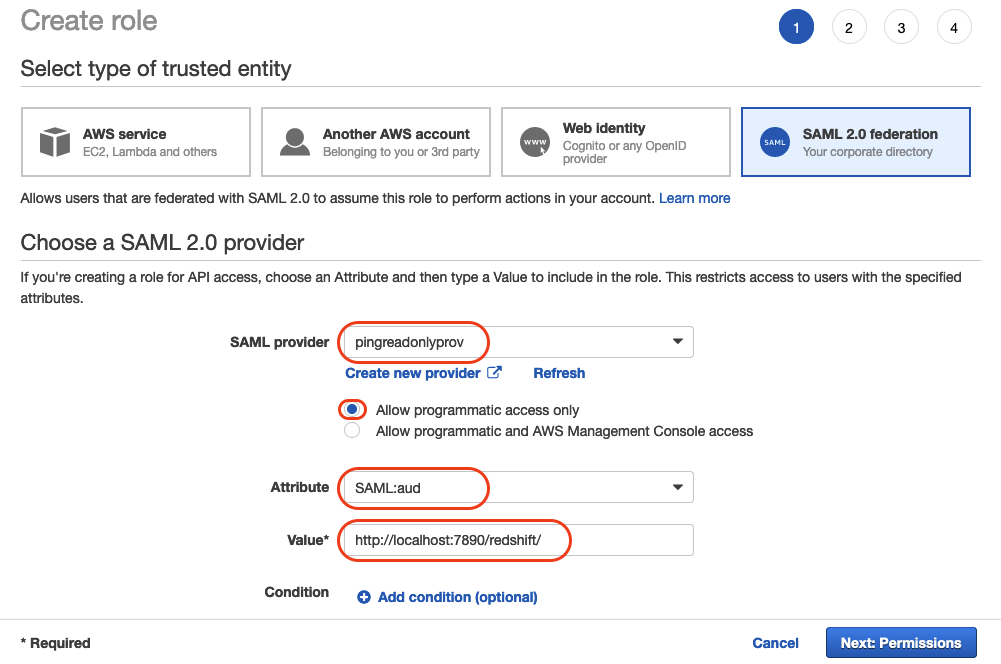
In the AWS Identity and Access Management (IAM) console, choose Roles and Create role and create a SAML 2.0 federation role by choosing the SAML provider pingreadonlyprov you just created in the previous step. Then select Allow programmatic access only. From Attributes dropdown select SAML:aud. As a value set the ACS URL which you configured in PingOne: http://localhost:7890/redshift/
|
|
Attach the readonlypolicy to the readonly role
|
Select the policy pingreadonlypolicy for the first role and pingreadwritepolicy for the second role.
|

|
Name the role pingreadonlyrole
|
Enter pingreadonlyrole for the Role Name:
|

|
The list of roles created are shown below. For testing purposes, you only need to create two of these roles, so we will create pingreadonlyrole and pingreadwriterole.
|
View the list of roles |

|
Amazon Redshift SQL Client Setup
| Say | Do | Show |
|---|---|---|
Now you will create the database groups in Amazon Redshift. These group names should match the group names used in Ping Identity setup. Then you will assign privileges to the groups to access the database objects including schemas and tables. User assignment to groups is done only once in Ping Identity; you do not assign users to groups in Amazon Redshift. To set up federated access, you take a two-step approach
For this walkthrough, you will create database objects, groups, and users and assign proper privileges to the groups on the database objects they are allowed to access. You should receive a successful connection message, as in the following screenshot. |
Choose New Connection. Construct a JDBC connection URL for the database standard user:
Choose |

|
Connect as awsuser (a superuser). From SQL Workbench/J, enter the following commands to set up the following environment:
|
|
Table finance.revenue created Execution time: 0.16s |
| Set up groups and privileges in Amazon Redshift |
First, log in to your Amazon Redshift cluster with an admin account using the admin database credentials. Use the scripts below to create groups that match the IdP group names, and grant the appropriate permissions to tables and schemas.
|
|
| You can then setup a new connection to your cluster using your PingIdentity IdP credentials with SQL Workbench/J. |
Create two new connection profiles with the settings as specified below, and choose Extended Properties to define the SSO parameters for loging_url and plugin_name.
Name the connection profiles as Redshift-ReadOnly and Redshift-ReadWrite
Username and Password are not required in JDBC setting. PingOne will prompt you for username and password in the web browser upon login. |

|
| Set the Extended Properties, for the connections: |
In the Extended Properties, enter the properties and values as shown below:
|

|
The login_url is the url from PingIdentity AmazonRedshift Applications setup earlier
|
Choose the SSO URL from the RedshiftReadOnly application for the readonly connection and the SSO URL from RedshiftReadWrite application for the readwrite connection
|

|
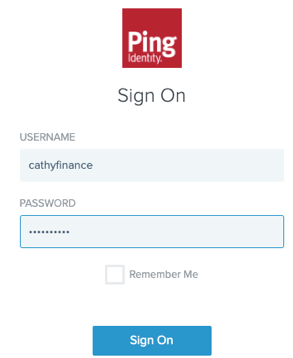
| Test SSO authentication and access privileges | When you login from SQL Client, you will be redirected to the browser for sign on. Here you enter the PingIdentity username and password to login. |
|
When you login using bob and execute a query, you are able to see records from finance.revenue table
|
Login as user bob with the IdP password. This user will have access to SELECT all tables in finance schema and not INSERT/UPDATE access. You can execute the below statements to test.
|

|
When you login using bob and execute a query, you are able to see records from finance.revenue table
|
Using the same login using bob when you execute an INSERT statement, he is not authorized to insert data.
|

|
Before you Leave
Be sure to close out your Ping trial so you don’t get charged.
If you are done using your cluster, please think about deleting the CFN stack or to avoid having to pay for unused resources do these tasks:
- pause your Redshift Cluster
- stop the Oracle database
- stop the DMS task